Centralized Label Management
View all shipping labels in one place. See labels from the last 90 days with their status, tracking numbers, and print history.
Shipping Labels shows all shipping labels generated for orders. View labels, print them individually or in batches, void labels, and track print status. This page displays labels produced in the last 90 days and helps manage the label printing process.

View all shipping labels in one place. See labels from the last 90 days with their status, tracking numbers, and print history.
Print multiple labels at once. Select multiple orders and print all their labels together for efficient warehouse operations.
See which labels have been printed and which are waiting. Filter by print status to focus on labels that need attention.
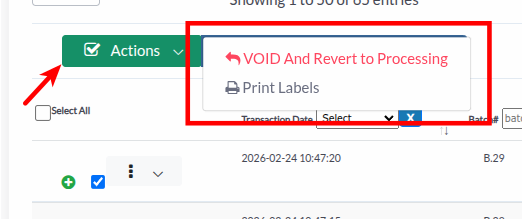
Void labels that were printed incorrectly or need to be cancelled. Revert orders back to Processing status when needed.
Navigate to Shipping Labels
Click Shipping Labels from the warehouse menu. The page loads with the title “Shipping Labels (Print Out)” and shows labels from the last 90 days. Click Back to return to Shipped Orders.
View Label Table
Browse labels showing Transaction Date, Batch#, Ship#, Company Name, Ship Method, Type, Tracking#, Label Name, Print Status, Updated at, and Label Server.
Filter Labels
Use the print status toggle buttons or advanced filters to find specific labels.
Print or Manage
Select labels and use the Actions menu to print labels or void them.
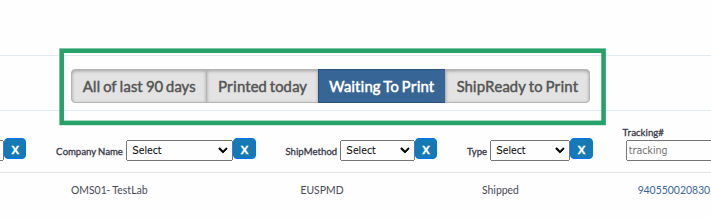
Use the toggle buttons at the top to filter labels by print status:
The shipping labels table displays:
Select multiple labels using checkboxes, then perform bulk operations:
Print Labels:
VOID And Revert to Processing:
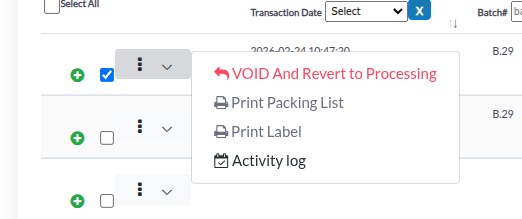
Click the actions menu (⋮) on any label row to access:
Print Label:
Print Packing List (for shipped labels):
Activity log:
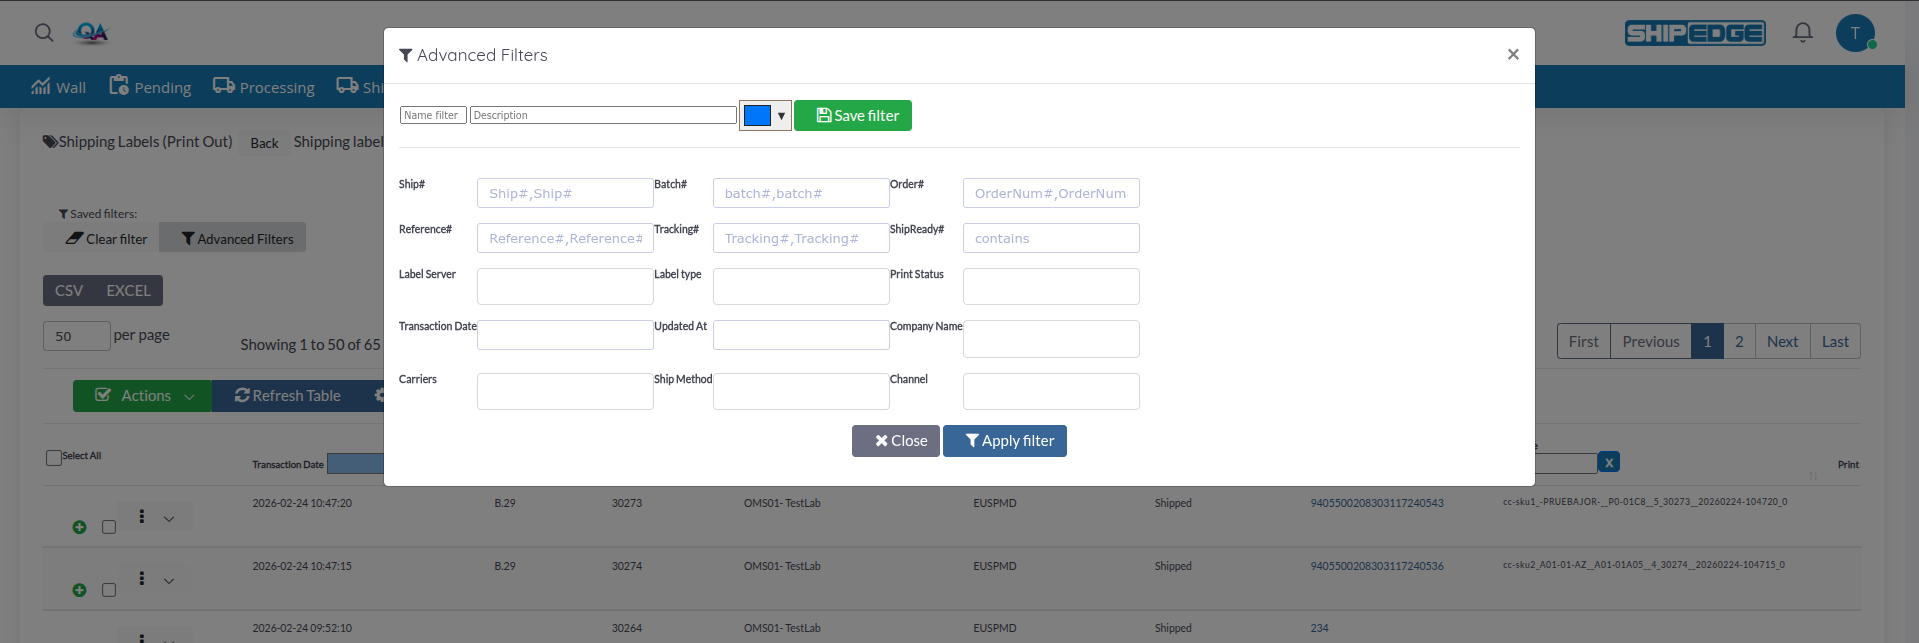
Click Advanced Filters button to open the advanced filter modal:
Order Information:
Label Details:
Dates:
Account and Shipping:
Saved Filters:
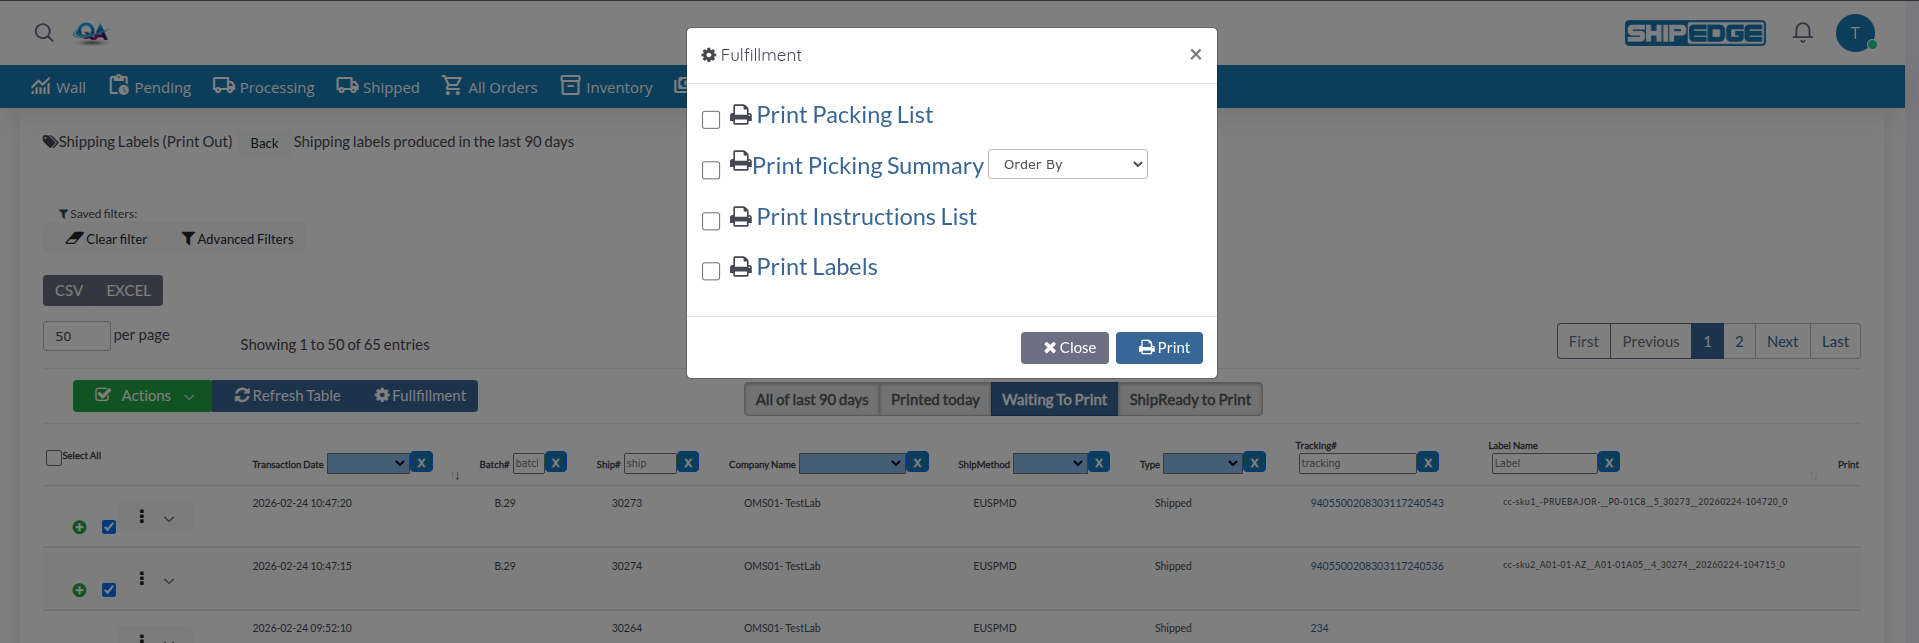
Click Fullfillment button to open the fulfillment options modal:
Available Options:
Select checkboxes for desired documents, then click Print to process all selected options.
Select Labels
Check boxes next to labels you want to print. Use “Select All” checkbox to select all visible labels.
Open Actions Menu
Click the Actions dropdown button (green button with checkmark icon).
Select Print Labels
Click Print Labels from the dropdown menu.
Review Labels
Labels open in a print preview modal. Review each label before printing.
Print Labels
Click Print And Ship button (for labels not yet printed) or Print button (for already printed labels) in the modal to print labels using your browser’s print function. Clicking “Print And Ship” marks the labels as printed automatically.
Print Attached Files (if available)
If international documents are attached, they appear in a separate card. Print them separately if needed.
Find Label
Browse the table or use filters to find the label you want to print.
Open Actions Menu
Click the actions menu (⋮) on the label row.
Select Print Label
Click Print Label from the menu.
Review and Print
Label opens in print preview modal. Click Print And Ship (if not yet printed) or Print (if already printed) button to print. The button text changes based on the label’s print status.
Select Labels
Check boxes next to labels you want to void.
Open Actions Menu
Click the Actions dropdown button.
Select VOID And Revert to Processing
Click VOID And Revert to Processing from the dropdown menu.
Confirm Void
Labels are voided and orders are reverted to Processing status. This action cannot be undone.
Open Advanced Filters
Click Advanced Filters button at the top of the page.
Set Filter Criteria
Enter values in filter fields:
Apply Filter
Click Apply filter button to apply filters and close the modal. Click Close to dismiss the modal without applying.
Clear Filters
Click Clear filter button to remove all filters and reset the table.

Set Filter Criteria
Configure advanced filters as desired.
Name Filter
Enter a name in the “Name filter” field in the advanced filter modal.
Add Description (optional)
Enter a description to help identify the filter.
Choose Color (optional)
Select a color using the color picker to visually identify the filter.
Save Filter
Click Save filter button to save the filter combination.
Load Saved Filter
Click on saved filter chips at the top of the page to apply saved filters.
Select Orders
Check boxes next to orders you want to process.
Open Fulfillment Modal
Click Fullfillment button.
Select Documents
Check boxes for documents you want to print:
Configure Options
For Picking Summary, select sort order from dropdown (Bin Ascending, Bin Descending, etc.).
Click Print button to process all selected documents.
Use filters to narrow down labels before printing. Filter by print status, date, or account to print only what you need.
Select multiple labels and print them together. This is faster than printing labels one at a time.
Regularly check print status to ensure all labels are printed. Filter by “Waiting To Print” to find labels that need attention.
Save frequently used filter combinations. This saves time when you need to view the same set of labels repeatedly.
Always review labels before voiding them. Voiding reverts orders to Processing status and may require regenerating labels.
Problem: Label table is empty or shows no labels.
Solutions:
Problem: Print Labels button doesn’t work or labels don’t appear.
Solutions:
Problem: Labels show error badge or error message.
Solutions:
Problem: Advanced filters don’t apply or show incorrect results.
Solutions:
Problem: VOID And Revert to Processing option doesn’t work.
Solutions:
Problem: Fullfillment button doesn’t open the modal.
Solutions:
Next Steps:
Related Features: