External shipping workspace
Jump from ShipEdge Processing to Xenvio’s Shipper View for the same shipment number when labels and rates are handled in Xenvio.
Xenvio Shipper View is a control on the WMS Processing shipping page. When your warehouse has the feature enabled and Xenvio is configured, the button opens Shipper View in a new browser window so you can work with the shipment in the Xenvio front end using the current Ship# and warehouse context.
The button label Xenvio Shipper View is fixed in the application code (it does not use the modern UI translation file). Use that exact name when you search for it on screen.
Start from Xenvio Home
Log in to the Xenvio web system.
Open your account menu
In the top-right, click your email address (next to the avatar and notifications) to open the account dropdown for settings and preferences.
Open Settings
Click the Settings icon in the header to open account configuration.
Go to Apps
In Settings, use the left sidebar and click Apps.
Start a new app
On the Apps list, click New app (top right, above the search and table).
Name the application
In the New App modal, type an Name for the application in the Name field.
Enter the webhook URL
In Url, enter the webhook URL that connects this app to ShipEdge such as https://your.shipedge.host/api/rest/webhooks/xenvio/shipments.
Select Warehouses
In Warehouses, check at least one warehouse that this application should use (pick the fulfillment location that matches how you will select Xenvio Warehouse Name in ShipEdge).
Create the app
Click Create App to save the new application.
Open Preferences
In the WMS menu, go to System Config → Preferences.
Open the Operations tab
Click the Operations tab. It loads Operations of Warehouse in an iframe.
Enter Xenvio connection fields
Set Xenvio URL (saved with https://), Xenvio Email, and Xenvio API Key as required for your environment.
Select Xenvio Warehouse Name (when Shipper View is enabled)
When the Shipper View module is active, the form shows Xenvio Warehouse Name. Choose a warehouse from the list and save.
Save Settings
Click Save Settings on the Operations page.
Go to Processing
Open Processing in the warehouse menu
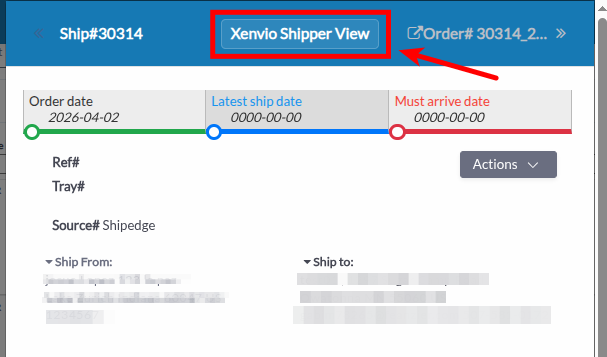
Open a shipment’s detail panel
Select a row and open the side detail view where the header shows Ship# and Order#. The Xenvio Shipper View button is in the center of that header.
Click Xenvio Shipper View
The application requests Xenvio settings and opens Shipper View in a new window.
Work in the new window
Shipper View opens in a new window. The URL uses your configured Xenvio host and query parameters.
Get Rates in Xenvio
You can generate rates and labels in Xenvio. Click the Get Rates button to get rates.
Get Labels in Xenvio
Click the Get Labels button to generate labels and then click in Preview Labels and Documents button to see the labels.
Print Labels
Click the Print Labels button to print the labels.
Jump from ShipEdge Processing to Xenvio’s Shipper View for the same shipment number when labels and rates are handled in Xenvio.
The link passes the Ship# shown in the open detail panel so the external view matches the order you are working on.
When Xenvio Warehouse Name is saved in Operations, the link includes warehouse_id and app_id from that selection.
Confirm Xenvio Warehouse Name is saved in Operations before you rely on Shipper View links in production.
The link always uses the Ship# currently shown in the detail header. Open the correct shipment before you click Xenvio Shipper View.
If Xenvio credentials change, update Xenvio Email, API Key, and URL in Operations and save again.
| Problem | What to check |
|---|---|
| Button never appears | Shipper View may be off for the warehouse; Xenvio Warehouse Name may be empty or invalid JSON; or Xenvio data failed to load—verify Operations and reload Processing. |
| Blank or failed window | Xenvio host, shipper-view route, or network access to Xenvio; confirm Xenvio URL in Operations. |
| Wrong shipment in Xenvio | You opened Shipper View with a different Ship# in the panel—close and select the correct row first. |
Next steps: Processing Orders · Preferences (WMS Configuration) · Shipping Labels