Complete Fulfillment Control
Manage the entire order fulfillment process from picking to shipping. Generate labels, print packing slips, and track order progress all in one place.
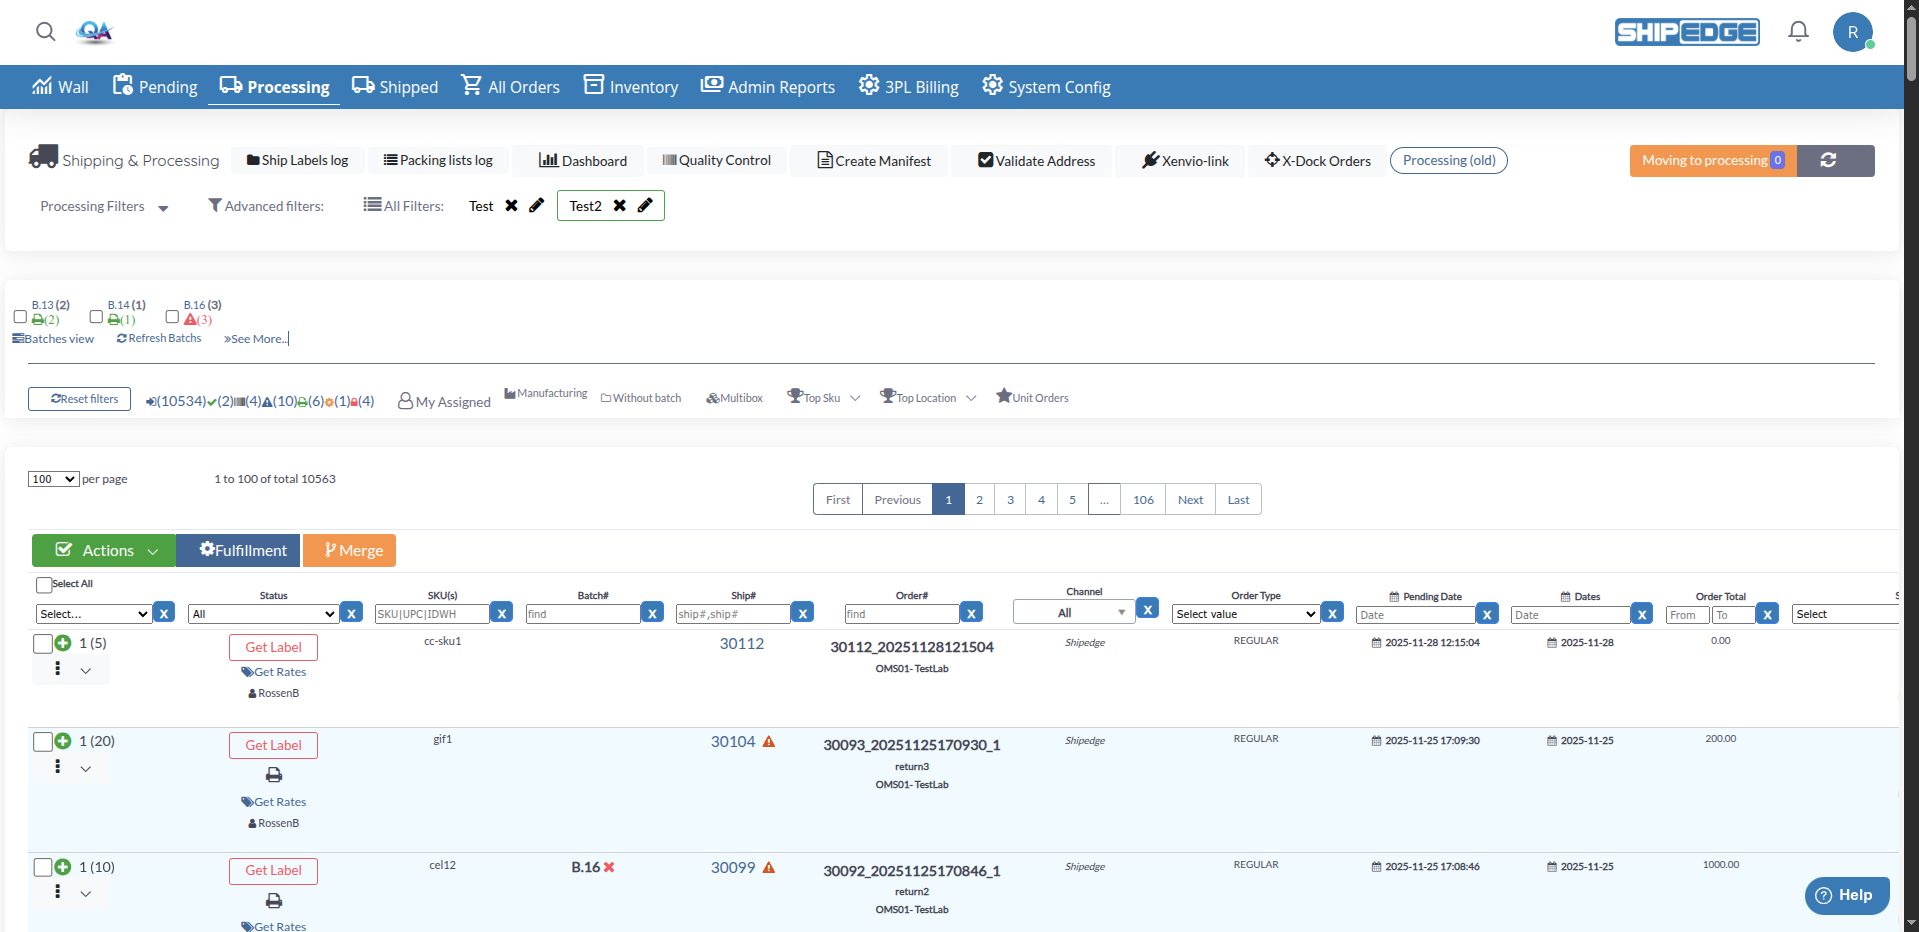
Processing Orders shows all orders that are being picked, packed, and prepared for shipment. This is where you complete the fulfillment workflow by generating shipping labels, printing packing slips, and managing order actions.
Manage the entire order fulfillment process from picking to shipping. Generate labels, print packing slips, and track order progress all in one place.
Process multiple orders together using batch operations. Generate shipping labels in batches, print multiple packing lists, and manage bulk actions.
Access Quality Control tools directly from processing orders. Verify package contents, check weights, and ensure orders meet shipping requirements.
Filter orders by account, shipping method, carrier, order type, label status, and many other criteria to focus on specific order groups.
Navigate to Processing
Click Processing in the warehouse navigation menu. The page loads showing all orders with status “Processing”.
View Order Table
Browse the table showing key information: Ship#, Account, Order#, Reference#, Order Type, Shipping Carrier, Shipping Method, Customer details, Package information, Label status, and more.
Filter Orders
Use the filter options at the top to narrow down orders by account, shipping method, carrier, order type, label status, or other criteria.
Process Orders
Select orders and use the Actions menu to generate labels, print packing lists, or perform other fulfillment tasks.

Located at the top of the page below the navigation bar, the header shows Shipping & Processing as the page title and provides quick access to key tools:
View the history of all generated shipping labels. Track label creation, download labels, and review label batch history.
View the history of all printed packing lists. Track packing slip generation and review packing documentation.
Open the processing dashboard to view statistics, order counts, and fulfillment metrics.
Open Quality Control interface to verify package contents, check weights, and validate shipping requirements.
Generate shipping manifests for carriers. Group multiple shipments together for carrier pickup or drop-off.
Verify shipping addresses meet carrier requirements. Check residential vs commercial addresses and validate address format.
Access Xenvio integration for shipping services. Available when Xenvio integration is enabled for your account.
View cross-docking orders that require special handling or routing through distribution points.

Below the filters, the page shows a Batches section displaying label batch numbers (B.89, B.92, B.112, etc.) with order counts and status indicators. Each batch shows:
Batch Controls:

Processing Filters (main filter bar):
Advanced Filters: Click Advanced filters button to access additional filtering options.
All Filters:
Click All Filters button to see and manage all active filters at once. Shows a summary line like #1187#3(+4)(2)#bc26Δ78hc(16)le(19)zt0Δ(15) indicating filter counts.
Quick filter buttons for common order categories:
The filter bar shows saved filter presets as colored buttons. Each saved filter shows:
Click a saved filter to apply its criteria instantly.
The processing orders table displays the following information:
Above the order table, three main action buttons are available:
Dropdown menu with bulk actions for selected orders (Batch Labels, Print Labels, Pause Ship, etc.). See Bulk Actions section below.
Access fulfillment-specific options for selected orders. Manage picking, packing, and shipping workflow steps.
Combine multiple orders from the same customer into a single shipment. Select orders and click Merge to consolidate.
A dropdown filter allows quick selection by order complexity:
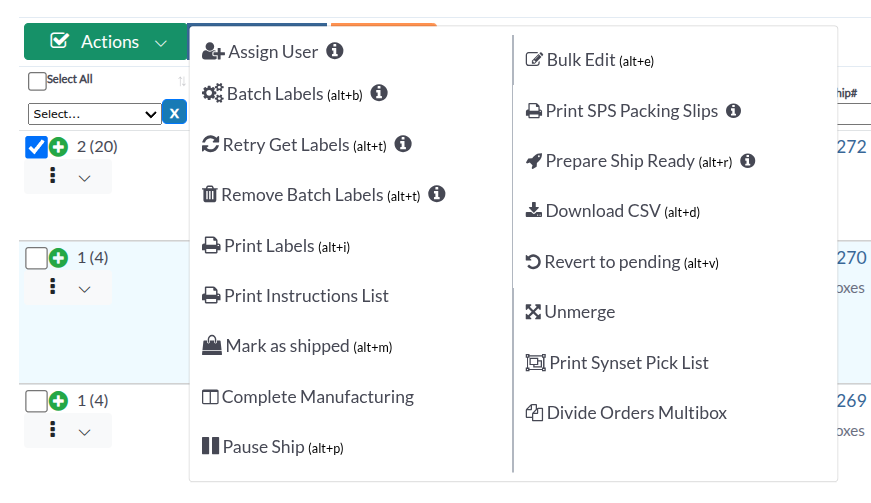
Select multiple orders using checkboxes, then click the Actions dropdown button to perform bulk operations:
Generate shipping labels for all selected orders in a single batch. Keyboard shortcut: (alt+b)
Retry generating labels for orders that failed label generation. Keyboard shortcut: (alt+t)
Remove selected orders from their current label batch. Orders can then be added to a different batch.
Print shipping labels for selected orders. Keyboard shortcut: (alt+i)
Temporarily pause order processing for selected orders. Not available for MANUFACTURE orders. Keyboard shortcut: (alt+p)
Assign selected orders to specific warehouse users. Only visible to managers.
Edit multiple orders at once. Keyboard shortcut: (alt+e)
Print special packing slips for SPS orders in bulk.
Divide Ship Ready orders into boxes. Keyboard shortcut: (alt+r)
Export selected orders data to CSV file. Keyboard shortcut: (alt+d)
Click the actions menu (⋮) on any order row to access individual order actions:
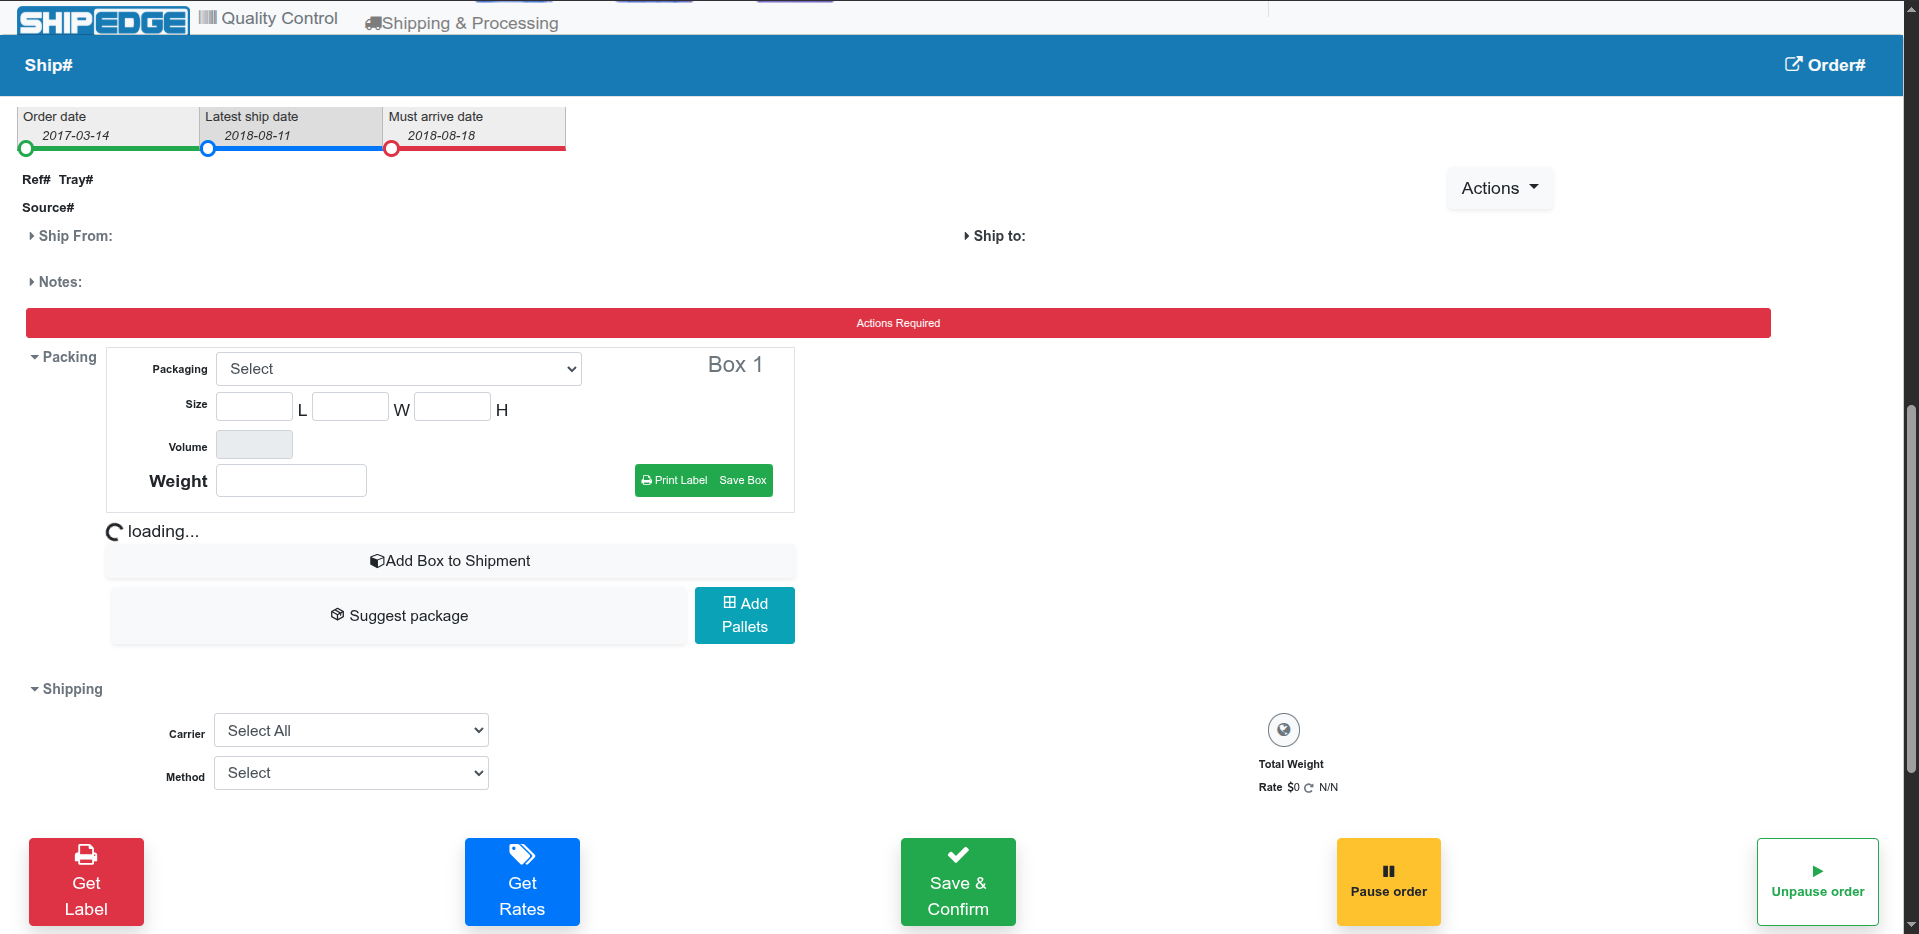
Some orders may show special actions that need to be completed before shipping. Click the Actions Required button to open a modal with these actions:
Print special packing slip format required for SPS orders.
Generate GS1-128 barcode labels for SPS orders.
Prepare Ship Ready orders for shipping. Divides order into boxes based on configuration.
Print FBA (Fulfillment by Amazon) SKU labels for Amazon FBA orders.
Select or edit shipping service for FBA orders. Choose the appropriate Amazon shipping method.
Select Multiple Orders
Check boxes next to all orders you want to include in the batch.
Open Actions Menu
Click the Actions dropdown button.
Select Batch Labels
Click Batch Labels from the dropdown menu (or press alt+b).
Assign to User (optional)
A dialog appears asking to assign the batch to a user. Select a user or proceed without assignment.
Wait for Processing
The system generates labels for all selected orders. A progress indicator shows processing status.
Review Results
Check which orders successfully generated labels and which may need attention.
If label generation fails for some orders:
Identify Failed Orders
Look for orders with label status indicating failure or error.
Select Failed Orders
Check boxes next to orders that need retry.
Retry Get Labels
Click Actions → Retry Get Labels (or press alt+t).
Wait for Processing
The system attempts to generate labels again for selected orders.
Find Order
Locate the order in the processing table.
Open Actions Menu
Click the actions menu (⋮) on the order row.
Select Print Packing List
Click Print Packing List from the menu.
The packing slip opens in a modal. Click Print PDF to print using your browser’s print function.
Select Order
Find the order you need instructions for.
Open Actions Menu
Click the actions menu (⋮).
Select Print Instruction List
Click Print Instruction List from the menu.
Review and Print
Instructions open showing picking locations, items, and packing requirements.
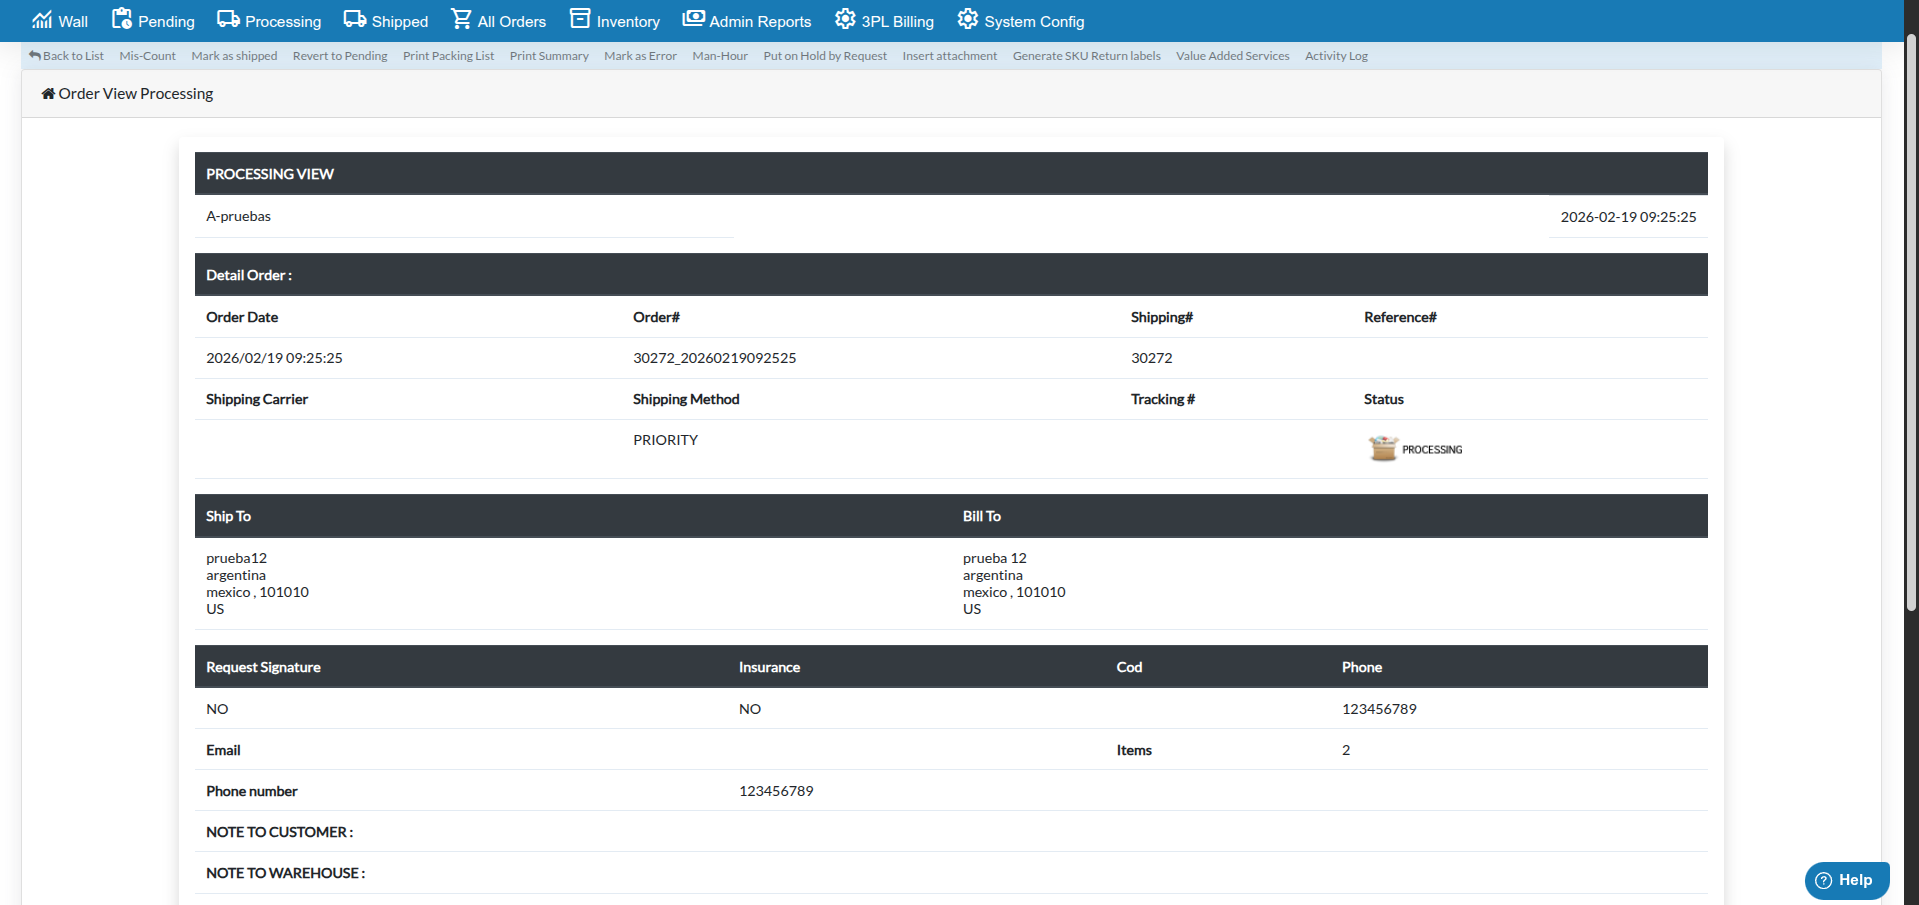
Click on an order or select View to open the detailed order view. This view shows complete order information and provides additional actions:
The navigation bar in order view provides these actions:
The order view displays:
Access Quality Control directly from processing orders:
Select Order
Find the order you want to verify.
Open QC
Click Actions → Web QC or click the Quality Control button in the page header.
Verify Package
In Quality Control, verify:
Complete QC
Mark QC as complete when verification passes.
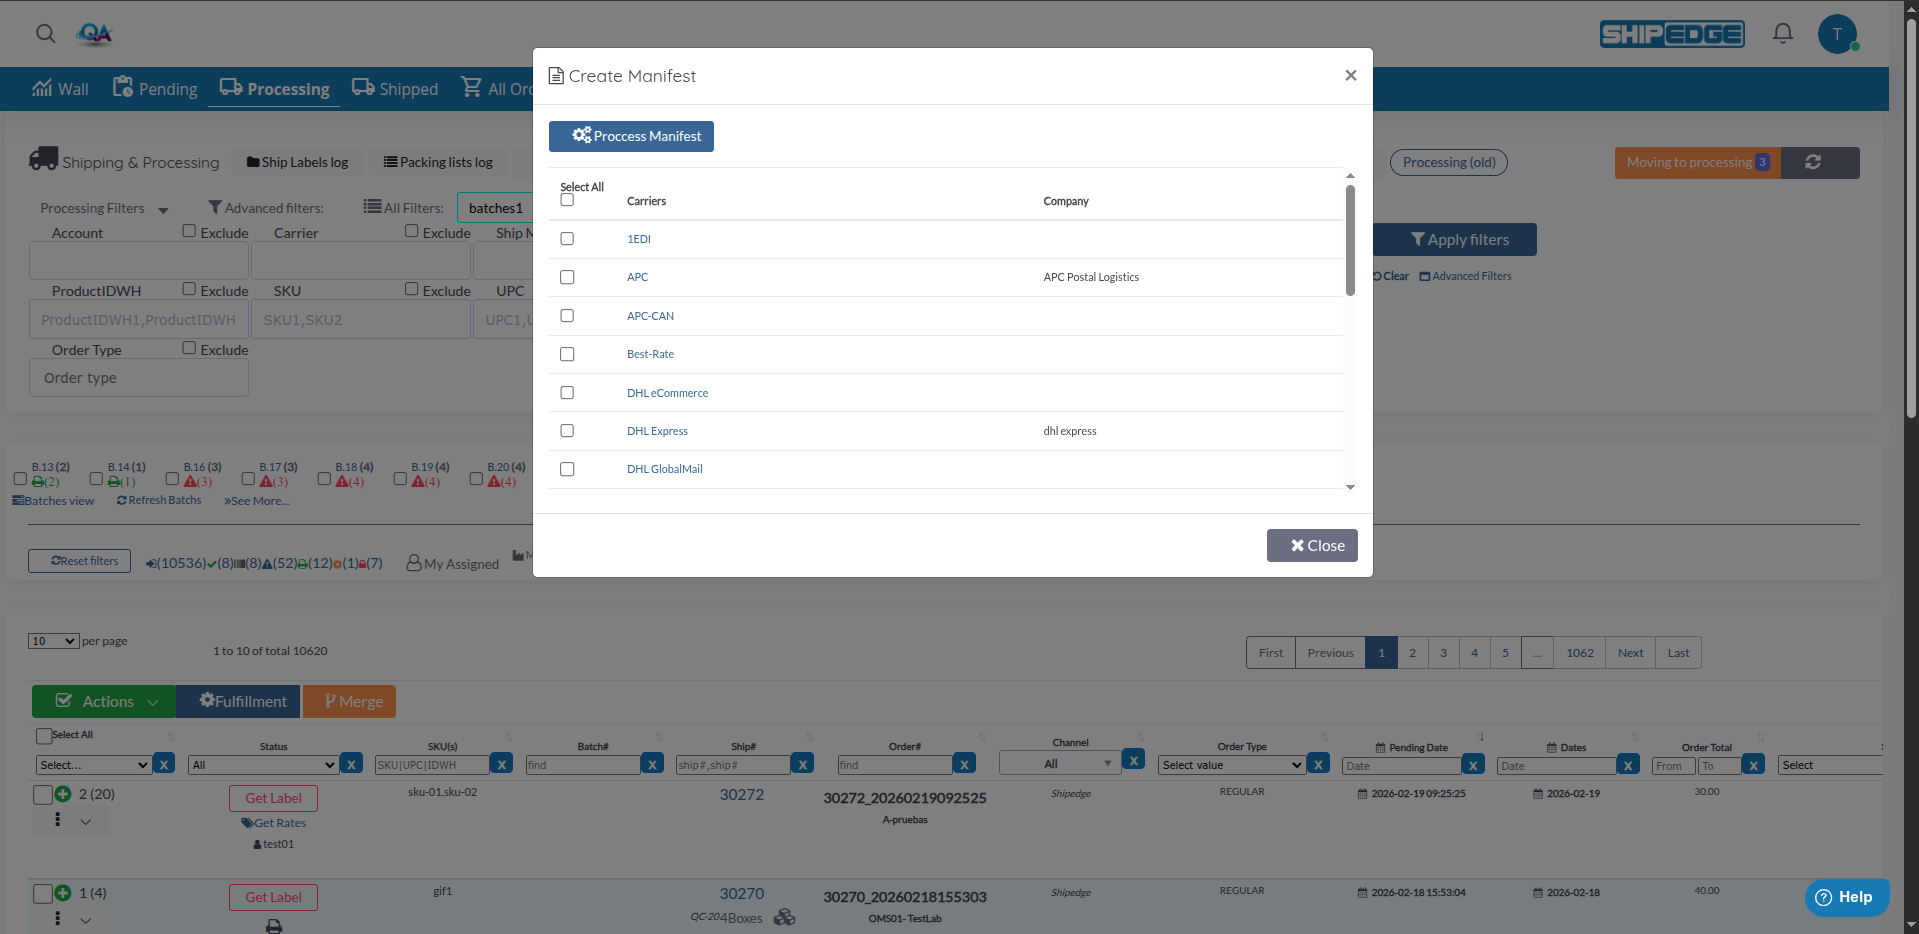
Generate shipping manifests for carrier pickup or drop-off:
Click Create Manifest
Click the Create Manifest button in the page header.
Select Options
Choose carrier and date range for the manifest.
Generate Manifest
Click to generate the manifest document.
Print or Export
Print the manifest or export for carrier submission.
Filter orders by carrier and process them together. This makes manifest creation easier and reduces carrier-specific errors.
Always use batch label generation for multiple orders. It’s faster and more reliable than individual label generation.
Complete all “Actions Required” items before generating labels. This prevents delays and errors during shipping.
Use Quality Control to verify package contents and weights before generating labels. Catch errors early to avoid shipping mistakes.
Use the Assign User feature to distribute orders evenly among warehouse staff. This improves efficiency and accountability.
Learn the keyboard shortcuts (alt+b, alt+t, alt+p, etc.) to speed up your workflow.
Problem: Shipping labels fail to generate for some orders.
Solutions:
Problem: Packing list won’t print or shows errors.
Solutions:
Problem: Some orders in a batch didn’t generate labels.
Solutions:
Problem: Action buttons are disabled or don’t work.
Solutions:
Problem: Assign User option doesn’t appear or doesn’t work.
Solutions:
Problem: QC button doesn’t open Quality Control interface.
Solutions:
Next Steps:
Related Features: