Skip to content

Batch Processing

Batch Processing Overview

Batch Processing lets you group multiple orders together into batches for efficient processing. Create batches, manage orders within batches, print labels and packing lists for entire batches, and track batch progress. This helps streamline warehouse operations by processing multiple orders together.

Process Orders Together

Group multiple orders into batches to process them together. Print labels and packing lists for entire batches at once instead of one at a time.

Track Batch Progress

Monitor batch completion with progress bars showing how many orders are ready. See label status and print status for each batch.

Efficient Printing

Print labels, packing lists, and picking summaries for entire batches with one click. Save time by printing multiple orders together.

Manage Batch Contents

Add or remove orders from batches as needed. View all orders in a batch and manage them individually or as a group.

  1. Navigate to Batches

    Click Batches in the warehouse navigation menu. The page loads showing all batches in a table on the left.

  2. View Batch Table

    Browse batches showing Batch#, Type, Status, Quantity of Shippings, Progress, Labels Status, Print Status, Description, User, and Created At.

  3. Select a Batch

    Click on any batch row to view its orders in the right panel.

  4. Manage Batches

    Select batches and use the Actions menu to print labels, packing lists, or perform other batch operations.

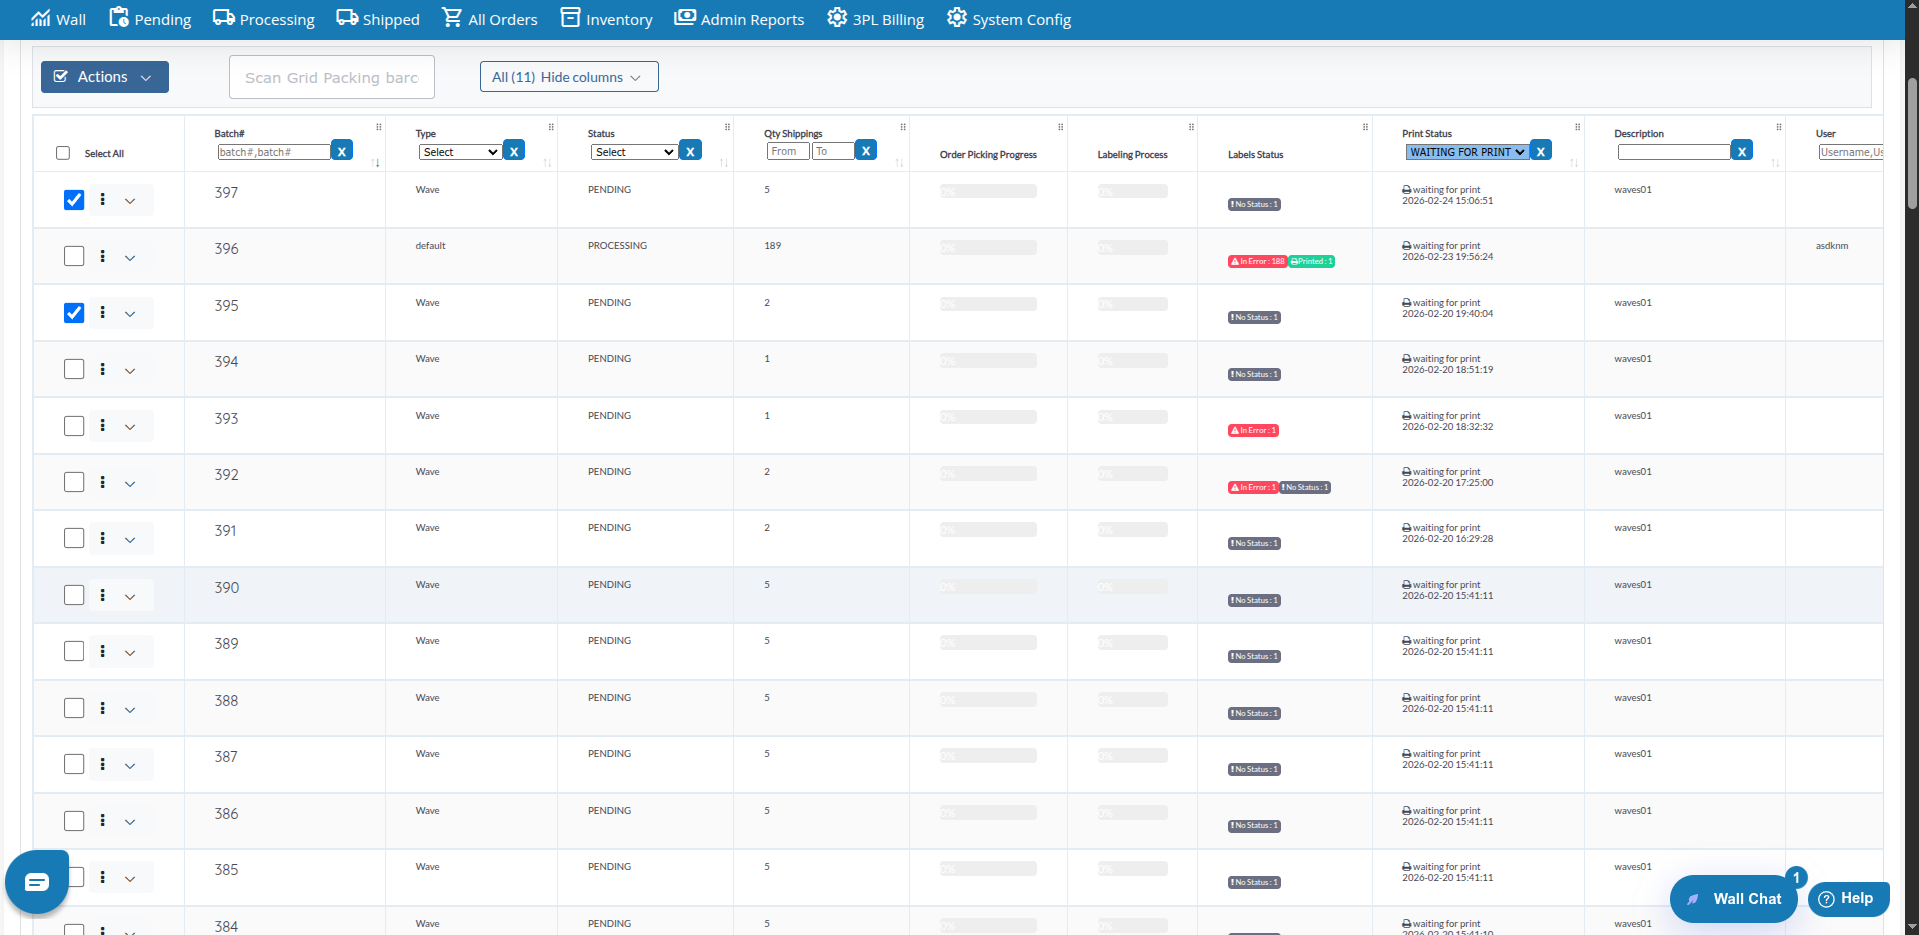
The batches table displays the following information:

  • Checkbox - Select batches for bulk actions
  • Actions Menu (⋮) - Access individual batch actions
  • Batch# - Batch number identifier
  • Type - Batch type:
    • default - Standard batch
    • Grid Packing - Batch for grid packing operations
  • Status - Current batch status:
    • PROCESSING - Batch is currently being processed
    • COMPLETED - Batch processing is complete
  • Qty Shippings - Number of orders (shippings) in the batch
  • Progress - Progress bar showing completion percentage:
    • Red (< 10%) - Just started
    • Yellow (50-80%) - In progress
    • Green (> 80%) - Nearly complete
  • Labels Status - Status of shipping labels:
    • Getting Label - Labels are being generated
    • Print Label - Labels ready to print
    • In Error - Label generation failed
    • No Status - No label status yet
    • Printed - Labels have been printed
  • Print Status - Packing list print status:
    • waiting for print - Not yet printed
    • Printed - Packing lists have been printed (with timestamp)
  • Description - Batch description or name
  • User - User who created the batch
  • Created At - Date and time when batch was created

Click the actions menu (⋮) on any batch row to access:

Available for All Batches:

  • Activity log - View complete activity history for the batch
  • Set BOE (outbound) - Set outbound batch number
  • International docs - Generate international shipping documents (if enabled)
  • Create S.I. File - Create Shipping Instruction file (if robot communication enabled)
  • Send file S.I. - Send Shipping Instruction file via FTP (if robot communication enabled)
  • Grid Packing - Open Grid Packing interface (for Grid Packing batches)

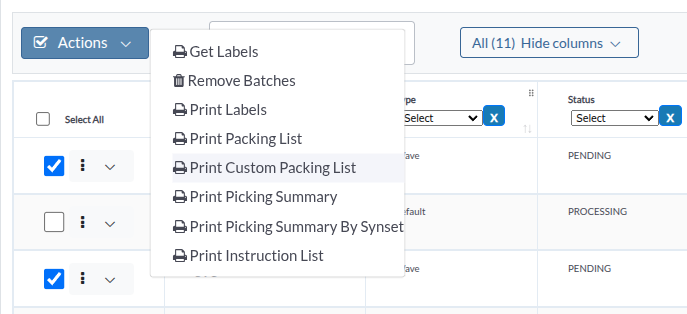
Select multiple batches using checkboxes, then perform bulk operations:

Remove Batches:

  • Delete selected batches from the system
  • Removes batches and their associations

Print Labels:

  • Generate and print shipping labels for all orders in selected batches
  • Processes labels for entire batches at once

Print Packing List:

  • Print packing lists for all orders in selected batches
  • Standard packing list format

Print Custom Packing List (if custom templates enabled):

  • Print packing lists using custom templates
  • Useful for branded or customized packing slips

Print Picking Summary:

  • Generate picking summaries for selected batches
  • Shows what to pick for all orders in batches

Print Picking Summary By Synset:

  • Generate picking summaries grouped by product synsets
  • Groups related products together for efficient picking

Print Instruction List:

  • Print picking and packing instructions for selected batches
  • Includes detailed instructions for warehouse staff

Use the filter form at the top to narrow down batches:

Basic Filters:

  • Account - Filter by account/company name
  • User - Filter by user who created the batch
    • Managers see all users
    • Regular users see only “Me”
  • Batch# - Filter by batch numbers (comma-separated: Batch#,Batch#)
  • Ship# - Filter by shipping numbers (order IDs) within batches

Column Filters: Use filters below column headers:

  • Batch# - Text filter (comma-separated)
  • Type - Select filter (default, Grid Packing)
  • Status - Select filter (PROCESSING, COMPLETED)
  • Qty Shippings - Range filter (min-max)
  • Print Status - Select filter (WAITING FOR PRINT, PRINTED)
  • Description - Text filter
  • User - Text filter (comma-separated usernames)
  • Created At - Date range filter

Grid Packing Button:

  • Click Grid Packing button to open Grid Packing interface
  • Used for organizing orders in grid layout for packing

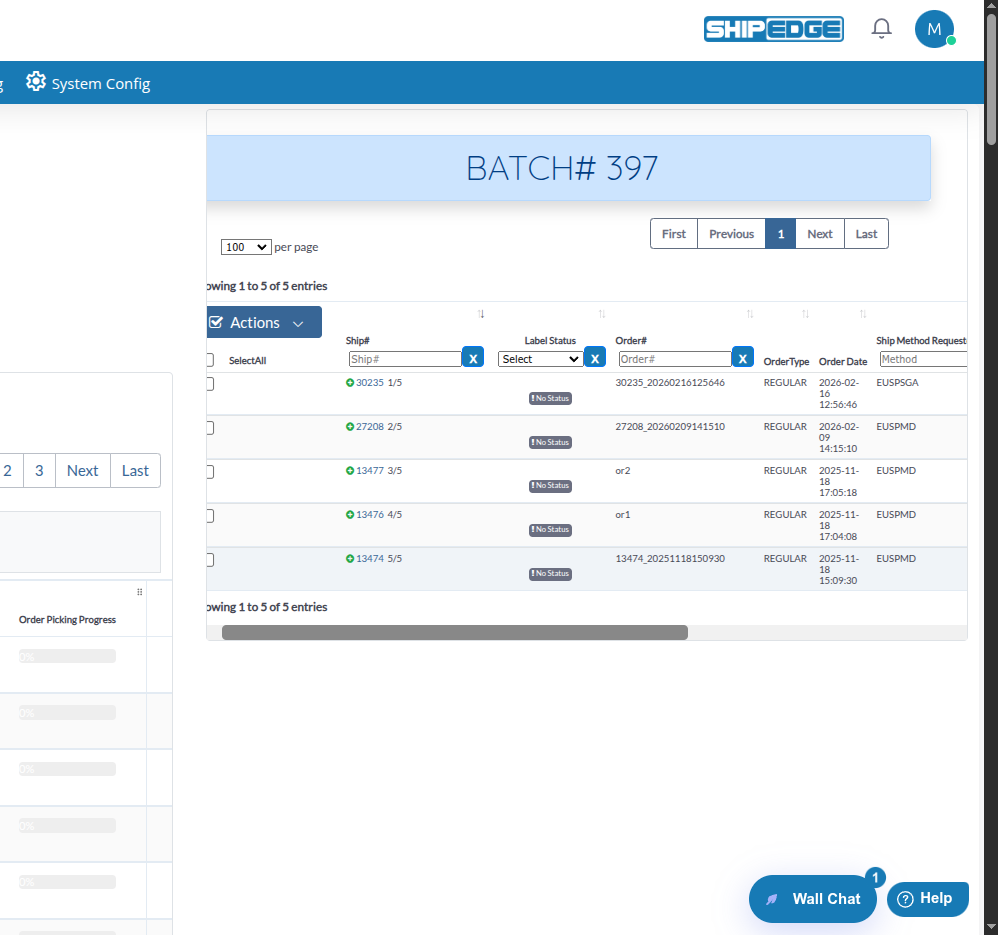
When you click on a batch row, the right panel shows all orders in that batch:

Orders Table Columns:

  • Checkbox - Select orders for bulk actions
  • Actions Menu (⋮) - Access individual order actions
  • Ship# - Internal system order ID
  • LabelStatus - Current label status for the order
  • Order# - Customer-facing order number
  • OrderType - Type of order
  • Order Date - When the order was created
  • Ship Method Requested - Shipping method requested by customer
  • Ship Method Used - Actual shipping method assigned

Order Actions Menu:

  • Remove from Batch - Remove order from the batch
  • Print Labels - Print shipping labels for selected orders
  • Print Packing List - Print packing slips for selected orders
  • Print Instruction List - Print picking/packing instructions
  • Print Picking Summary - Generate picking summary
  • Void Labels - Void/cancel shipping labels
  • Print Custom Invoice Print - Print custom invoice (if custom templates enabled)

Monitor batch completion:

Progress Bar:

  • Shows percentage of orders ready for shipping
  • Color-coded:
    • Red: Less than 10% complete
    • Yellow: 50-80% complete
    • Green: More than 80% complete

Labels Status:

  • See how many orders have labels ready
  • Track label generation progress
  • Identify orders with label errors

Print Status:

  • Track which batches have had packing lists printed
  • See timestamp of last print
  1. Find Batch

    Use filters or browse the batch table to find the batch you want to view.

  2. Click Batch Row

    Click anywhere on the batch row in the table.

  3. View Orders

    The right panel opens showing all orders in that batch with batch number displayed at the top.

  4. Review Order Details

    Browse orders to see their status, label status, and other details.

  1. Select Batch

    Check the box next to the batch (or batches) you want to print labels for.

  2. Open Actions Menu

    Click the Actions dropdown button (blue button with checkmark icon).
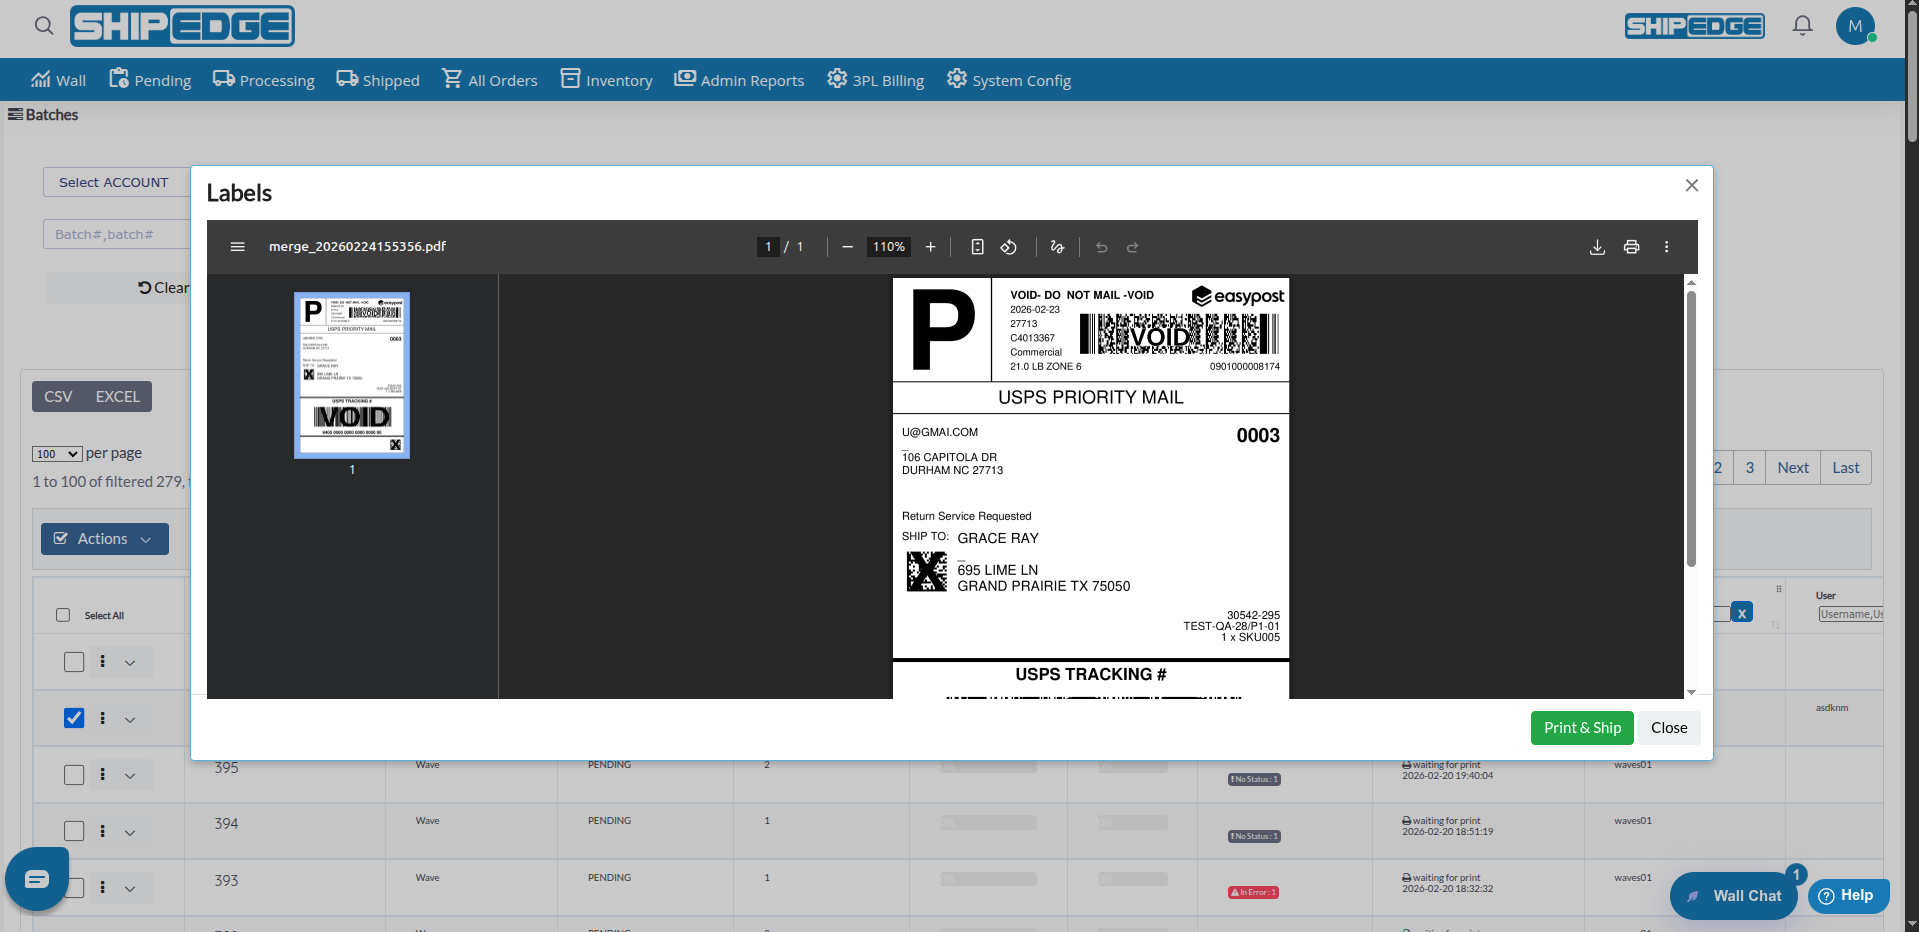
  3. Select Print Labels

    Click Print Labels from the dropdown menu.

  4. Wait for Processing

    The system generates labels for all orders in the selected batches. A progress indicator shows processing status.

  5. Print Labels

    Once generated, labels open in a print window. Print using your browser’s print function.

  1. Select Batch

    Check the box next to the batch (or batches) you want to print packing lists for.

  2. Open Actions Menu

    Click the Actions dropdown button.

  3. Select Print Packing List

    Click Print Packing List (or Print Custom Packing List if using custom templates).

  4. Review Packing Lists

    Packing lists open in a print window showing all orders in the batch.

  5. Print

    Print using your browser’s print function.

  1. Select Batch

    Click on the batch row to view its orders.

  2. Select Orders

    Check boxes next to orders you want to remove from the batch.

  3. Open Actions Menu

    Click the Actions dropdown in the orders table (right panel).

  4. Select Remove from Batch

    Click Remove from Batch from the dropdown menu.

  5. Confirm Removal

    Orders are removed from the batch. The batch progress updates automatically.

  1. Select Batches

    Check boxes next to batches you want to remove.

  2. Open Actions Menu

    Click the Actions dropdown button in the batch table.

  3. Select Remove Batches

    Click Remove Batches from the dropdown menu.

  4. Confirm Removal

    Batches are deleted from the system. This action cannot be undone.

For batches with type “Grid Packing”:

  1. Find Grid Packing Batch

    Look for batches with Type = “Grid Packing” or click the Grid Packing button in filters.

  2. Open Grid Packing

    Click the Grid Packing button next to the batch, or click the Grid Packing link in the batch actions menu.

  3. Organize Orders

    Use the Grid Packing interface to organize orders in a grid layout for efficient packing.

Generate international shipping documents for batches:

  1. Select Batch

    Find a batch that needs international documents.

  2. Open Actions Menu

    Click the actions menu (⋮) on the batch row.

  3. Select International docs

    Click International docs from the menu.

  4. Choose Document Type

    Select from available international documents:

    • Custom Invoice (Excel)
    • HS Code Summary (Excel)
    • Delivery Advise (PDF)
    • Commercial Invoice (PDF)
    • Transfer of Ownership (PDF)
  5. Generate Document

    The document is generated and downloaded.

Set outbound batch number for batches:

  1. Select Batch

    Find the batch you want to set BOE for.

  2. Open Actions Menu

    Click the actions menu (⋮) on the batch row.

  3. Select Set BOE

    Click Set BOE (outbound) from the menu.

  4. Enter BOE Number

    Enter the outbound batch number in the dialog.

  5. Save

    BOE number is saved to the batch.

Group by Account

Create batches grouped by account when possible. This makes it easier to track which customer’s orders are being processed together.

Monitor Progress

Regularly check batch progress bars to identify batches that need attention. Focus on batches with low completion percentages.

Print in Batches

Always use batch printing for multiple orders. It’s faster and more efficient than printing orders one at a time.

Check Label Status

Review Labels Status before printing. Ensure all labels are ready (green badge) before printing packing lists.

Use Filters

Use filters to find specific batches quickly. Filter by account, user, or date range to focus on relevant batches.

Review Before Removing

Always review batch contents before removing batches. Ensure all necessary documents have been printed.

Problem: Batch table is empty or shows no batches.

Solutions:

  1. Check if batches have been created - batches are created automatically or via rules
  2. Clear all filters - you may have filters excluding all batches
  3. Check date range filter - expand to include older batches
  4. Verify you have permissions to view batches
  5. Refresh the page and try again

Problem: Batch progress bar doesn’t update or shows incorrect percentage.

Solutions:

  1. Refresh the page to reload batch data
  2. Check individual order statuses in the batch
  3. Verify orders have labels generated
  4. Check if orders are in correct status (Processing)
  5. Review Labels Status column for errors

Problem: Print Labels button doesn’t work or labels don’t generate.

Solutions:

  1. Verify batch has orders - empty batches can’t generate labels
  2. Check if orders have valid shipping addresses
  3. Ensure carrier and shipping method are selected for orders
  4. Check Labels Status - orders with errors may not generate labels
  5. Try printing labels for individual orders instead of batch
  6. Review error messages in Labels Status column
  7. Check Xenvio-link settings if using Xenvio integration

Problem: Clicking on batch doesn’t show orders in right panel.

Solutions:

  1. Wait a moment - orders load via AJAX and may take a few seconds
  2. Check browser console for JavaScript errors
  3. Refresh the page and try clicking batch again
  4. Verify batch actually has orders (check Qty Shippings column)
  5. Try a different browser
  6. Check internet connection

Problem: Remove from Batch option doesn’t work.

Solutions:

  1. Verify orders are selected (checkboxes must be checked)
  2. Ensure you’re in the orders table (right panel), not batch table
  3. Check if you have permissions to modify batches
  4. Refresh the page and try again
  5. Try removing orders one at a time

Problem: Grid Packing button doesn’t appear for Grid Packing batches.

Solutions:

  1. Verify batch type is “Grid Packing” (check Type column)
  2. Ensure robot communication feature is enabled
  3. Check if Grid Packing module is enabled in system settings
  4. Try accessing Grid Packing from batch actions menu instead
  5. Contact administrator if feature is not enabled

Problem: International docs option doesn’t appear in batch actions menu.

Solutions:

  1. Verify international documents feature is enabled in system settings
  2. Check if batch contains international orders
  3. Ensure you have permissions to generate international documents
  4. Contact administrator if feature is not enabled

Problem: Create S.I. File and Send file S.I. options don’t appear.

Solutions:

  1. Verify robot communication feature is enabled in system settings
  2. Check if your user role has access to S.I. file features
  3. Contact administrator if robot communication is not enabled
  4. These features are only available when robot communication is active

Next Steps:

Related Features: