Complete Inventory View
See all bins in your warehouse with complete details including SKU, quantity, location, bin category, and product information.
Warehouse Overview provides a complete view of all inventory in your warehouse. See every bin with detailed information including SKU, quantity, location, bin category, and more. Filter by account or location, customize visible columns, and perform bulk actions on multiple bins at once.

See all bins in your warehouse with complete details including SKU, quantity, location, bin category, and product information.
Filter inventory by account, location, or use advanced column filters to find specific bins quickly.
Show or hide columns based on your needs. Customize the view to focus on the information that matters most.
Select multiple bins and perform actions like blocking, relocating, editing volume, or printing labels all at once.
Access related features like Procedures, MinMax bins, Bin Management, Locations, Serials, Old Inventory Version, and Metadata directly from the page header.
Navigate to Warehouse
Click Inventory from the warehouse menu, then select Warehouse. The page loads showing all warehouse inventory.
View Inventory Table
Browse the table showing detailed bin information: Location, Lpn, Bin, Bin Category, Account, SKU, UPC, Description, Quantities, UOM, and more.
Apply Filters
Use the filter dropdowns to filter by Account or Location, then click Apply filter.
Customize View
Use the column selector to show or hide columns based on your needs.
Filter warehouse inventory using basic filters or advanced column filters:
Basic Filters:
Select Account
Choose an account from the Account dropdown to filter by specific company.
Select Location
Choose a location from the Location dropdown to filter by warehouse location.
Apply Filters
Click Apply filter button to apply your selections.
Reset Filters
Click Reset filter button to clear all filters and show all inventory.
Advanced Column Filters:
Each column has its own filter box below the column header. Use these filters to:
Filters work together - multiple filters narrow down results further.
Android Request:
Click Android Request button to generate a request for Android mobile app users. This creates a filtered view that can be accessed from mobile devices.
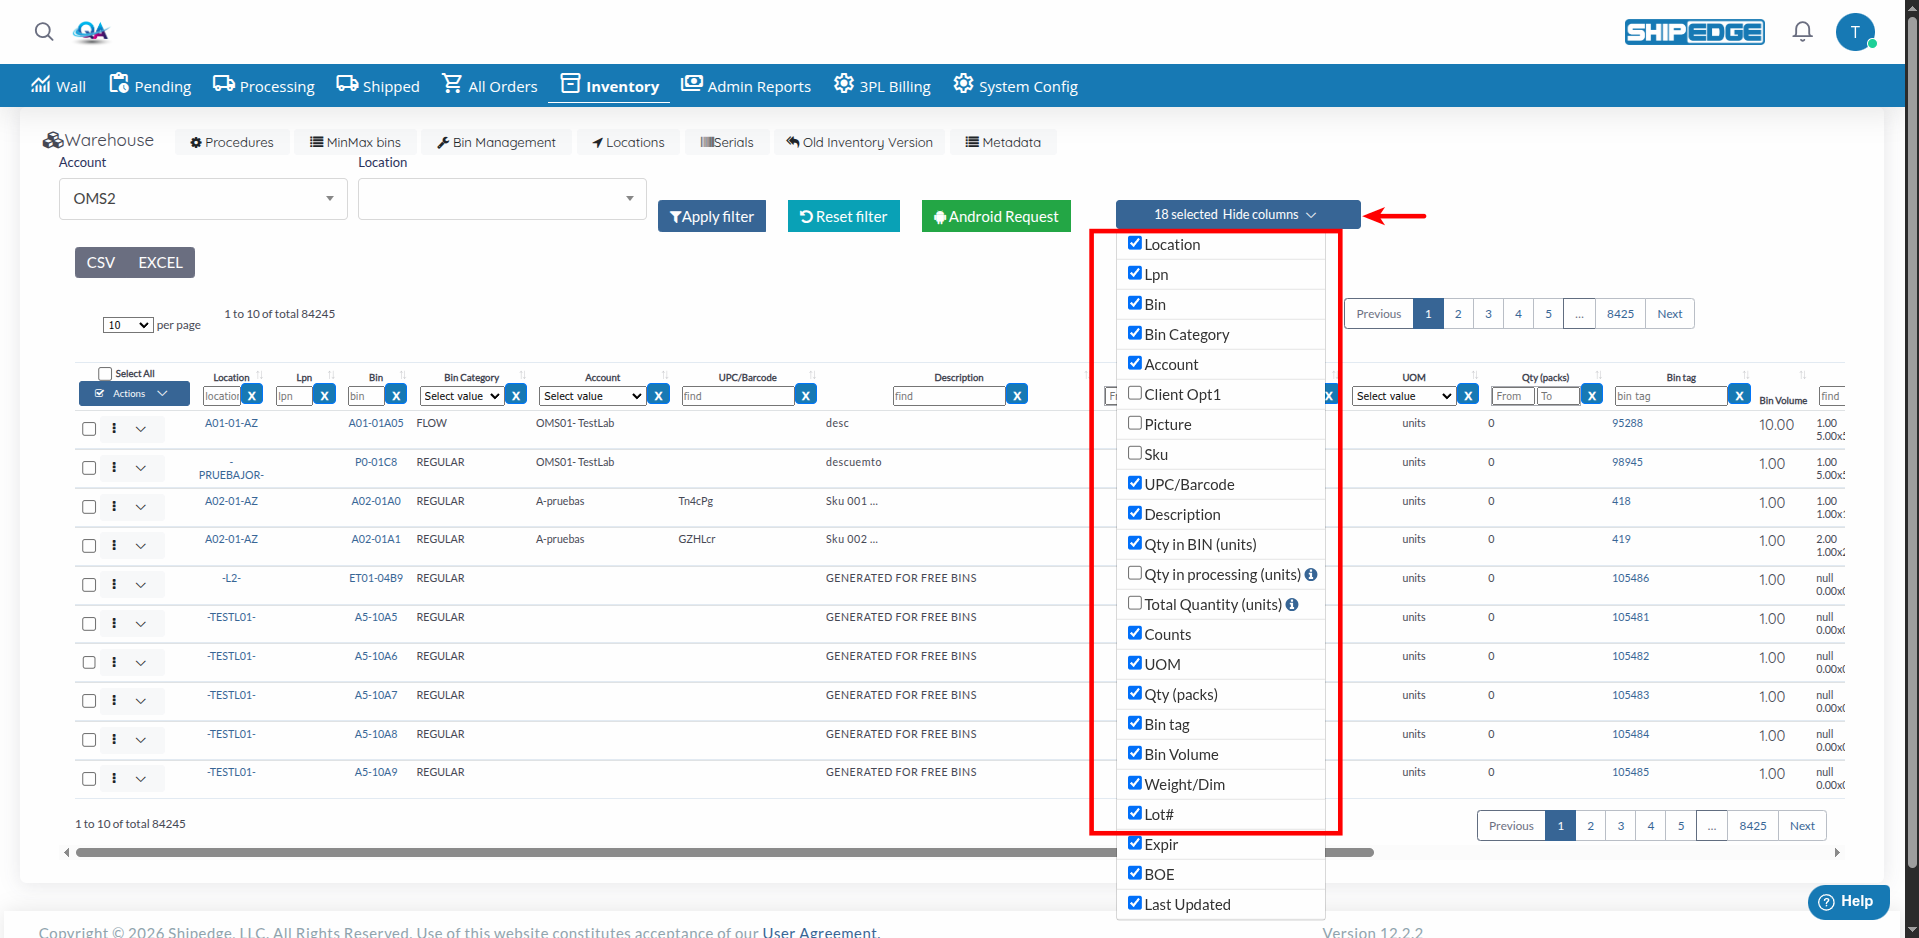
Show or hide columns to customize your view:
Open Column Selector
Click the Hide columns dropdown button (shows selected column count).
Toggle Columns
Check or uncheck columns to show or hide them:
Save Preferences
Column visibility preferences are saved automatically for your user account.
Select multiple bins and perform actions on them:
Selecting Bins:
Select Individual Bins
Check the checkbox next to each bin row to select it.
Select All Bins
Check the Select All checkbox in the table header to select all visible bins.
View Selection
Selected bins are highlighted. The selection persists as you navigate pages.
Row-Level Actions:
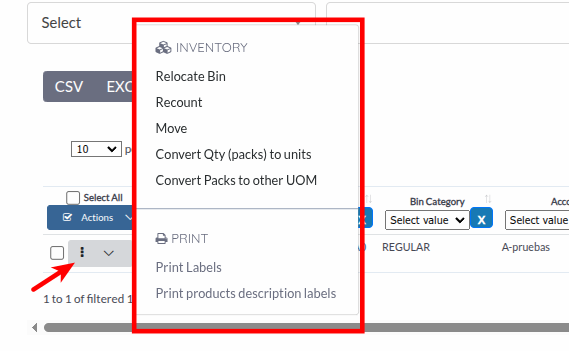
Each bin row has a dropdown menu (three dots icon) with actions for that bin:
Available Bulk Actions:
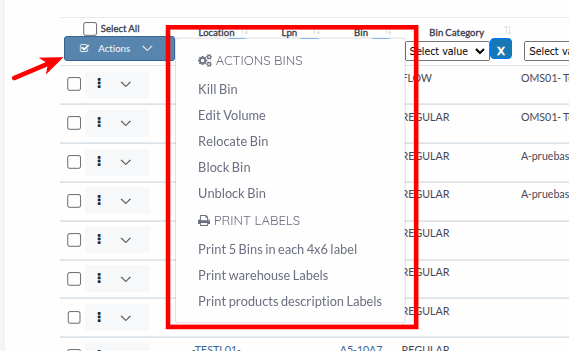
Click the Actions dropdown button to access bulk actions:
Bin Actions:
Print Labels:
Performing Bulk Actions:
Select Bins
Check the boxes next to bins you want to act on.
Choose Action
Click Actions dropdown and select the desired action.
Confirm Action
Follow prompts to confirm the action (some actions require additional information).
Review Results
System shows success message or any errors encountered.
Change the volume capacity of one or more bins:
Select Bins
Check the boxes next to bins you want to edit.
Open Edit Volume
Click Actions → Edit Volume.
Enter Volume
In the modal, enter the new volume value (required field).
Save Changes
Click Save to update volume for all selected bins.
Move bins to a different warehouse location:
Select Bins
Check the boxes next to bins you want to relocate.
Open Relocate
Click Actions → Relocate Bin.
Choose Destination
In the modal, select the destination location from the dropdown.
Confirm Relocation
Click Relocate to move bins.
Blocking Bins:
Block bins to prevent them from being picked:
Select Bins
Check the boxes next to bins you want to block. You can select multiple bins to block them all at once.
Block Action
Click Actions dropdown button, then select Block Bin.
Confirm Block
System blocks selected bins and updates bin category to “Blocked”.
Unblocking Bins:
Restore blocked bins to available status so they can be used again:
Select Blocked Bins
Check the boxes next to blocked bins you want to unblock. You can select multiple bins to unblock them all at once.
Unblock Action
Click Actions dropdown button, then select Unblock Bin.
Confirm
The system unblocks selected bins and restores them to their previous category from history.
Print various types of labels for selected bins:
Print Bin Labels:
Select Bins
Check the boxes next to bins you want to print labels for.
Choose Label Type
Click Actions → Select label type:
Generate Labels
System generates labels and opens print preview.
Use browser print function to print labels.
Export inventory data for reporting or analysis. CSV and EXCEL buttons appear in the DataTables toolbar above the table.
CSV Export:
Apply Filters (Optional)
Set up any filters you want to include in the export.
Export CSV
Click the CSV button in the toolbar above the table.
Open File
Open the downloaded CSV file in Excel or another spreadsheet application.
Excel Export:
Apply Filters (Optional)
Set up any filters you want to include in the export.
Export Excel
Click the EXCEL button in the toolbar above the table.
Open File
Open the downloaded Excel file with all formatted data.

Access related warehouse features from the page header:
Bin categories classify bins by their status or purpose:
Common Categories:
Bin category affects whether bins can be picked and what actions can be performed on them.
If UOM feature is enabled, bins can track quantities in different units:
UOM Features:
UOM Actions (available in the row dropdown when UOM is set):
Start with Account or Location filters to narrow down large inventories. Then use column filters for specific searches.
Hide columns you don’t need to focus on important information. Save your preferences for faster access.
Keep “Qty in processing” visible to track reserved inventory. Hide it only if performance is slow.
Select multiple bins for bulk operations like blocking, relocating, or printing labels to save time.
Monitor bin categories to ensure bins are properly classified. Block bins that need attention.
Problem: Warehouse Overview table is empty or shows no bins.
Solutions:
Problem: Applied filters don’t show expected results.
Solutions:
Problem: Bulk actions don’t execute or show errors.
Solutions:
Problem: Column visibility preferences don’t persist.
Solutions:
Problem: CSV or EXCEL buttons don’t work or download fails.
Solutions:
Problem: Page loads slowly or times out.
Solutions:
Next Steps:
Related Features: