Individual Tracking
Track each product individually by its unique serial number. Ideal for high-value products or those requiring warranty.
The serial number management system (Serials Management) allows you to track individual products through their unique serial numbers. This is essential for products that require individual tracking, such as electronics, medical devices, or high-value products.
With Serials Management you can:
Track each product individually by its unique serial number. Ideal for high-value products or those requiring warranty.
Manage the status of each serial (Ready, Hold, Out, Imperfect) to know exactly where each product is.
Maintain a complete record of all movements and status changes for each serial for audit and traceability.
Add multiple serials at once via CSV upload, saving time during initial setup.
Navigate to Inventory - Warehouse View
From the main menu, go to the WMS section and then to Inventory.
Open Serials
Click Serials in the inventory options list (Inventory → Serials).
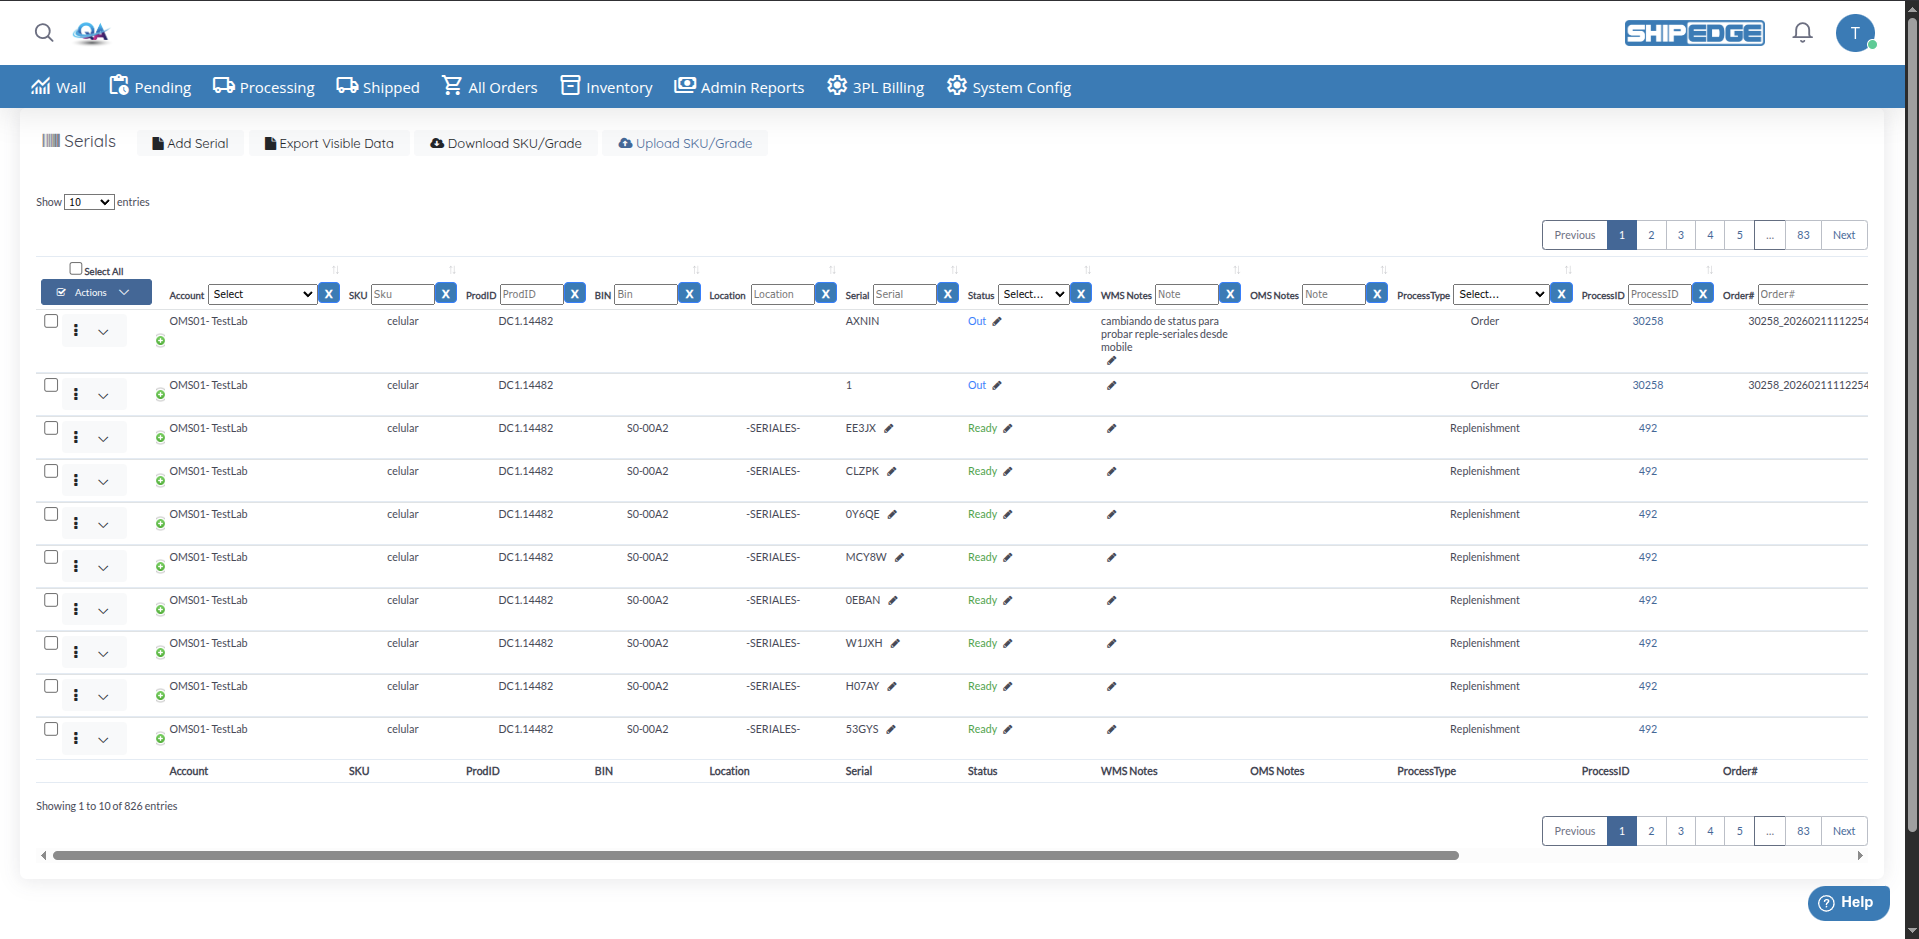
View Serials Table
You’ll see a table with all registered serials, showing information like Account, SKU, BIN, Location, Serial, Status, and more.
Serials can have the following statuses:
Click Add Serial
On the Serials page, click the Add Serial button (with the file icon).
Select OMS Account
Choose the Accounts in the dropdown.
Select the Product
Choose the Products (SKU). Only products with serials enabled appear.
Select Status
Choose Status: Ready, Hold, or Imperfect.
Choose Location Bin
Select the Location Bin. The list shows bins for the selected status (Regular for Ready, Staged for Hold, Hurt for Imperfect).
Enter Serial Number
Type the product’s unique serial number in Serial. No spaces allowed.
Save the Serial
Click Save to add the serial to the system.
You can change the status of a single serial or multiple serials at once:
Locate the Serial
In the Serials table, find the serial you want to modify using filters if needed.
Click the Pencil Icon
Click the pencil icon next to the Status value in the row.
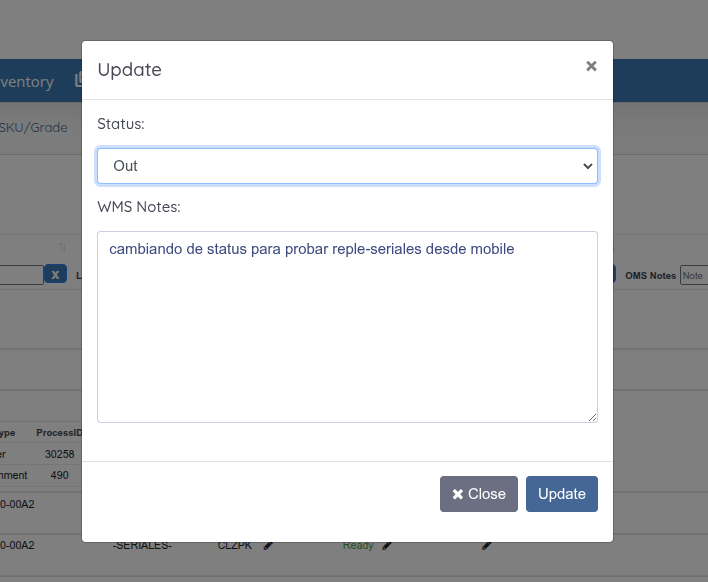
Select New Status
Choose the new status: Hold, Ready, Imperfect, or Out.
Select Destination Bin
If the status change requires a bin (e.g., Ready to Regular, Hold to Staged), select the destination bin from the Bins dropdown.
Add WMS Notes
Enter comments in WMS Notes (required) to document the change.
Confirm Change
Click Update to apply the status change.
Select Multiple Serials
Check the boxes of serials you want to update. Only serials with status Hold, Ready, or Imperfect can be bulk updated (not Reserved or Out).
Open Actions Menu
Click the Actions button (with the checkmark icon).
Select Edit Status
Click Edit Status from the dropdown menu.
Configure Status Change
Confirm Update
Click Update to change the status of all selected serials.
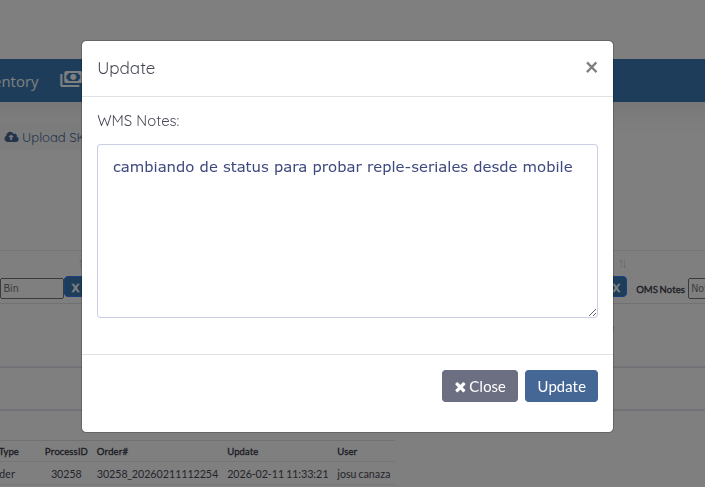
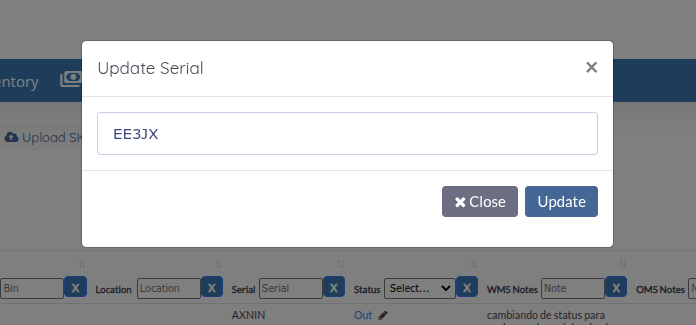
You can edit the serial number and WMS Notes by clicking the pencil icon next to each field:
Edit Serial Number:
Edit WMS Notes:

Each serial maintains a complete history of all its changes:
Open History
Click the details icon (arrow) in the second column of the serial row.
Review History
A table shows all serial changes with: SKU, ProdID, BIN, Serial, Status, WMS Notes, OMS Notes, ProcessType, ProcessID, Order#, Update, User.
Download Full History
You can download the complete history by clicking the download button if available.
You can print barcode labels for serials (max 20 serials at a time):
Select Serials
Check the boxes of serials for which you want to print labels (max 20).
Open Actions Menu
Click the Actions button.
Select Print 4x1 label
Click Print 4x1 label (with the printer icon).
Configure Options
Generate Labels
Click Print to generate the PDF. Use Print PDF in the preview modal to print.
Labels include:
Export Visible Data: Exports all visible rows (based on filters and pagination) to CSV.
Apply Filters if Necessary
Use table filters to show only serials you want to export.
Click Export Visible Data
Click the Export Visible Data button in the header (next to Add Serial).
Download File
The CSV file downloads automatically with all visible data.
Download Serial History (from Actions): Select serials, click Actions → Download Serial History to get a CSV with full history and attributes for selected serials.
This function allows you to download serials with Ready or Hold status:
Apply Filters if Necessary
Filter the table to show only serials you want to include.
Click Download SKU/Grade
Click the Download SKU/Grade button (with the cloud download icon).
Download File
A CSV file will be generated with visible serials that have Ready or Hold status.
You can upload multiple serials at once using a CSV file:
Prepare Your CSV File
The file must contain the following columns:
Click Upload SKU/Grade
Click the Upload SKU/Grade button (with the cloud upload icon).
Select Your File
Choose the CSV file from your computer.
Process Upload
The system will process the file and show:
Review Results
The modal shows links to Download Success Report and Download Error Report. Download and review to verify processing.
The Serials table includes multiple filters to find specific serials:
Use these filters in combination to find exactly the serials you need.
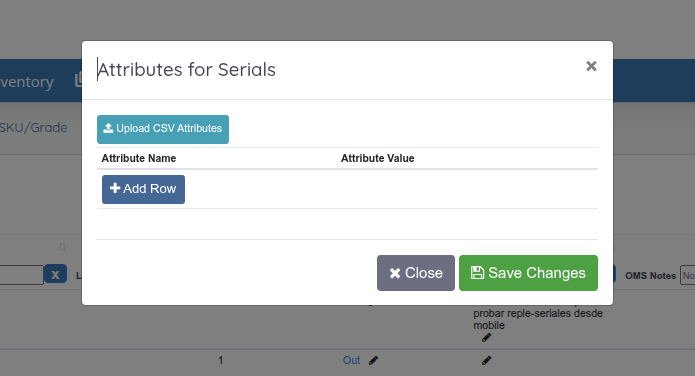
You can add custom attributes (metadata) to serials:
Open Row Dropdown
Click the dropdown (⋮) on the serial row.
Select Attributes
Click Attributes to open the attributes modal and add attributes for that serial.
Select Multiple Serials
Check the boxes of serials to which you want to add attributes.
Open Actions Menu
Click the Actions button.
Select Add Attributes
Click Add Attributes (with the tags icon).
Configure Attributes
Select the attributes you want to add and their values in the modal.
Confirm Addition
Save to add attributes to all selected serials.
Select Serials
Check the boxes of serials to which you want to add attributes.
Open Actions Menu
Click the Actions button.
Select Add Attributes By CSV
Click Add Attributes By CSV.
Upload File
Select your CSV file. Optionally check “overwrite attributes that already exist”.
Download Template
Use the Download Template link to get the correct CSV format.
Process Upload
Click Upload to process the file and apply attributes to selected serials.
The table shows the following columns:
You can sort by any of these columns by clicking the column header.
Before adding a serial, verify that the serial number is unique and correct. Duplicate serial numbers will cause errors.
Add clear comments in WMS Notes when changing a serial’s status. This helps track why the change was made.
Regularly review serial history to detect discrepancies or tracking issues.
Make sure you have Regular, Hurt, and Staged bins configured before adding serials. The system needs these bins to assign statuses correctly.
Problem: I receive an error when trying to add a serial.
Solution:
Problem: I can’t change a serial’s status.
Solution:
Problem: I don’t see products when trying to add a serial.
Solution:
Problem: I can’t see a serial’s history.
Solution: