Warehouse Organization
Organize your warehouse into logical areas with descriptive names. Makes it easy to find products quickly.
Locations are specific physical areas within your warehouse where products are stored. Each location can contain multiple bins (containers) and helps organize inventory efficiently.

Locations allow you to:
Organize your warehouse into logical areas with descriptive names. Makes it easy to find products quickly.
Automatically generate multiple bins based on location patterns. Saves time when setting up new areas.
Group related locations into zones to facilitate management and product picking.
Monitor how many bins are in use and how many are available in each location.
Navigate to Warehouse
From the main menu, click Warehouse.
Open Locations
On the Warehouse page, click the Locations button (with the location arrow icon).
View Location List
You’ll see a table with all existing locations, showing information like Location, Bin Init, Default Volume, Category, Type, Zone, and bin statistics.
Click Add Location
On the Locations page, click the Add Location button (with the plus icon).
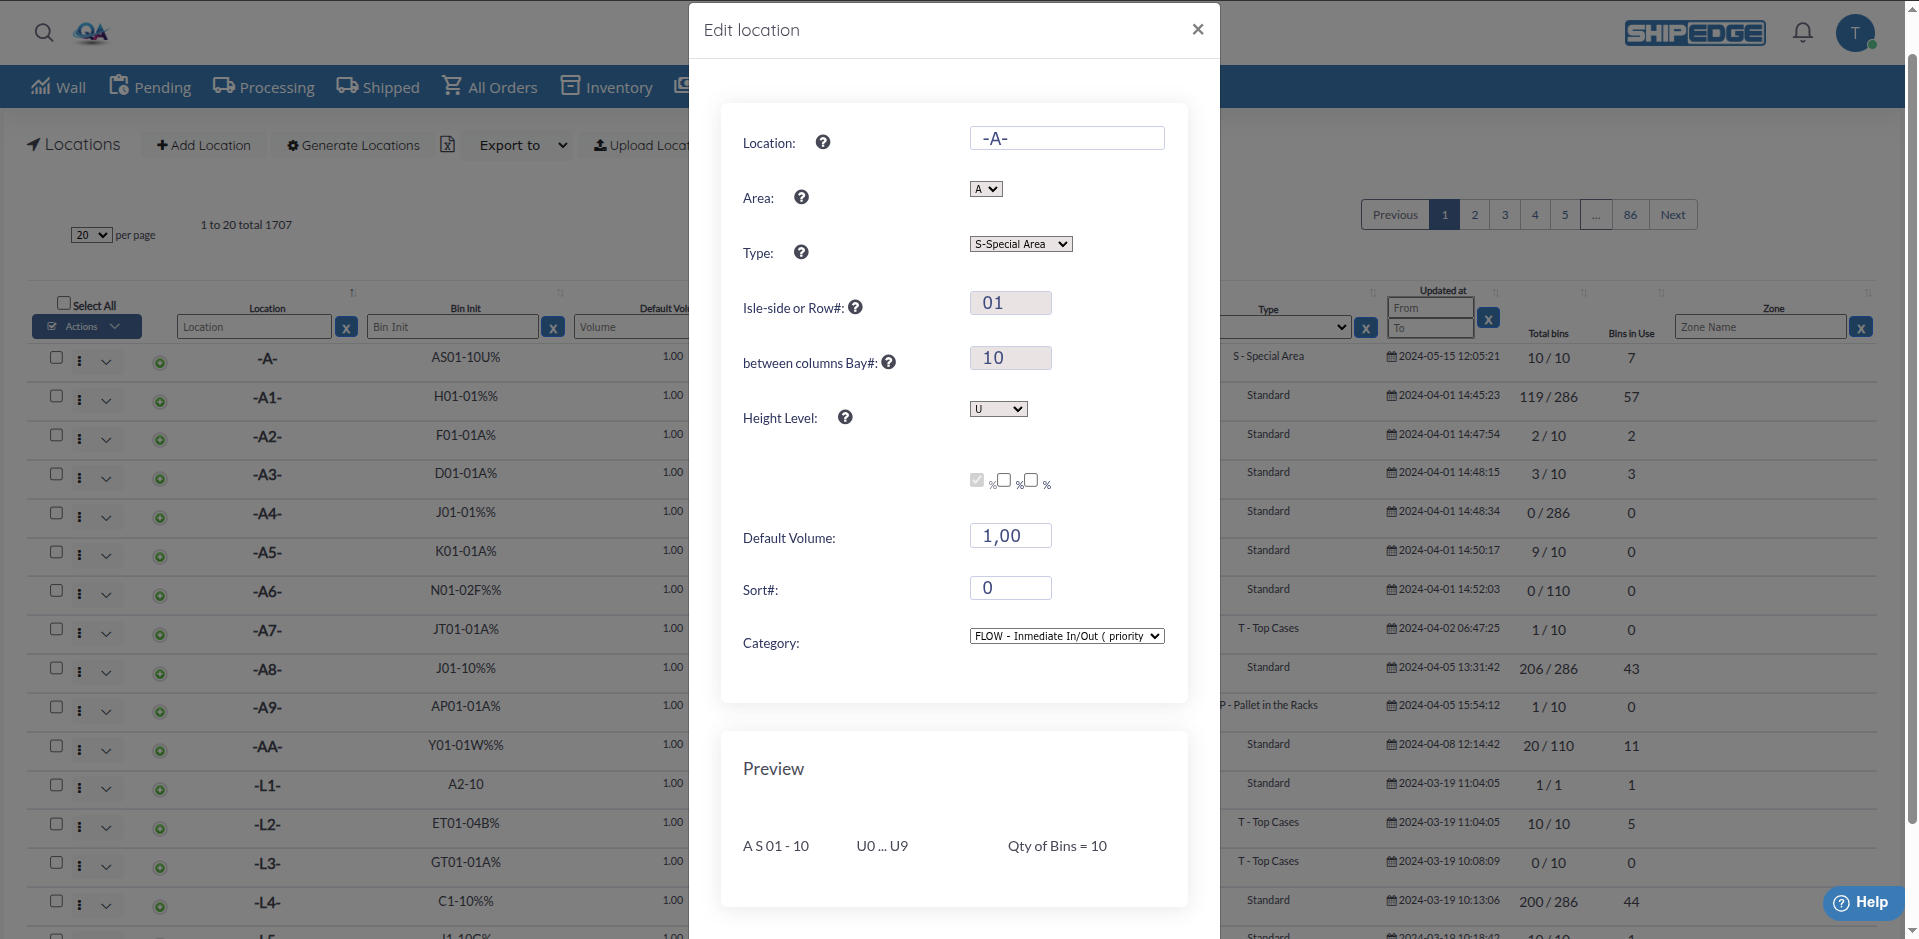
Complete Basic Fields
Define Bin Structure
Configure Additional Options
Review Preview
The Preview section shows how the Bin Init will look based on your selections.
Save Location
Click Save to create the location.
If you need to create many locations with a similar pattern, use the Generate Locations function:
Click Generate Locations
On the Locations page, click the Generate Locations button.
Configure Area and Type
Define Bin Volume
Enter the Bin Volume that will apply to all generated locations.
Specify Row Range
Specify Bay Range
Configure Height Levels
Select Category
Choose the bin category that will apply to all generated locations.
Review Total
The system shows how many locations will be created and how many bins per location.
Generate Locations
Click Generate Locations to create all locations.
Select the Location
In the Locations table, click the location you want to edit.
Modify Fields
The same form used when creating a location will open. Modify the necessary fields.
Save Changes
Click Save to update the location.
Select Multiple Locations
Check the boxes of locations you want to update, or use Select All to select all.
Open Actions Menu
Click the Actions button (with the checkmark icon).
Select Edit Category
Click Edit Category from the dropdown menu.
Choose New Category
Select the category you want to assign to selected locations.
Confirm Update
Click Update. Only locations in allowed categories (Regular, Picking, Repository, Flowbin) or with Bins in use = 0 will be updated.
Select Locations
Check the boxes of locations you want to delete.
Open Actions Menu
Click the Actions button.
Select Eliminate Locations
Click Eliminate Locations (with the trash icon).
Confirm Deletion
Only locations without associated bins will be deleted.
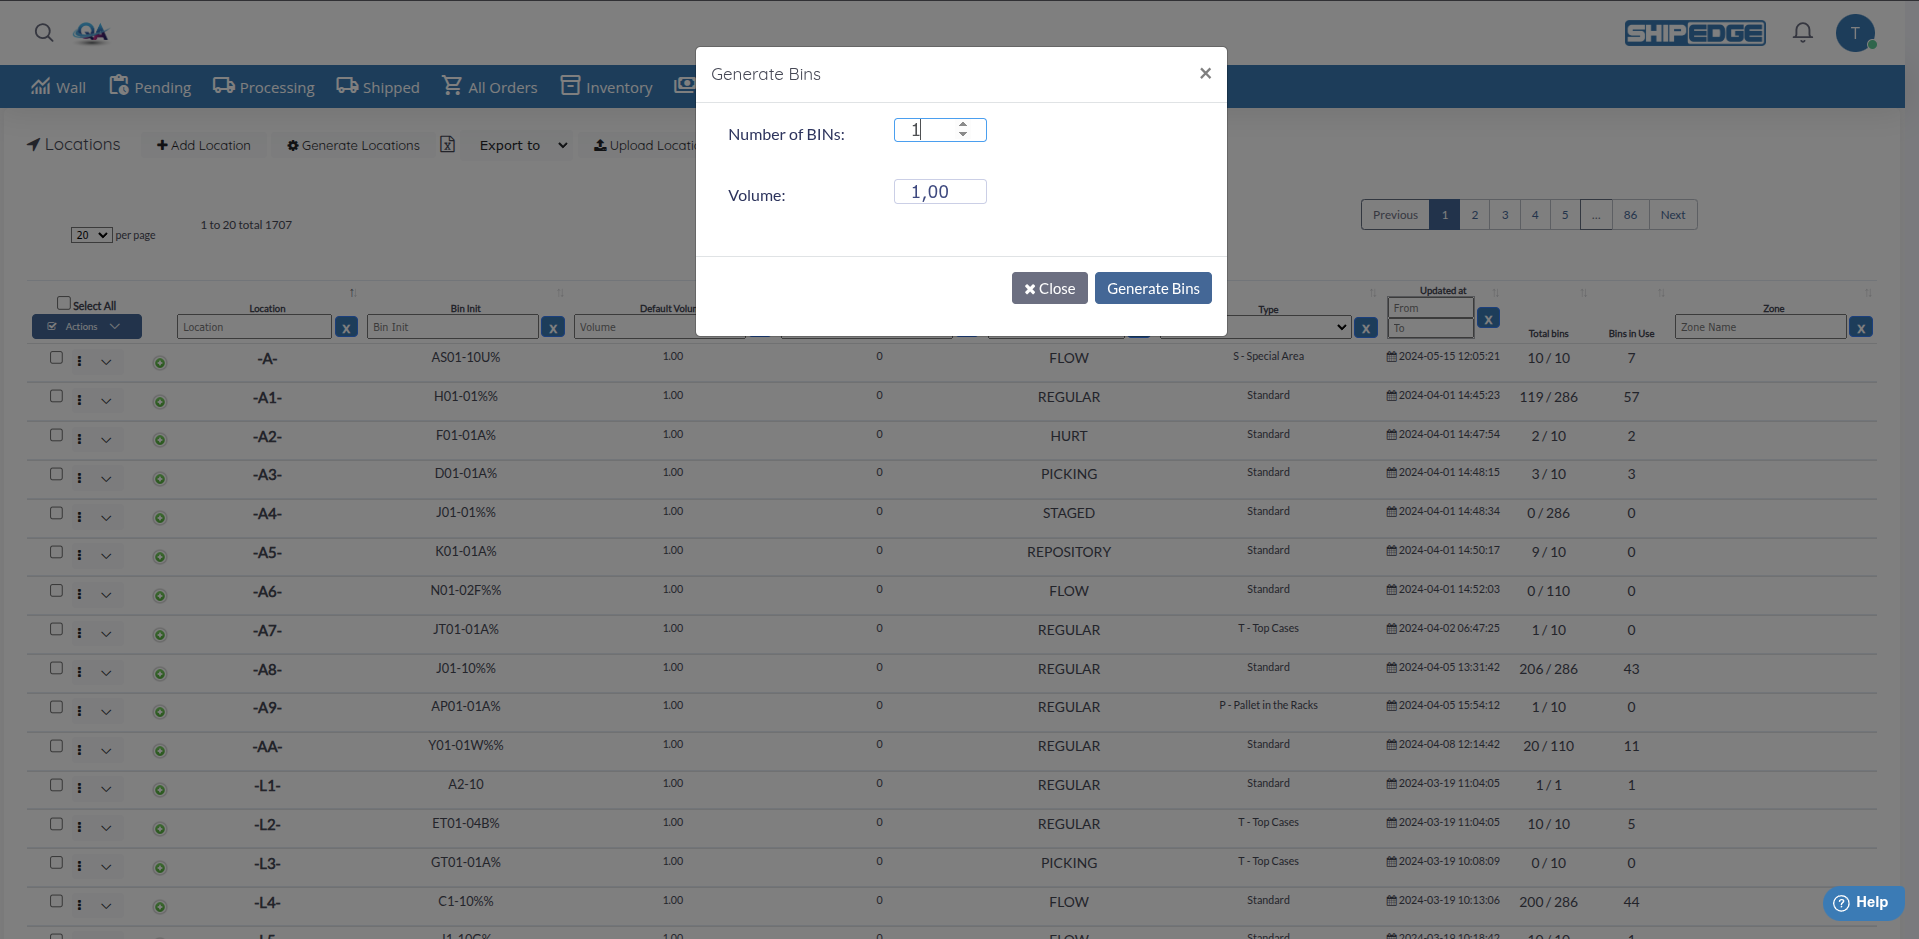
You can automatically generate bins for one or multiple locations:
Select Locations
Check the boxes of locations for which you want to generate bins.
Open Actions Menu
Click the Actions button.
Select Generate new bins
Click Generate new bins (with the gears icon).
Specify Quantity
Enter how many bins you want to generate (maximum 500 per location).
Define Volume
Enter the volume that generated bins will have.
Generate Bins
Click Generate to create the bins.
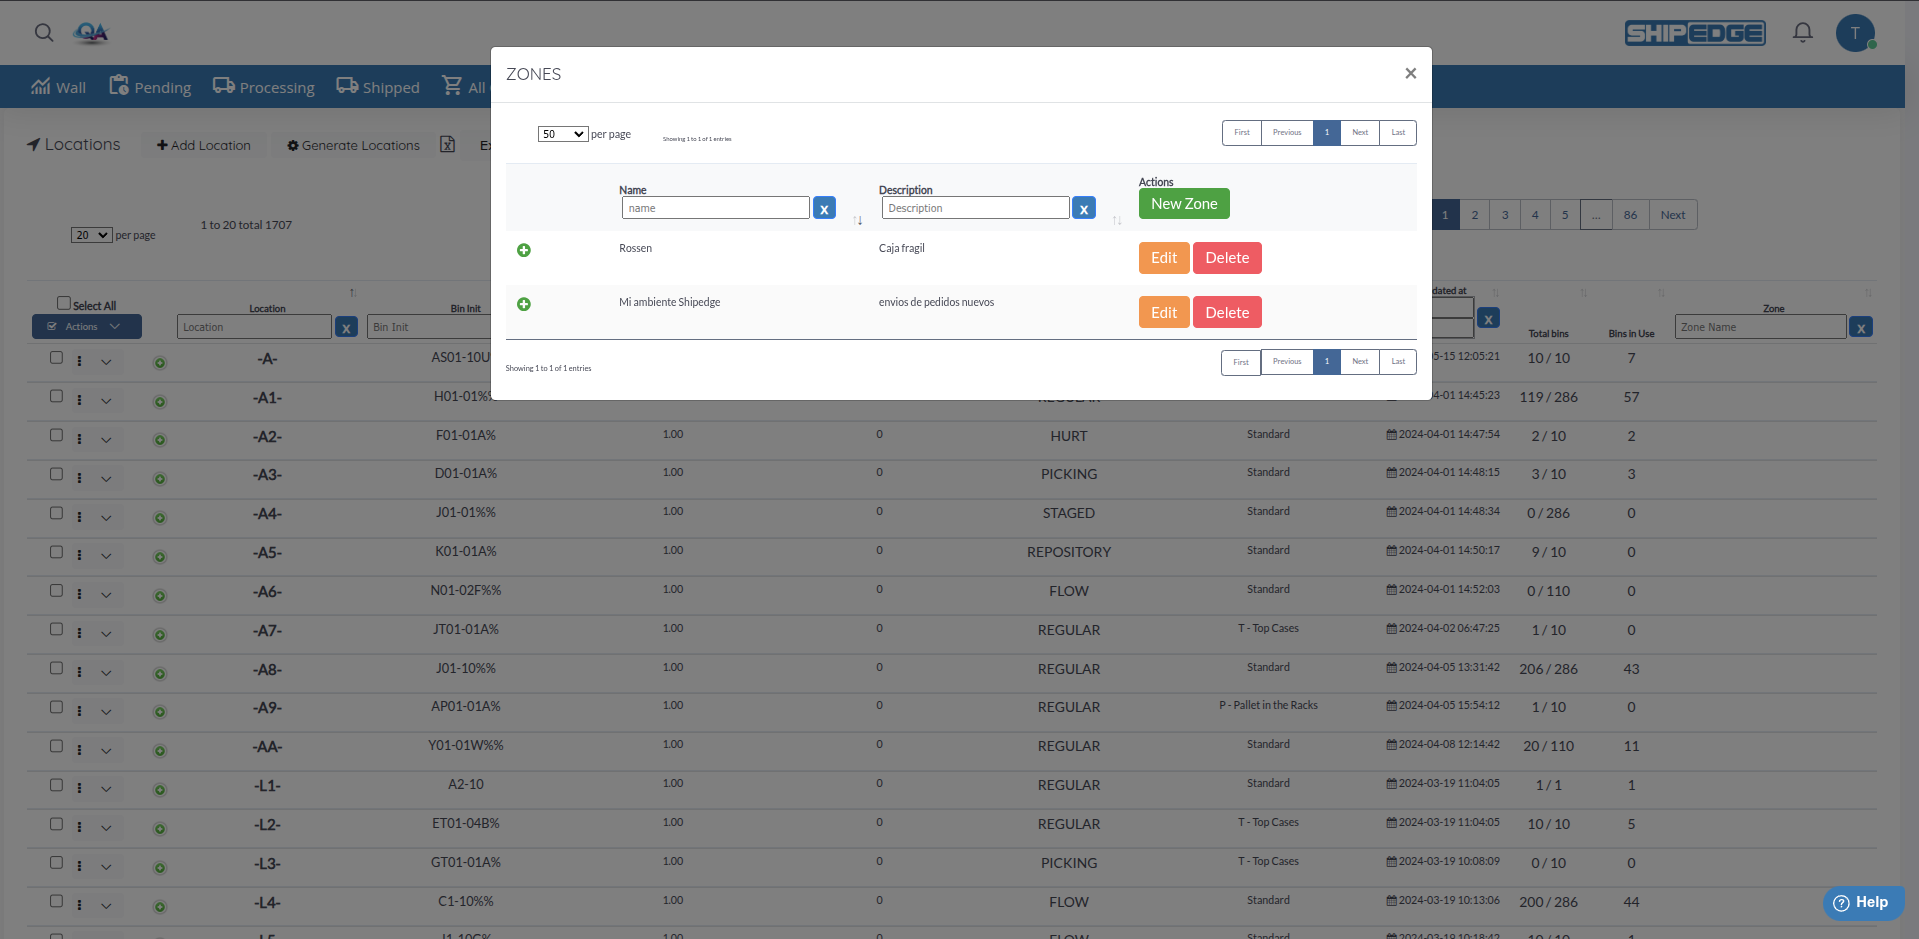
Zones allow you to group related locations to facilitate management:
Open Zones Modal
On the Locations page, click the Zones button (with the file icon).
Create a New Zone
Click the button to create a new zone and enter:
Edit or Delete Zones
Use controls in the zones table to edit or delete existing zones.
Select Locations
Check the boxes of locations you want to assign to a zone.
Open Actions Menu
Click the Actions button.
Select Assign Zone
Click Assign Zone (with the file icon).
Choose Zone
Select the zone to which you want to assign locations, or create a new zone.
Confirm Assignment
Click Assign to complete the assignment.
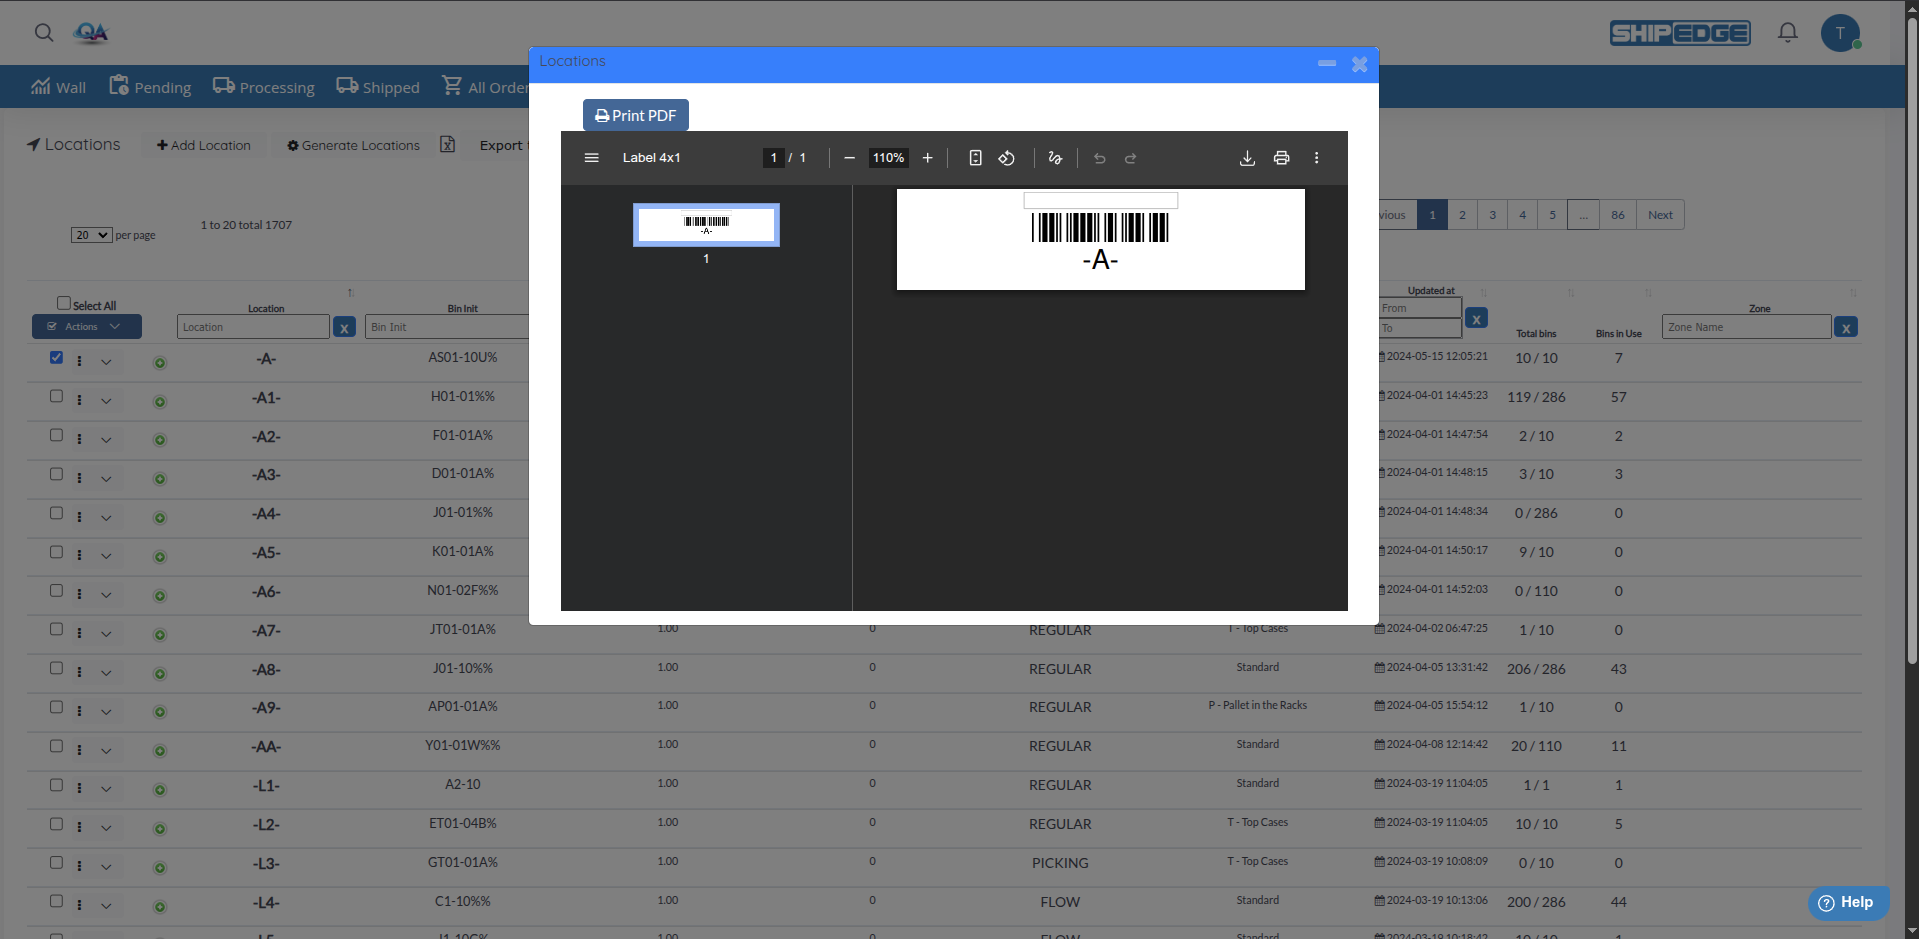
You can print labels for locations and bins:
Select Locations
Check the boxes of locations for which you want to print labels.
Open Actions Menu
Click the Actions button.
Select Print Labels
Click Print Labels (with the printer icon).
Configure Options
Generate Labels
Click Print to generate the PDF with labels.
You can also use the Print LPN/Tray Labels button in the top bar to print LPN or tray labels.
You can bulk import locations using a CSV file:
Prepare Your CSV File
Download the CSV template by clicking Update Sort# and selecting “Download template CSV”.
Complete the File
The file must contain columns: location and sort_num.
Upload the File
Click Upload Locations (with the upload icon) and select your CSV file.
Review Results
The system will show how many locations were inserted correctly and if there were errors.
You can export location information in different formats:
Select Format
Click the Export to dropdown menu in the top bar.
Choose Format
Select from:
Download File
The file will be generated and downloaded automatically.
The table shows the following columns:
You can filter and sort by any of these columns using the table controls.
Use location names that are easy to understand and follow a consistent pattern. For example: A-T-01-05-A for Area A, Type Top, Row 01, Bay 05, Level A.
Group related locations into zones to facilitate picking and inventory management. For example, create a “Fast Moving” zone for high-turnover products.
Before generating multiple locations, plan the complete range you’ll need. This avoids having to create additional locations later.
Regularly review the “Total bins” and “Bins in Use” columns to identify locations that need more bins or are underutilized.
Problem: The “Eliminate Locations” button doesn’t delete the location.
Solution: You can only delete locations that don’t have associated bins. If the location has bins, you must first delete or move the bins to another location.
Problem: I generated locations but they don’t appear in the list.
Solution:
Problem: The “Assign Zone” button doesn’t work.
Solution: