Inventory Accuracy
Correct discrepancies between recorded and physical inventory to maintain accurate data.
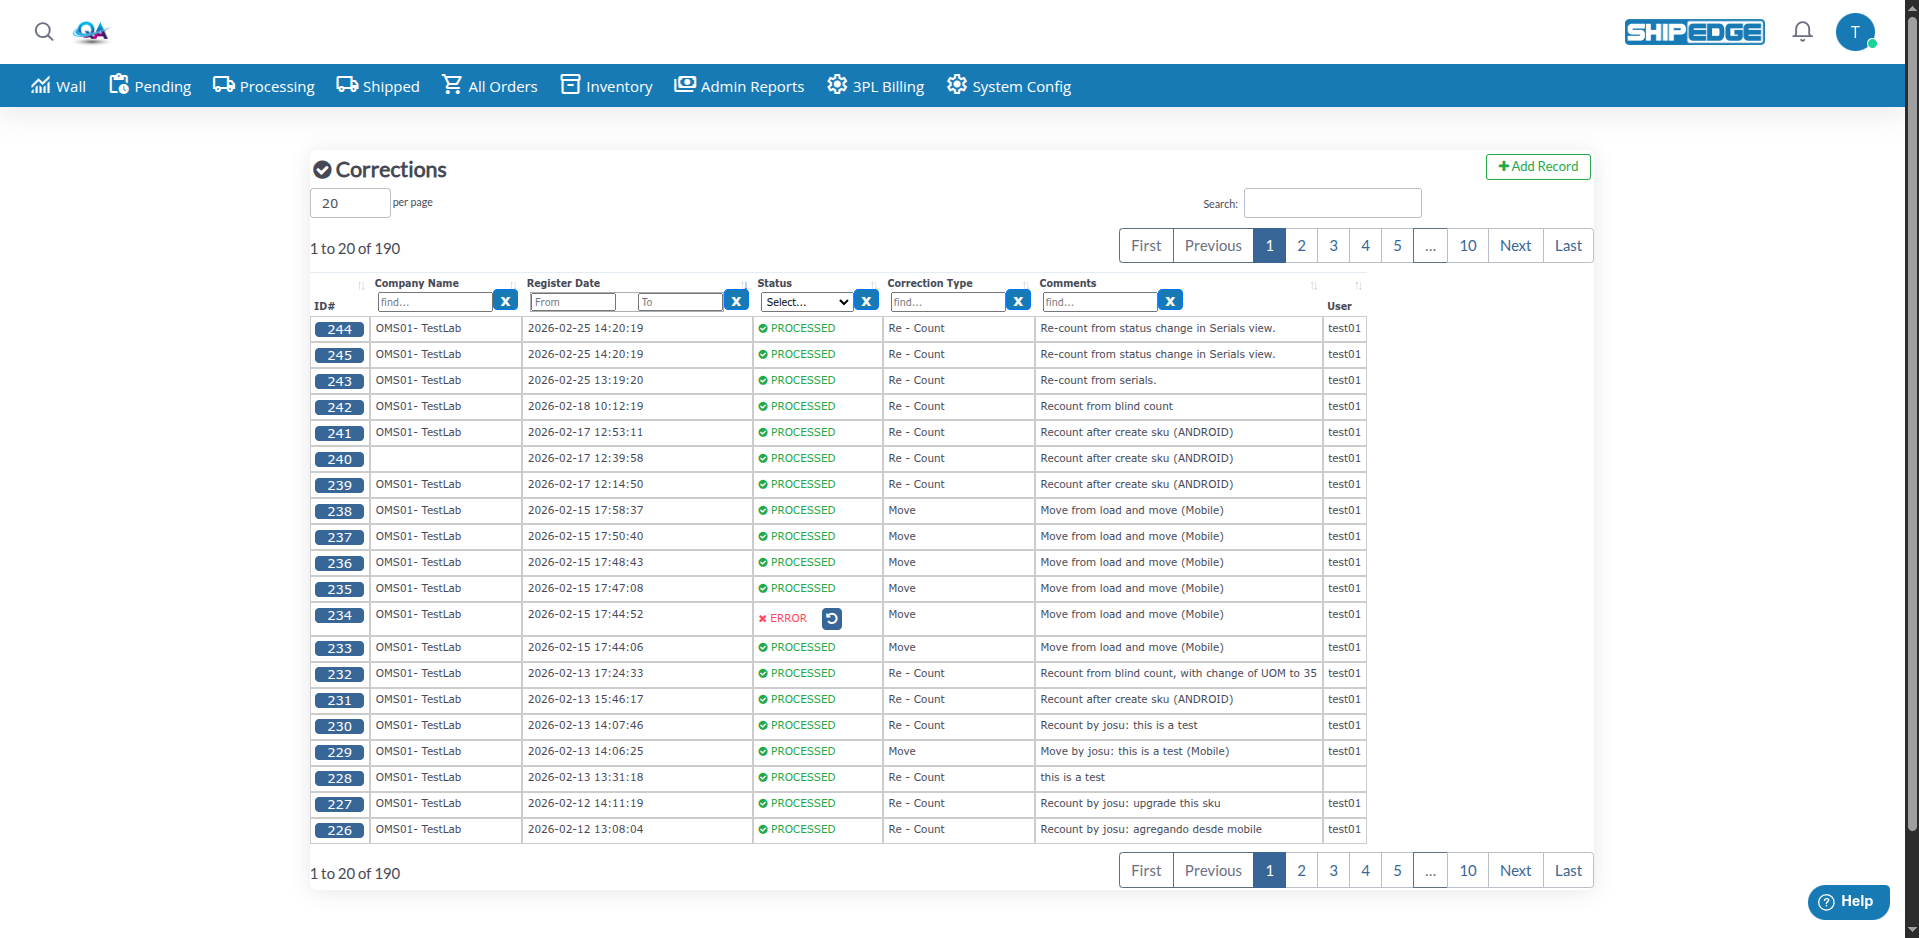
Corrections (also known as Recounts) allow you to adjust product quantities in bins when you find discrepancies between recorded and physical inventory. This tool is essential to maintain inventory accuracy and correct counting errors.
Correct discrepancies between recorded and physical inventory to maintain accurate data.
All corrections are recorded with date, user, and comments for auditing.
Requires special permissions and notifies account administrators by email when changes are confirmed.
Supports different types of corrections: Re-count, Move, and Relocation (depending on availability).
ShipEdge Core supports three types of corrections:
Access Corrections
Navigate to Inventory > Corrections in the main menu, or go directly to the corrections page.
Create a new record
Click the Add Record button in the top right corner of the corrections table.
Select the account
In the form, select the Account for which you’re creating the correction.
Choose correction type
Select the Type Correction:
Add comments
Write descriptive comments in the ComentCorrection field explaining why you’re making this correction.
Submit the form
Click Post to create the correction. You’ll be redirected to the details page where you can add specific products.
Once the correction is created, you are taken to the correction details page. Add products and bins to correct:
Use the Custom Filter
In the “Counted Inventory Quantities” section, use the filter to find the product or bin. Enter a value, select the field (BIN, Sku, Upc, or Description), then click SEARCH.
Click Correction on the row
In the inventory table, find the row with the bin and SKU you want to correct. Click the Correction link on that row.
Enter weight if prompted
If the SKU has no weight set, the system will ask you to enter a weight before continuing. Enter the weight and confirm.
Enter Actual Qty in Bin
You will see a grid of bins for that SKU. For each bin, enter the Actual Qty in Bin (the physical count you found). The system shows the current “Qty Good Units” for comparison.
Select Count Type and Reason (if required)
If your warehouse has “Count Type” and “Reason for Count” configured as required, select these values for each line before submitting.
Click Insert
Click Insert to add the correction. The system calculates the difference between actual and recorded quantity automatically.
Add more products
Click OTHER SKU/BIN to return to the inventory list and add more products. Repeat steps 1–6 for each product you need to correct.
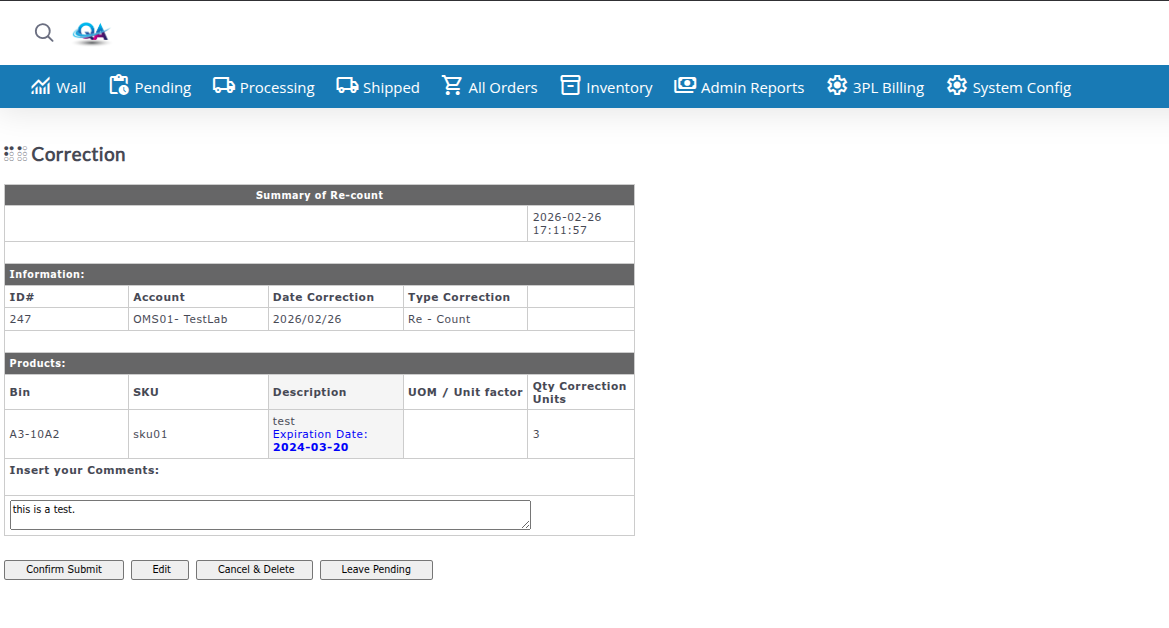
Before applying changes to inventory, you must review all details:
Review summary
The view page shows a complete summary of the correction with:
Verify quantities
Carefully review each line to ensure correction quantities are correct.
Add final comments (optional)
You can add or modify comments in the text field before confirming.
Confirm the correction
Click Confirm Submit to apply changes to inventory. The system will show a confirmation explaining that:
Wait for confirmation
Once confirmed, the correction will change its status to “PROCESSED” and changes will be applied to inventory.
Corrections can have the following statuses:
The correction is being created or edited. No changes have been applied to inventory yet.
The correction has been confirmed and changes have been applied to inventory.
The correction has been completed successfully.
The correction has incomplete information and needs to be reviewed.
An error occurred while processing the correction. Review details and contact support if necessary.
If you need to make changes to a correction that hasn’t been confirmed yet:
Open the correction
Click on the correction ID in the list to open the details view.
Click Edit
On the view page, click the Edit button to return to the edit page.
Modify products
Update quantities, add or remove products as needed.
Save changes
Changes are saved automatically when you update each product line.
If you need to cancel a correction that hasn’t been confirmed yet:
Open the correction
Click on the correction ID to open the details view.
Confirm cancellation
Click Cancel & Delete. The system will ask for confirmation before deleting the correction.
Verify deletion
The correction will be permanently deleted and disappear from the list.
If you need to leave a correction unconfirmed to work on it later:
Open the correction
Click on the correction ID to open the details view.
Click Leave Pending
This will save the correction in “IN PROGRESS” status without applying changes to inventory.
Continue later
You can return to the correction later to complete and confirm it.
Some warehouses have configured the requirement to specify a “Count Type” and “Reason for Count” for each product line in a correction.
If this configuration is active:
Always add descriptive comments explaining why you’re making the correction. This helps in future audits.
Carefully review all quantities before confirming. Changes are permanent and affect inventory immediately.
Create separate corrections for different accounts. This keeps records organized and facilitates tracking.
The system will alert you if a bin is being used by another SKU. Verify these cases before confirming.
For large or significant corrections, consider notifying the team before confirming to avoid surprises.
If you need to review something before confirming, use “Leave Pending” instead of deleting the correction.
Problem: I don’t see the “Add Record” button or can’t create corrections.
Solution:
allow_recount) enabledProblem: The “Confirm Submit” button doesn’t work or shows an error.
Solution:
Problem: The correction has “ERROR” status after trying to confirm it.
Solution:
Problem: A confirmed correction cannot be edited.
Solution: