Skip to content

Bulk Upload Inventory

Bulk Upload Inventory allows you to upload hundreds or thousands of products to your catalog in minutes using CSV files. You can create new products, update existing products, and even create replenishments automatically, all from a single file.

This tool is essential for:

  • Initial setup: Load your entire catalog when starting with ShipEdge
  • Bulk updates: Change prices, weights, dimensions, or descriptions for many products
  • Create replenishments: Generate purchase orders automatically by including quantities in the CSV
  • Synchronization with external systems: Keep your inventory updated from your ERP or e-commerce

Efficient Bulk Upload

Upload hundreds or thousands of products in minutes instead of hours of manual entry.

Flexible Updates

Choose whether to create only new products or update existing ones with new information.

Automatic Replenishments

Include a quantity column to automatically create replenishment requests when uploading the CSV.

Custom Templates

Create and save mapping templates for different suppliers or e-commerce platforms.

Smart Validation

The system validates your CSV before processing, detecting format errors and invalid SKUs.

Complete History

View history of all your previous uploads with detailed results and re-processing capability.

The bulk upload process has 4 main phases:

Download a template and complete your products with all necessary information (SKU, description, cost, weight, dimensions, etc.).

Upload your CSV file to ShipEdge. The system accepts multiple separators (commas, semicolons, pipes, tabs).

If your CSV doesn’t match the standard template, map your columns to ShipEdge fields. You can save this mapping as a template for future use.

The system processes the file in the background (queue), creating/updating products and generating replenishments if quantities were applied.

  1. Navigate to Upload Inventory View

    From the main menu, go to Inventory → Upload Inventory or search for “Master Upload Inventory”.

    You can also access from:

    • Product view: “Upload CSV file” link
    • Replenishments list: Bulk upload link
  2. Download a CSV Template (First Time)

    If it’s your first upload, click the Download Template button (CSV icon).

    There are two templates available:

    • Standard Template: Includes all standard columns
    • Extended Template: Includes additional advanced columns

    Tip: You can also download custom templates you created previously from the dropdown.

  3. Prepare Your CSV File

    Open the template in Excel or Google Sheets and complete the data:

    Required Columns (minimum required):

    • SKU: Unique product code
    • Description: Product description

    Recommended Columns:

    • UPC: Barcode
    • Cost: Unit cost
    • Declared or Retail: Declared value for shipping
    • Weight: Product weight
    • Length, Width, Height: Package dimensions

    Optional Columns:

    • Quantity: If you want to create a replenishment automatically
    • Supplier: Supplier name
    • DistributionCenter: If you handle multiple warehouses
    • SynSet: To create product families
    • Many others (see Detailed Fields section)
  4. Save File as CSV

    In Excel:

    • File → Save As → Type: “CSV UTF-8 (Comma delimited) (.csv)”

    In Google Sheets:

    • File → Download → Comma-separated values (.csv)

    Important: Make sure to save as CSV, not as Excel (.xlsx).

  5. Upload File in ShipEdge

    Back in ShipEdge:

    • Click Choose File or drag your CSV to the upload area
    • File name will appear in the field
    • You’ll see a message: “Choose or drag products file…”
  6. Select Update Option (Optional)

    If you check “Update SKU data if already in Shipedge”:

    • System will update existing products with new CSV information
    • ⚠️ WARNING: This action is irreversible. Previous data will be overwritten.

    If you DO NOT check the box:

    • Only new products will be created (SKUs that don’t exist)
    • Existing products will be ignored (not updated)
  7. Click “Upload”

    Press the blue Upload button.

    The system:

    • Validates file format
    • Detects separator used (comma, semicolon, pipe, tab)
    • Verifies CSV structure
  8. Mapping Columns (If Necessary)

    If your CSV doesn’t exactly match the standard template, the system will redirect you to the Mapping page.

    On this page:

    • You’ll see your CSV columns on the left
    • You’ll see ShipEdge fields on the right
    • Connect each column with its corresponding field using drag-and-drop or selection
    • Click Save Mapping and give the template a name (example: “CSV Supplier ABC”)

    Next uploads: Select the saved template and mapping will apply automatically.

  9. System Processes File

    Once mapping is confirmed:

    • File enters Queue (processing queue)
    • Status will change to “In queue” or “Processing”
    • Processing happens in background, you can close the window

    Estimated time:

    • 50 products: 30 seconds
    • 500 products: 3-5 minutes
    • 5,000 products: 20-30 minutes
  10. Review Results

    Once completed, status changes to “Completed”.

    Click the “Details” link to see:

    • How many products were created
    • How many were updated
    • If any replenishment was generated (will include link to RequestID)
    • Errors or warnings (invalid SKUs, missing data, etc.)

Below, all available fields in the CSV, grouped by category:

Format: Alphanumeric, maximum 40 characters (less than 10 recommended)

Description: Unique product identifier. This is the code you use to identify each product in your system.

Examples:

  • “ABC-001”
  • “WIDGET-BLU-LG”
  • “SKU12345”

Rules:

  • Must be unique in your account
  • Only alphanumeric characters and some symbols: . - # / ~ & | ( ) + _
  • Avoid spaces and special characters (á, é, ñ, etc.)
  • Case-sensitive: “ABC” is different from “abc”

Best Practices:

  • Use short and consistent codes
  • If importing from a supplier, use the same SKU they use
  • If selling on e-commerce, use the SKU they have in your store
  • Use SynSets to map different codes to the same product

Format: Text, maximum 150 characters

Description: Product description that warehouse staff will use to verify they received the correct item.

Examples:

  • “Widget Blue Large - 12oz”
  • “Red Polo Shirt Size M”
  • “Laptop Charger 65W USB-C”

Rules:

  • Maximum 150 characters (automatically truncates for customs forms)
  • Don’t use double quotes inside description
  • Don’t use commas inside description

Best Practices:

  • Be descriptive but concise
  • Include color, size, material if applicable
  • Avoid marketing language (“The best!”, “Amazing”, etc.)
  • Think of someone who doesn’t know your product: what do they need to know to identify it?

Format: Alphanumeric, maximum 255 characters (generally 12-15 digits)

Description: Product barcode. Can be UPC, EAN, ISBN, ASIN, or any other barcode.

Examples:

  • “012345678905” (standard UPC)
  • “9780134685991” (ISBN for books)
  • “B08N5WRWNW” (Amazon ASIN)

When to Use:

  • Products with retail barcode
  • Books (use ISBN)
  • Products sold on Amazon (can use ASIN)
  • For quick scanning in warehouse

Note: If the product doesn’t have an official barcode, you can leave empty or use your own internal code.


Format: Alphanumeric, 12 characters

Description: If the product comes from another ShipEdge warehouse, this is ShipEdge’s internal barcode.

When to Use:

  • Transfers between ShipEdge warehouses
  • Products that already have ShipEdge label
  • Advanced use only

Format: Decimal number, maximum 6 digits with 3 decimals (example: 123.456)

Description: Unit purchase cost of the product from your supplier. Used for:

  • Generating purchase orders
  • Calculating total inventory value
  • Cost reports
  • Warehouse insurance

Examples:

  • “15.99”
  • “125.50”
  • “0.75”

Best Practices:

  • Use most recent purchase price
  • Don’t include currency symbols ($, €)
  • Use period (.) as decimal separator, not comma (,)
  • Update periodically if your costs change

Format: Decimal number, maximum 6 digits with 3 decimals

Description: Declared value of the product for shipping, customs, and insurance purposes. Generally your retail price to the public.

Examples:

  • “29.99”
  • “199.00”
  • “1.50”

Importance:

  • Used in customs forms for international shipments
  • Used to calculate package insurance during shipping
  • Appears on shipping documents if required

Note: If you don’t complete this field, some carriers may reject international shipments or apply default values.


Format: Decimal number (in pounds - lbs)

Description: Weight of individual product in its retail packaging (the one shipped to end customer).

Examples:

  • “0.5” (half pound)
  • “2.25” (2 pounds and a quarter)
  • “12.0” (12 pounds)

Importance:

  • Critical for calculating shipping cost
  • Verified in warehouse upon receipt (can be overridden if differs)
  • Used to select appropriate box type

Note: Warehouse can weigh product upon receipt and update this value if it differs significantly.


Format: Decimal number (in inches)

Description: The longest dimension of the product’s retail packaging.

Examples:

  • “12.5” (12.5 inches)
  • “8.0” (8 inches)
  • “24.75” (24 inches and three quarters)

Format: Decimal number (in inches)

Description: The second longest dimension of the retail packaging.

Examples:

  • “8.5”
  • “6.0”
  • “18.25”

Format: Decimal number (in inches)

Description: The shortest dimension of the retail packaging (generally height when standing).

Examples:

  • “2.5”
  • “4.0”
  • “10.75”

Importance of Dimensions:

  • Used to calculate dimensional weight (DIM weight) in shipments
  • Help select correct box size for shipping
  • Used to optimize warehouse space

Best Practices:

  • Measure product in its retail packaging (not bare product)
  • Be precise: 1 inch difference can change shipping cost
  • Round up if between two measurements

Format: Integer (no decimals)

Description: ADVANCED - If you complete this field, the system will automatically create a Replenishment Request with this quantity for each SKU.

Examples:

  • “100”
  • “500”
  • “1000”

How It Works:

  • System creates a replenishment with status “INCOMPLETE”
  • Groups all CSV SKUs into a single replenishment
  • Generates a RequestID that appears in upload results
  • You can review and edit the replenishment before confirming it

When to Use:

  • When uploading products you already ordered from supplier
  • To create purchase orders in bulk
  • To prepare scheduled receipts

Warning: Only use this field if you actually expect to receive inventory. Don’t use it just to create products without replenishment.


Format: Alphanumeric, maximum 255 characters (less than 15 recommended)

Description: ADVANCED - Name or code of your supplier. Associates the product with a specific supplier.

Examples:

  • “Acme Wholesale”
  • “PROV-001”
  • “Amazon Vendor”

How It Works:

  • If supplier doesn’t exist, system creates it automatically
  • Used to generate POs (purchase orders) automatically
  • Used in forecasting and reorder reports

Best Practices:

  • Use a consistent name for each supplier
  • Can be full name or short code
  • Configure suppliers manually in “Procedures” for full functionality

Format: Alphanumeric, maximum 25 characters

Description: ADVANCED - Advanced Shipping Notice number. If a shipment arrives in multiple boxes, each box with a different ASN is split into a separate replenishment.

Examples:

  • “ASN-2024-001”
  • “SHIPMENT-A”
  • “BOX-001”

When to Use:

  • Large shipments arriving in multiple pallets or boxes
  • When you need to process each box separately
  • For advanced tracking of complex shipments

Warehouse and Distribution Fields (Advanced)

Section titled “Warehouse and Distribution Fields (Advanced)”

Format: Alphanumeric, 1-5 characters

Description: ADVANCED - Code of the distribution center or warehouse where the product is stored.

Examples:

  • Leave empty = main warehouse (home warehouse)
  • “FBA” = Amazon FBA
  • “DC2” = Distribution Center 2
  • “MS” = MyShelf

How It Works:

  • Leave empty for ShipEdge’s main warehouse
  • Enter code if you handle multiple integrated DCs
  • If code doesn’t exist, automatically creates a “dropship code” (supplier)

Important:

  • Additional ShipEdge DCs are configured in: Account Prefs → Channel Automation → Fulfillment Centers
  • Dropship suppliers are configured in Suppliers view

Format: 1 letter + 3 numbers (example: A123)

Description: Only for MyShelf - The specific bin where the product is stored.

Examples:

  • “A001”
  • “B125”
  • “Z999”

When to Use:

  • Only if product is in MyShelf
  • Bin must exist previously in the system
  • Mainly used by clients with self-storage warehouse

Format: Integer

Description: Only for MyShelf - Quantity in good condition stored in MyShelf.

When to Use:

  • Only applicable to MyShelf products
  • To initialize inventory in MyShelf locations
  • Not used in standard ShipEdge warehouses

Product Families and Sets Fields (Advanced)

Section titled “Product Families and Sets Fields (Advanced)”

Format: Alphanumeric, maximum 40 characters

Description: ADVANCED - Creates or assigns the product to a SynSet (Product Family).

How It Works:

For Synonyms:

  • Use the same SynSet for equivalent SKUs
  • Example: If “WIDGET-A” and “WIDGET-B” are the same physical product, give them the same SynSet “WIDGET”
  • System will treat them as interchangeable

For Sets (Bundles/Kits):

  • Repeat the same SynSet for multiple rows (multiple SKUs)
  • Each SKU in the bundle must be in its own row with the same SynSet
  • System will create a bundle of all those SKUs

Examples:

CSV for a Synonym:

SKU,Description,SynSet
WIDGET-US,Widget for USA,WIDGET-GLOBAL
WIDGET-EU,Widget for Europe,WIDGET-GLOBAL

CSV for a Bundle (Kit):

SKU,Description,SynSet
SHIRT-RED,Red Shirt,SUMMER-KIT
SHORTS-BLUE,Blue Shorts,SUMMER-KIT
HAT-WHITE,White Hat,SUMMER-KIT

Warnings:

  • Creating SynSets in bulk is an advanced functionality
  • Recommended to create SynSets manually in the interface first to understand how they work
  • Don’t create SynSets and complex bundles simultaneously with new products (do in separate steps)

Format: Alphanumeric, maximum 40 characters (generally 6-10 digits)

Description: Harmonized System code for international trade. Required if you import or export products.

Examples:

  • “6109100040” (Cotton T-shirts)
  • “8471.30.01” (Laptop computers)
  • “9503.00.00” (Toys)

Importance:

  • Required for customs declarations in international shipments
  • Determines import tariffs and taxes
  • Varies by country (consult a customs expert if unsure)

Where to Find It:

  • Consult with your freight forwarder or customs broker
  • Use https://hts.usitc.gov/ for USA codes
  • Your international supplier can generally provide it

Format: 2-letter country code (ISO 3166-1 alpha-2)

Description: The country where the product was manufactured or produced. Required for import/export.

Examples:

  • “US” (United States)
  • “CN” (China)
  • “MX” (Mexico)
  • “DE” (Germany)

Importance:

  • Required on customs forms
  • Affects tariffs (USMCA, FTA, etc.)
  • May affect import regulations

Complete Code List: Search “ISO 3166-1 alpha-2” on Google for the complete list.


Format: Alphanumeric, maximum 40 characters

Description: Product model number or family (optional).

Examples:

  • “iPhone-14-Pro”
  • “MODEL-2024-A”
  • “GX-500”

When to Use:

  • To group related products by model
  • Useful in reports and filters
  • For additional identification

Format: Alphanumeric, maximum 40 characters

Description: Product manufacturer name (optional).

Examples:

  • “Apple”
  • “Samsung”
  • “Generic Manufacturer Inc.”

When to Use:

  • For manufacturer reports
  • For warranty tracking
  • For regulatory compliance

Format: Alphanumeric, maximum 40 characters

Description: Product category or family.

Examples:

  • “Electronics”
  • “Apparel”
  • “Home & Garden”
  • “Seasonal”

When to Use:

  • To group similar products
  • For sales reports by category
  • For specific fulfillment rules

Format: One letter: Y, N, or R

Description: Controls whether the product requires serial number tracking.

Options:

  • N or empty = No serial number control
  • Y = Outbound control (requires serial when shipping)
  • R = Inbound and outbound control (requires serial when receiving and shipping)

Usage Examples:

  • Y for electronics with warranty
  • R for medical devices
  • N for products without serial

Note: If you enable serial numbers, warehouse staff will need to scan or enter serials during receipt and/or shipping.


Format: Integer

Description: How many individual units come in a cardboard box (case pack or inner carton) from the supplier.

Examples:

  • “12” (box of 12 units)
  • “24” (box of 24 units)
  • “1” (product ships individually)

When to Use:

  • Products that come in sealed boxes (case packs)
  • To optimize receipt and put-away
  • For purchase orders based on cases instead of units

Practical Example:

  • Product: Water bottle
  • Case Qty: 24
  • When ordering 240 units = 10 cases

Format: Specific text (predefined options)

Description: VERY ADVANCED - Picking strategy for this product in the warehouse.

Available Options:

  • STANDARD: Maximum efficiency (default)
  • SAVE_SPACE: Save space (empty bins)
  • FIFO: First In First Out
  • LIFO: Last In First Out
  • FEFO: First Expire First Out
  • FLFO: First Lot# First Out
  • LLFO: Last Lot# First Out
  • BIN_ASC: By ascending bin (A001, A002, A003…)
  • BIN_DESC: By descending bin (Z999, Z998, Z997…)

When to Use:

  • FIFO: For perishable products (food, cosmetics)
  • FEFO: For products with expiration dates
  • SAVE_SPACE: For low-turnover products
  • STANDARD: For most products

Warning: Only change if you have a specific reason. STANDARD works well for 90% of cases.


Format: Y, Yes, N, No (default: No)

Description: Marks the product as “one-time use” - single-use product that won’t be reordered.

Examples:

  • Unique promotional products
  • Discontinued products being phased out
  • Project-specific temporary products

When to Use:

  • If you DON’T plan to reorder this product
  • To exclude from automatic forecasting
  • To identify temporary products

Format: Alphanumeric, maximum 10 characters each

Description: Custom optional fields for specific integration projects.

When to Use:

  • If your account has custom integrations
  • To store IDs from external systems
  • For tracking business-specific data

Examples:

  • ClientOpt1: Your ERP ID
  • ClientOpt2: Alternate supplier code
  • ClientOpt3: Special tag for rules

Note: Consult with your account manager before using these fields.


Format: Alphanumeric, maximum 40 characters. Separate words with pipe (|)

Description: Tags or labels for integration rules and advanced filters.
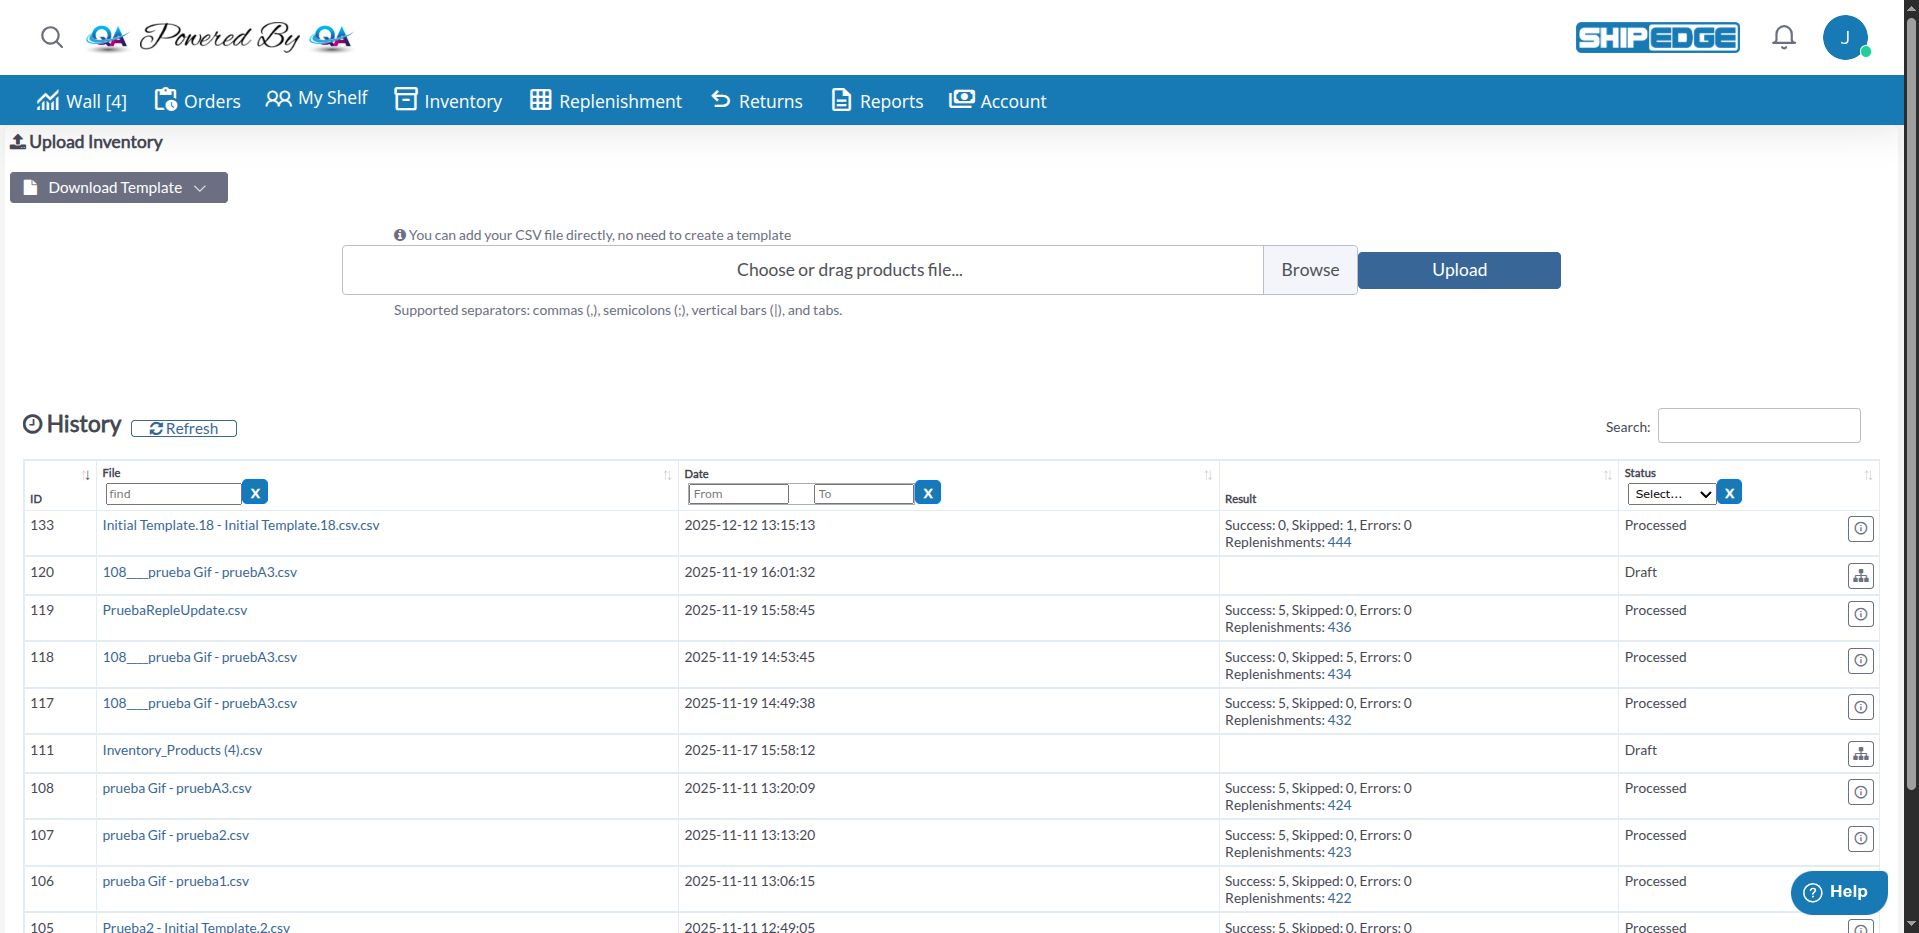
Correct Format:

tags
color|red|size|large
fragile|glass
electronic|warranty

When to Use:

  • For custom routing rules
  • For advanced filters in reports
  • For integrations that use tags

Format: Full URL, maximum 250 characters

Description: Direct URL to the product’s main image.

Examples:

https://example.com/images/product123.jpg
https://cdn.shopify.com/s/files/1/0123/4567/products/widget.png

Requirements:

  • Must be a full URL (start with http:// or https://)
  • Image must be publicly accessible
  • Supported formats: JPG, PNG, GIF
  • Recommended size: 800x800 px

Note: System downloads and stores image locally. If URL is invalid, product is created without image.


Format: Alphanumeric

Description: Product packaging type (optional, advanced use).

Examples:

  • “Box”
  • “Poly Bag”
  • “Envelope”
  • “Tube”

When to Use:

  • For automatic box type selection
  • For specific shipping rule compliance
  • For reporting by packaging type

Example 1: Basic CSV (Create Products Only)

Section titled “Example 1: Basic CSV (Create Products Only)”
SKU,Description,UPC,Cost,Declared,Weight,Length,Width,Height
WIDGET-001,"Blue Widget Large",012345678905,15.99,29.99,2.5,12,8,4
WIDGET-002,"Red Widget Small",012345678912,12.99,24.99,1.8,10,6,3
GADGET-001,"Electronic Gadget Pro",012345678929,45.50,89.99,5.2,14,10,6

Result: Creates 3 products without replenishment.


SKU,Description,Cost,Weight,Quantity,Supplier
PROD-100,"Product 100",10.00,1.5,500,Acme Wholesale
PROD-101,"Product 101",12.50,2.0,300,Acme Wholesale
PROD-102,"Product 102",8.75,1.0,1000,Acme Wholesale

Result:

  • Creates 3 products
  • Creates 1 replenishment with 500 units of PROD-100, 300 of PROD-101, and 1000 of PROD-102
  • Associates supplier “Acme Wholesale” (creates it if it doesn’t exist)

Example 3: CSV for International Shipments

Section titled “Example 3: CSV for International Shipments”
SKU,Description,Cost,Declared,Harmonization,CountryOfOrigin,Weight
SHIRT-RED-M,"Red T-Shirt Medium",5.00,19.99,6109100040,CN,0.5
LAPTOP-001,"Laptop 15 inch",450.00,899.99,8471300100,US,5.5
TOY-CAR-001,"Toy Car Racing",3.50,14.99,9503000000,MX,0.8

Result: Creates 3 products with complete customs information for international shipments.


Example 4: CSV with SynSets (Product Family)

Section titled “Example 4: CSV with SynSets (Product Family)”
SKU,Description,Cost,SynSet
WIDGET-US,"Widget for US Market",10.00,WIDGET-GLOBAL
WIDGET-EU,"Widget for EU Market",10.00,WIDGET-GLOBAL
WIDGET-ASIA,"Widget for Asian Market",10.00,WIDGET-GLOBAL

Result: Creates 3 different SKUs but all associated with the same SynSet “WIDGET-GLOBAL” (treated as synonyms).


Test with Small File First

Before uploading 5,000 products, test with 5-10 products to verify format and mapping are correct.

Use UTF-8 Encoding

Save your CSV with UTF-8 encoding to support special characters (accents, ñ, etc.). In Excel: “CSV UTF-8 (Comma delimited)”.

Avoid Special Characters in SKUs

Use only letters, numbers, and basic symbols (. - # / ~ & | ( ) + _). Avoid spaces, commas, quotes, and accents.

Don't Use Quotes or Commas in Descriptions

Quotes and commas inside fields can break CSV format. Use hyphens or parentheses instead.

Verify Before Checking 'Update SKU'

Updating existing SKUs is IRREVERSIBLE. If unsure, DO NOT check this option on first upload.

Save Your Mapping Templates

If you upload CSVs from the same supplier frequently, save the mapping as a template to reuse.

Complete Accurate Dimensions

1 inch difference in dimensions can significantly change shipping costs by dimensional weight.

Review Upload History Results

Always review details of completed upload to see if there were errors or warnings.

Problem: System rejects the file when trying to upload it.

Solutions:

  1. Check extension: Must be .csv, not .xlsx or .txt
  2. Save correctly:
    • Excel: File → Save As → CSV UTF-8 (Comma delimited)
    • Google Sheets: File → Download → Comma-separated values (.csv)
  3. Don’t rename an Excel file to .csv: Must save/export as CSV properly

Problem: System detects special characters in SKUs that may cause integration issues.

Allowed Characters: a-z A-Z 0-9 . - # / ~ & | ( ) + _

NOT Allowed Characters: á é í ó ú ñ @ $ % ^ * , " ' and other symbols

Solution:

  1. Review your SKU column
  2. Replace special characters:
    • “SKU#001” → OK
    • “SKU@001” → ERROR (replace @ with -)
    • “SKU,001” → ERROR (replace , with -)
  3. Save CSV again and upload

Error: “The CSV header-name and/or the order of the columns does not meet our requirements”

Section titled “Error: “The CSV header-name and/or the order of the columns does not meet our requirements””

Problem: CSV columns don’t match the expected template.

Solution:

  1. Use Column Mapping: System will redirect you to mapping page
  2. Manually connect each CSV column with ShipEdge fields
  3. Save mapping as template for future uploads
  4. Or: Download official template and reorganize your data to match exactly

Problem: “No records found” or “SKUs not created”

Section titled “Problem: “No records found” or “SKUs not created””

Problem: Upload completes but no products were created.

Common Causes:

  1. Empty CSV: Only has headers, no data rows
  2. Incorrect format: Rows weren’t detected correctly
  3. Errors in all rows: All SKUs had errors

Solution:

  1. Open CSV in plain text editor (Notepad, Sublime)
  2. Verify each row has data below headers
  3. Verify separator (must be comma, semicolon, pipe, or tab)
  4. Review upload “Details” to see specific errors

Problem: Included Quantity column but replenishment wasn’t generated.

Common Causes:

  1. All SKUs already exist: If you DIDN’T check “Update SKU”, existing SKUs are ignored and no replenishment is created
  2. Quantities are 0 or empty: If quantities are 0, there’s no replenishment to create
  3. Processing error: Review upload details to see errors

Solution:

  1. If you want to create replenishment for existing SKUs, check “Update SKU data”
  2. Verify quantities are greater than 0
  3. Review “Details” link - if replenishment was created, RequestID will appear there

Problem: “Duplicate value for primary key”

Section titled “Problem: “Duplicate value for primary key””

Problem: A SKU already exists and you didn’t check update option.

Solution:

  • If you want to update existing SKU, upload again checking “Update SKU data if already in Shipedge”
  • If you only want to create new SKUs, remove existing SKU rows from CSV

Problem: Some Products Created, Others Didn’t

Section titled “Problem: Some Products Created, Others Didn’t”

Problem: Upload completed partially - some SKUs created, others didn’t.

Solution:

  1. Click upload “Details”
  2. Review error list
  3. Common errors per row:
    • Invalid SKU (special characters)
    • Empty Description (required)
    • Incorrect number format (Cost, Weight, etc.)
    • Duplicate SKU in same CSV
  4. Fix SKUs with errors
  5. Create a new CSV ONLY with failed SKUs
  6. Upload again

Problem: Status Stuck in “Processing” for Long Time

Section titled “Problem: Status Stuck in “Processing” for Long Time”

Problem: Upload has been in “Processing” or “In queue” for more than 30 minutes.

Solution:

  1. For large files (5,000+ products), processing can take 30-60 minutes - this is normal
  2. Refresh page (F5) to see if status changed
  3. If more than 1 hour:
    • Contact support
    • Process may have stalled
    • Support can restart processing

Problem: Update Overwrote Data I Didn’t Want to Change

Section titled “Problem: Update Overwrote Data I Didn’t Want to Change”

Problem: Checked “Update SKU” and some fields were deleted or changed unintentionally.

Explanation: When updating an existing SKU, ALL CSV fields overwrite current values. If a field is empty in CSV, it overwrites with empty.

Prevention:

  1. If you only want to update some fields, include ALL SKU fields in CSV (not just ones you want to change)
  2. Export your current products first:
    • Go to Products view
    • Export to CSV
    • Use that CSV as base to update
  3. Test with few products first before updating in bulk

Solution IF it already happened:

  • Unfortunately, there’s no “undo”
  • You’ll need to reload correct values
  • For future, always test with 2-3 products first

Case 1: Initial Setup - Load Entire Catalog

Section titled “Case 1: Initial Setup - Load Entire Catalog”

Scenario: New client who needs to load 500 products when starting with ShipEdge.

  1. Export your product list from your current system (ERP, e-commerce, Excel)
  2. Download ShipEdge template
  3. Prepare a CSV file combining your data with ShipEdge format
  4. Include columns: SKU, Description, UPC, Cost, Declared, Weight, Length, Width, Height
  5. Test first with 10 products
  6. Verify they were created correctly
  7. Upload complete file (DO NOT check “Update SKU” since they’re new products)
  8. Wait for processing (15-20 minutes for 500 products)
  9. Review Details to confirm all were created

Scenario: Your supplier increased prices and you need to update 200 products.

  1. Go to Products → Export to CSV
  2. Download CSV of your current products
  3. Open in Excel
  4. Update only Cost column with new prices
  5. Save as CSV
  6. Upload file
  7. Check “Update SKU data if already in Shipedge”
  8. System updates costs for all SKUs

Important: Include all columns from original export, not just SKU and Cost. This avoids overwriting other data with empty.


Case 3: Create Products + Replenishment Simultaneously

Section titled “Case 3: Create Products + Replenishment Simultaneously”

Scenario: Ordered 50 new products from a supplier and need to create them in ShipEdge + create replenishment.

  1. Prepare a CSV with:
    • SKU, Description, Cost, Weight (minimum)
    • Quantity: Quantities you ordered for each SKU
    • Supplier: Supplier name
  2. Upload CSV (DO NOT check “Update” because they’re new products)
  3. System:
    • Creates 50 products
    • Creates 1 replenishment with 50 SKUs and their quantities
    • Associates replenishment with supplier
  4. In upload Details, you’ll see link to created replenishment RequestID
  5. Click RequestID to review and edit replenishment
  6. Complete additional information (PO#, Tracking#, Expected Date)
  7. Update status to IN-TRANSIT when supplier ships

Scenario: Have 300 products in Shopify and want to import them to ShipEdge.

  1. In Shopify Admin: Products → Export → CSV
  2. Download Shopify CSV
  3. In ShipEdge, upload Shopify CSV directly
  4. System detects it’s not standard format
  5. Redirects you to Column Mapping
  6. Connect columns:
    • “Variant SKU” → Sku
    • “Title” → Description
    • “Variant Price” → Retail (Declared)
    • “Image Src” → ImageUrl (optional)
  7. Save mapping as “Shopify Import Template”
  8. Process file
  9. Next time: Select “Shopify Import Template” and mapping applies automatically

Note: ShipEdge automatically creates two default templates:

  • “Shopify Default”
  • “Initial Template”

If your CSV matches Shopify’s standard export, mapping is automatic.


Scenario: Need to update weight and dimensions of 20 SKUs that received updated information from supplier.

  1. Create a CSV with ONLY those 20 SKUs
  2. Include ALL columns (SKU, Description, Cost, etc.), not just ones you want to change
  3. Update only Weight, Length, Width, Height with new values
  4. Leave other fields with their current values
  5. Upload CSV
  6. Check “Update SKU data if already in Shipedge”
  7. System updates only those 20 SKUs

Tip: First export those 20 specific SKUs using filters in Products view, update exported CSV, and reload it.


All your uploads are saved in history. You can access it from:

  • Same Upload Inventory view (table at bottom)
  • “View History” link on upload page
  • Menu: Master Upload Inventory → View History

Each row shows:

  • ID: Unique upload ID
  • File: Name of uploaded CSV file
  • Date: Upload date and time
  • Result: Result summary (success, errors, warnings)
  • Status: Draft, In queue, Processing, Completed, Error
  • Details: View complete upload details (products created, errors, generated replenishments)
  • Delete: Delete record from history (doesn’t delete created products)

Next Steps:

See Also:

Complete Setup Process:

  1. Bulk Upload Inventory ← You are here
  2. Review Products → See Product Management
  3. Configure Suppliers → Suppliers documentation (coming soon)
  4. Setup Replenishments → See Creating Replenishment Requests

Download from Upload Inventory view:

  • Standard Template: MASTE-Import_Inventory_description.csv
  • Extended Template: MASTE-Import_Inventory_description_extended.csv

System automatically detects:

  • Commas: ,
  • Semicolons: ;
  • Pipe (vertical bar): |
  • Tab: \t
  • Maximum file size: 50 MB
  • Maximum recommended rows: 10,000 per file
  • Estimated processing time:
    • 100 products: ~1 minute
    • 500 products: ~3-5 minutes
    • 1,000 products: ~7-10 minutes
    • 5,000 products: ~30-40 minutes
    • 10,000 products: ~60-90 minutes

Tip: If you have more than 10,000 products, split into multiple files for faster processing and easier troubleshooting.