Skip to content

Uploading Orders (CSV)

Uploading orders via CSV lets you import many orders at once instead of creating them one by one. This saves time when you have orders from spreadsheets, external systems, or bulk order files. The system guides you through uploading the file, mapping columns to ShipEdge fields, and processing the orders.

Upload Orders Overview

Bulk Import

Import hundreds or thousands of orders at once instead of entering them manually one by one.

Flexible Format

Map your CSV columns to ShipEdge fields, so you can use files from different sources or formats.

Template Support

Download pre-configured templates that match your integration or create custom templates for your workflow.

Error Tracking

Get detailed reports showing which orders imported successfully and which had errors, with downloadable error files.

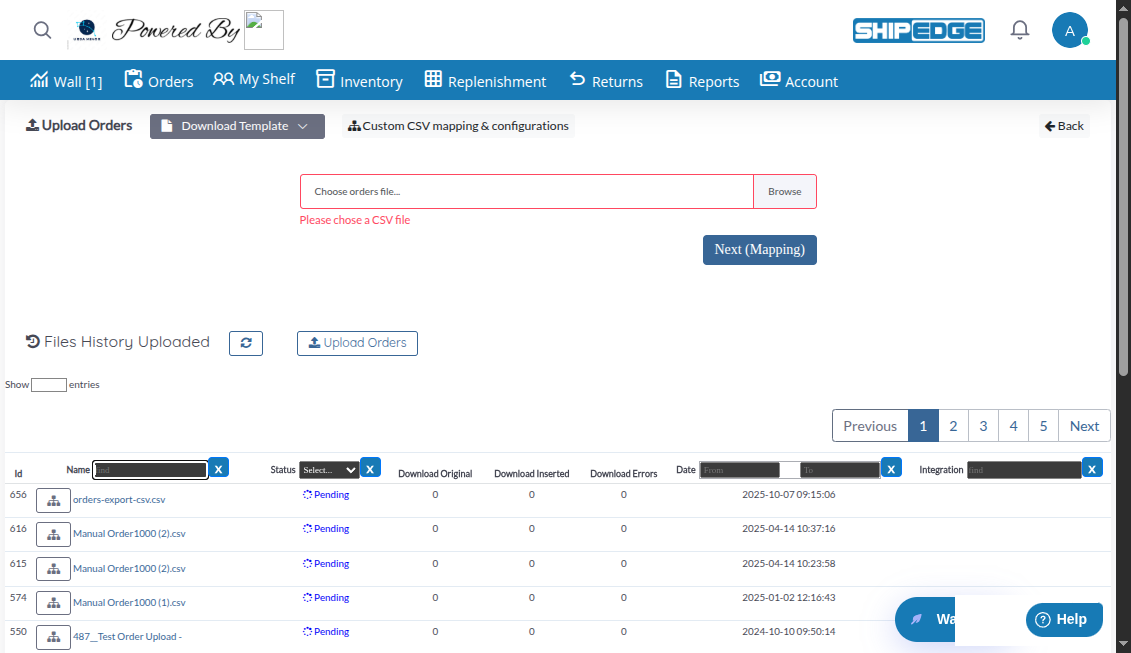
  1. Navigate to Upload Orders

    Go to Orders in the main menu, then click Upload Orders. Or navigate directly to /UploadOrdersFileadd_new.php.

  2. Download a Template (Optional but Recommended)

    Click the Download Template dropdown button to see available templates. Choose a template that matches your file format. This helps you understand the expected column structure.

  3. Choose Your CSV File

    Click Choose orders file… and select your CSV file from your computer. The file must be a .csv format. After selecting, the filename will appear next to the button.

  4. Start the Upload Process

    Click Next (Mapping) to upload the file and proceed to the column mapping screen. The system will upload your file and analyze its structure.

  5. Map CSV Columns to ShipEdge Fields

    On the mapping screen (configUploadOrders.php), you’ll see:

    • Left side: Your CSV file columns
    • Right side: ShipEdge system fields
    • Template selector: Choose a saved template or configure manually

    Drag and drop or click to connect CSV columns to ShipEdge fields. Required fields include:

    • Order Number (orderNum)
    • Customer First Name (custFName)
    • Customer Address (custAddress1)
    • Customer City (custCity)
    • Customer State (custState)
    • Customer Zip (custZip)
    • Customer Country (custCountry)
    • Shipping Method (orderShipMethod)
    • SKU (SKUi) - for product items
    • Quantity (QTYi) - for product quantities
  6. Configure Header Line

    In the right panel, set the header Line number (usually 1). If your file has no headers, set this to 0. The system will use this line to identify column names.

  7. Select or Save Template Configuration

    • Use the Config header (Template) dropdown to select a saved template if one matches your file format
    • Or configure manually by mapping each column
    • Click Save as… to save your mapping as a new template for future use
  8. Process the Upload

    Click Upload to start processing your orders. The system will:

    • Validate each order against ShipEdge rules
    • Check for duplicate order numbers
    • Verify products exist in your inventory
    • Validate addresses and shipping methods
    • Create orders that pass validation
    • Generate error reports for failed orders
  9. Review Results

    Return to the Upload Orders page to see your file in the Files History Uploaded table. Check the status:

    • Pending: File uploaded, waiting to process
    • In queue: File is queued for processing
    • Processing: Currently being processed
    • Processed: Completed (green icon shows success, half-battery icon shows some errors)
    • Error: Processing failed
  10. Download Results

    Once processing is complete, you can download:

    • Download Original: Your original uploaded file
    • Download Inserted: CSV file with successfully imported orders
    • Download Errors: CSV file showing orders that failed with error details

Your CSV file should:

  • Use comma (,) as the delimiter
  • Have column headers in the first row (or specify the header row number)
  • Include required order fields (order number, customer info, address, shipping method)
  • Include product information (SKU and quantity columns)

Single-Line Format (OrderMultiple = N):

  • Each row represents one complete order
  • All products for an order are in the same row
  • Use multiple SKU/Qty column pairs (SKU1, QTY1, SKU2, QTY2, etc.)

Multi-Line Format (OrderMultiple = Y):

  • Multiple rows can belong to the same order
  • Order number repeats for each product line
  • One SKU and QTY column pair is sufficient
  • System groups rows by order number

These fields must be mapped for orders to import successfully:

FieldDescriptionExample
orderNumUnique order numberORD-12345
custFNameCustomer first nameJohn
custAddress1Street address123 Main St
custCityCityNew York
custStateState/ProvinceNY
custZipPostal/Zip code10001
custCountryCountry name or codeUnited States or US
orderShipMethodShipping method codeUPS Ground
SKUiProduct SKUPROD-001
QTYiQuantity2

You can also map these fields if your CSV includes them:

  • Customer last name (custLName)
  • Customer email (custEmail)
  • Customer phone (custPhone)
  • Customer company (custCompany)
  • Address line 2 (custAddress2)
  • Order reference (orderRef)
  • Order comments (orderComments)
  • Billing address fields (custBillFName, custBillAddress1, etc.)
  • COD amount (orderCOD)
  • Insurance amount (orderInsurance)

The Files History Uploaded table shows all your upload attempts:

  • Id: Unique file identifier
  • Name: Original filename
  • Status: Current processing status
  • Download Original: Link to download your original file
  • Download Inserted: Link to successfully imported orders (CSV)
  • Download Errors: Link to failed orders with error details (CSV)
  • Date: Upload date and time
  • Integration: Associated integration name (if any)
  • Pending (blue spinner): File uploaded, ready to process
  • In queue (gray icon): File is queued for background processing
  • Processing (orange spinner): Currently being processed
  • Processed (green battery): All orders imported successfully
  • Processed (green half-battery): Some orders imported, some had errors
  • Error (red X): Processing failed completely

Use Templates

Download and use templates that match your file format. Save your mappings as templates to reuse them later.

Validate Before Upload

Check that your CSV has all required fields and that order numbers are unique. Verify SKUs exist in your inventory.

Test with Small Files

Start with a small test file (5-10 orders) to verify your mapping works correctly before uploading large batches.

Review Error Files

Always download and review error files to understand why orders failed. Fix issues and re-upload corrected data.

Check Shipping Methods

Ensure shipping method codes in your CSV match exactly with shipping methods configured in ShipEdge.

Verify Country Codes

Use standard country names or ISO codes (2-letter or 3-letter) that ShipEdge recognizes.

“Please chose a CSV file” error

  • Make sure your file has a .csv extension
  • Verify the file isn’t corrupted
  • Try opening the file in a text editor to check format

Orders not importing

  • Check the error file download to see specific validation errors
  • Verify all required fields are mapped correctly
  • Ensure order numbers are unique (not duplicates)
  • Check that SKUs exist in your product catalog

“Shipping method not found” errors

  • Verify shipping method codes match exactly with methods in ShipEdge
  • Check that shipping methods are active and visible
  • Review shipping method configuration in Settings

“Country not found” errors

  • Use standard country names (e.g., “United States” not “USA”)
  • Or use ISO country codes (2-letter: “US” or 3-letter: “USA”)
  • Check the country exists in ShipEdge’s country list

“Address empty” errors

  • Ensure address fields are mapped correctly
  • Check that address data isn’t empty in your CSV
  • Verify address line 1 and address line 2 mapping

Processing stuck in “Pending” or “Processing”

  • Large files may take time to process
  • Check if background job processing is running
  • Refresh the page to see updated status
  • Contact support if status doesn’t change after extended time

If you continue to have issues:

  1. Download the error CSV file to see detailed error messages
  2. Check that your CSV format matches the template
  3. Verify all required fields are present and mapped
  4. Review the mapping configuration for typos or incorrect connections
  5. Contact ShipEdge support with your file ID and error details