The Upload Orders Configuration screen lets you map your CSV file columns to ShipEdge system fields. This visual mapping interface helps you connect your file structure to ShipEdge’s order fields, save templates for reuse, and set default values for optional fields. After uploading a CSV file, you’ll automatically see this configuration screen to set up your column mapping.
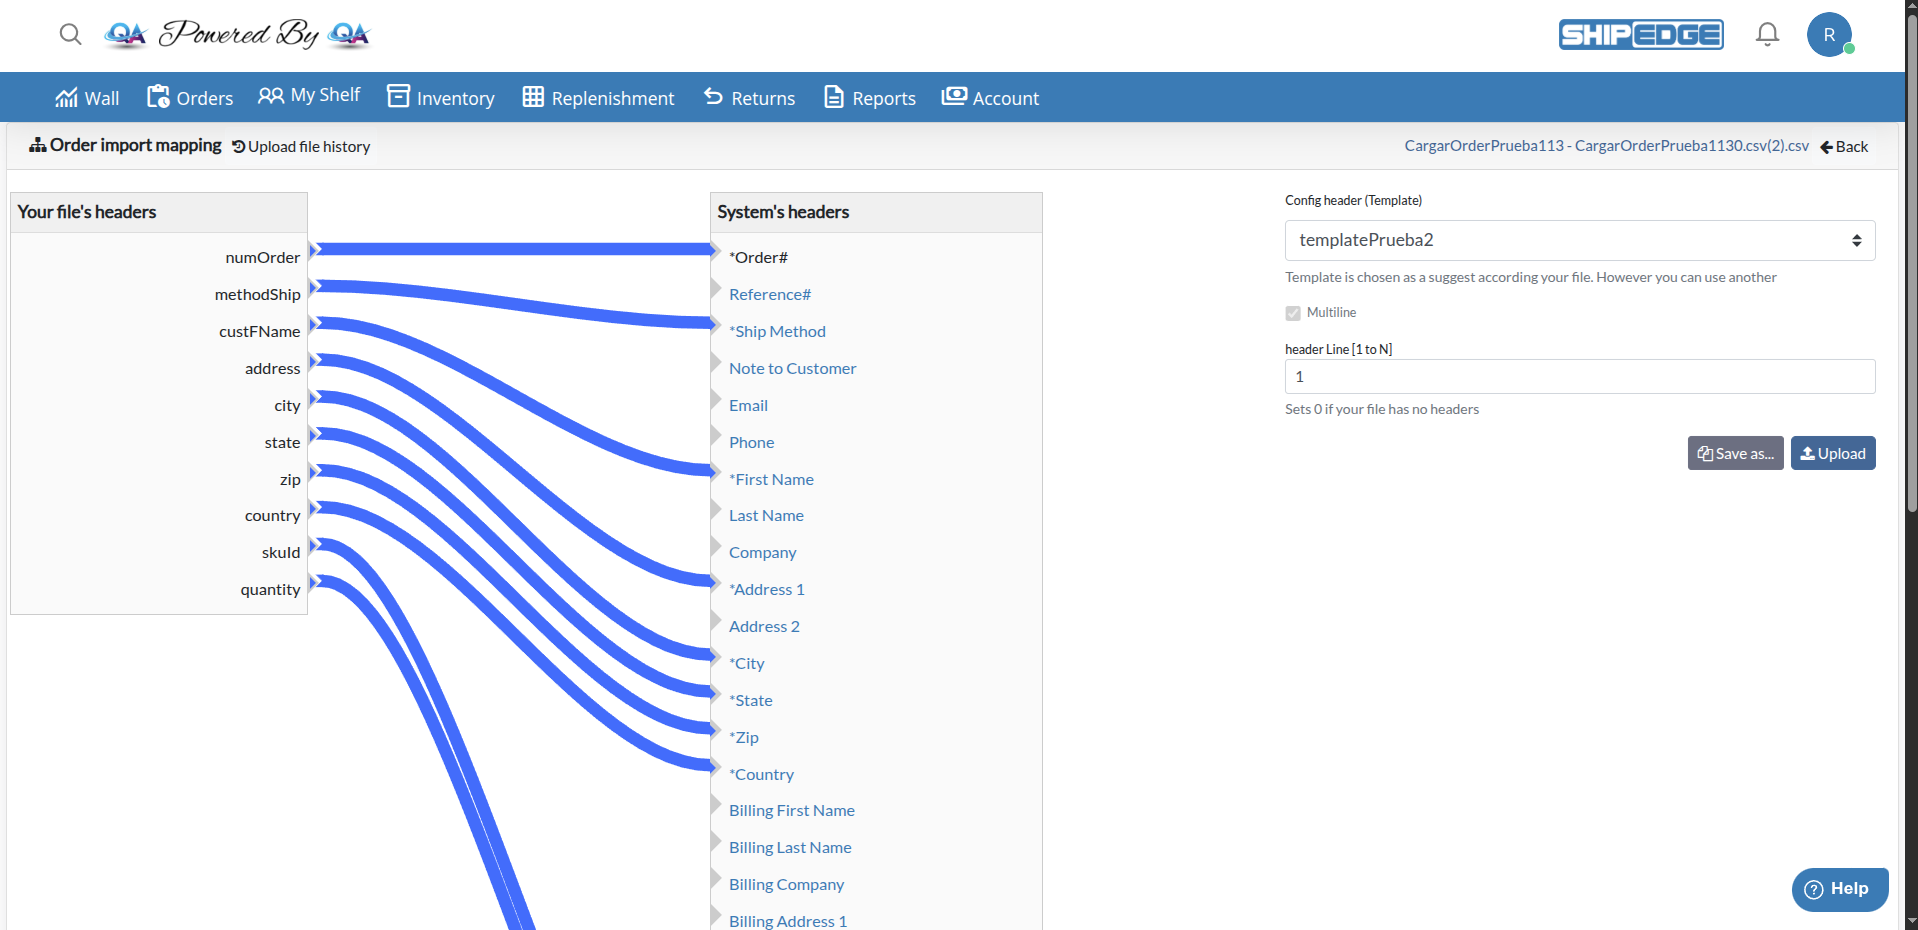
Use the drag-and-drop flowchart interface to visually connect CSV columns to ShipEdge fields. See all mappings at a glance.
Save your mapping configurations as templates to reuse them for future uploads. Templates speed up repeated imports from the same source.
Support different CSV formats - single-line orders, multi-line orders, files with or without headers. Configure each format once and reuse.
Set default values for optional fields that aren’t in your CSV. This ensures consistent data without modifying your source files.
The configuration screen appears automatically after you upload a CSV file. It has two main sections:
The flowchart shows:
- Left column: Your CSV file headers (from your uploaded file)
- Right column: ShipEdge system fields (available order fields)
- Connecting lines: Mapped relationships between CSV columns and system fields
Contains controls for:
- Config header (Template): Select or create template configurations
- Multiline: Toggle for multi-line order format
- header Line: Specify which row contains column headers
- Save as…: Save current mapping as a new template
- Upload: Process the file with current configuration
-
Access the Configuration Screen
After uploading a CSV file from the Upload Orders page, you’ll automatically be redirected to the configuration screen. The filename appears at the top right of the page.
-
Review the Suggested Template
The system analyzes your CSV file and automatically suggests a matching template. The template dropdown shows the suggested template name. Review the automatic mappings shown in the flowchart.
-
Select a Different Template (Optional)
If you have saved templates that better match your file format:
- Open the Config header (Template) dropdown
- Select a different template from the list
- The mapping will update automatically to show that template’s configuration
-
Set the Header Line Number
In the header Line [1 to N] field:
- Enter the row number where your column headers are located (usually
1)
- If your file has no headers, enter
0
- The system will validate the header row and update the mapping
-
Map CSV Columns to System Fields
In the visual flowchart:
- To create a mapping: Click and drag from a CSV column (left side) to a system field (right side)
- To remove a mapping: Click the connecting line and delete it, or click the system field to disconnect
- Required fields are marked with an asterisk (*) in the system fields column
-
Configure Multiline Format (If Needed)
If your CSV uses multiple rows per order:
- Check the Multiline checkbox
- This tells the system to group rows by order number
- Uncheck if each row represents one complete order
-
Set Default Values (Optional)
For system fields that aren’t mapped to CSV columns:
- Click on the system field name in the right column
- Enter a default value in the popup dialog
- Click Save to apply
- Fields with default values show in green
-
Verify Required Fields
Before uploading, ensure all required fields are mapped:
- Order# (
orderNum)
- First Name (
custFName)
- Address 1 (
custAddress1)
- City (
custCity)
- State (
custState)
- Zip (
custZip)
- Country (
custCountry)
- Ship Method (
orderShipMethod)
- Item: SKU (
SKUi)
- Item: SKU’s Quantity (
QTYi)
-
Save Configuration as Template (Optional)
To reuse this mapping later:
- Click Save as…
- Enter a descriptive name for your template
- Click Save
- The template will appear in the template dropdown for future uploads
-
Process the Upload
Click Upload to start processing:
- The system validates your configuration
- Checks that all required fields are mapped
- Confirms you want to proceed
- Starts processing your orders in the background
- Redirects you to the Upload Orders page to monitor progress
These fields must be mapped for orders to import successfully:
| System Field | Display Name | Description |
|---|
orderNum | Order# | Unique order identifier |
custFName | First Name | Customer’s first name |
custAddress1 | Address 1 | Street address line 1 |
custCity | City | City name |
custState | State | State or province |
custZip | Zip | Postal/ZIP code |
custCountry | Country | Country name or code |
orderShipMethod | Ship Method | Shipping method code |
SKUi | Item: SKU | Product SKU |
QTYi | Item: SKU’s Quantity | Product quantity |
You can map these fields if your CSV includes them:
Customer Information:
custLName - Last NamecustEmail - EmailcustPhone - PhonecustCompany - CompanycustAddress2 - Address 2
Order Details:
orderRef - Reference#orderComments - Note to CustomerorderCOD - COD AmountorderInsurance - Insurance amountorderReqSignature - Require signature?TotalCharge - Total ChargeCustComments - Note to Warehouse
Billing Address:
custBillFName - Billing First NamecustBillLName - Billing Last NamecustBillCompany - Billing CompanycustBillAddress1 - Billing Address 1custBillAddress2 - Billing Address 2custBillCity - Billing CitycustBillState - Billing StatecustBillZip - Billing ZipcustBillCountry - Billing Country
Product Details:
ItemCost - Item: SKU’s Sold Price
Other:
Residential - Residential flagCheckoutDate - Checkout DateChannelID - Selling Channel
Templates store complete mapping configurations for reuse:
- System Templates: Templates marked as “controlled by Administrator” are read-only system templates
- User Templates: Templates you create can be edited and deleted
- Auto-Suggestion: The system automatically suggests the best matching template based on your CSV headers
- Configure your column mappings
- Set header line and multiline options
- Optionally set default values
- Click Save as…
- Enter a descriptive name (e.g., “Amazon Orders”, “Shopify Export”)
- Click Save
The template is saved and available for future uploads.
- Templates remember all column mappings
- Templates store header line number
- Templates save multiline format setting
- Templates include default values you’ve set
- Templates are account-specific (your templates don’t affect other accounts)
- Each CSV row represents one complete order
- All products for an order are in the same row
- Use multiple SKU/Qty column pairs (SKU1, QTY1, SKU2, QTY2, etc.)
- Best for: Simple order files, spreadsheets with all data in one row
- Multiple CSV rows can belong to the same order
- Order number repeats for each product line
- One SKU and QTY column pair is sufficient
- System groups rows by order number automatically
- Best for: Files with one product per row, detailed order exports
- Set header Line to
0
- System will use generic column names (Column 1, Column 2, etc.)
- You can still map these generic columns to system fields
- Note: Cannot save configurations without headers as templates
Set default values for fields that aren’t in your CSV but should have consistent values:
Common Use Cases:
- Set default shipping method for all orders
- Set default country if all orders ship to one country
- Set default channel ID for integration tracking
- Set default warehouse or other system values
How to Set:
- Click on a system field name in the right column
- Enter the default value in the popup
- Click Save
- The field name turns green to indicate a default is set
To Remove:
- Click the field name again
- Clear the value
- Click Save
Name templates clearly (e.g., “Amazon US Orders”, “Shopify Multi-Line”) so you can quickly identify the right template for each file type.
Configure mapping with a small test file (5-10 orders) to verify everything works before processing large batches.
Always ensure all required fields are mapped before uploading. The system will prevent upload if required fields are missing.
Double-check that the header line number matches your file. If mapping looks wrong, try a different line number.
Save working configurations as templates immediately. This saves time on future uploads from the same source.
Set default values for fields that are truly consistent across all orders. Avoid defaults that might mask data issues.
“Some columns have to match with your File” error
- Cause: Required fields are not mapped
- Solution: Map all required fields (marked with *) before uploading
- Check: Look for unmapped required fields in the system fields column
“File contains over 50 headers” error
- Cause: CSV file has more than 50 columns
- Solution: Reduce columns in your CSV file to 50 or fewer
- Note: This is a system limitation to ensure processing performance
“Your header csv in position X is invalid” error
- Cause: The specified header line contains empty or invalid headers
- Solution: Try a different line number, or set to 0 if file has no headers
- Check: Open your CSV file and verify which line contains valid column names
“Apparently your first file line is not the header” message
- Cause: System couldn’t find valid headers in the first line
- Solution: Enter the correct line number in header Line field
- Alternative: Set to 0 if your file has no headers
Template dropdown is disabled
- Cause: File structure couldn’t be analyzed
- Solution: Check that your CSV file is valid and has proper formatting
- Check: Verify the file opens correctly in a spreadsheet application
Cannot connect CSV column to system field
- Cause: Field might already be mapped, or connection failed
- Solution: Try clicking and dragging again, or delete existing connection first
- Check: Ensure you’re dragging from CSV column (left) to system field (right)
Default value not saving
- Cause: Field might be a system-controlled template field
- Solution: Only user-created templates allow default value changes
- Check: Look for “controlled by Administrator” warning message
Mapping disappears after selecting different template
- Cause: This is normal - templates have their own mappings
- Solution: Save your custom mapping as a new template before switching
- Tip: Use “Save as…” before experimenting with different templates
If configuration issues persist:
- Verify your CSV file format matches expected structure
- Check that column headers match what you’re trying to map
- Ensure required fields are present in your CSV or set as defaults
- Try creating a new template from scratch
- Contact ShipEdge support with your file structure and error details