Save Time with Bulk Actions
Perform actions on multiple orders at once instead of editing them individually. Cancel, hold, release, or route dozens of orders in seconds.
Manage multiple orders at once using bulk actions, advanced filtering, and export capabilities. Save time by performing actions on many orders simultaneously instead of handling them one by one.
Perform actions on multiple orders at once instead of editing them individually. Cancel, hold, release, or route dozens of orders in seconds.
Use powerful filters and search to locate specific orders by status, date, customer, or order number. Save filter combinations for instant access.
Export order data to CSV format for analysis, reporting, or integration with external systems. Export up to 5,000 records at a time.
Use filters and bulk actions to organize orders by priority, status, or fulfillment location. Process similar orders together efficiently.
Before performing bulk actions, you need to select the orders you want to manage:
Navigate to Orders List
Go to Orders from the main menu. The orders list displays all your orders in a table format.
Select Individual Orders
Check the checkbox in the leftmost column next to each order you want to include in your bulk action.
Select All Visible Orders
Check the Select All checkbox in the table header to select all orders currently visible on the page. This selects all orders matching your current filters.
Verify Selection
The number of selected orders appears near the actions menu. Make sure you’ve selected the correct orders before proceeding.
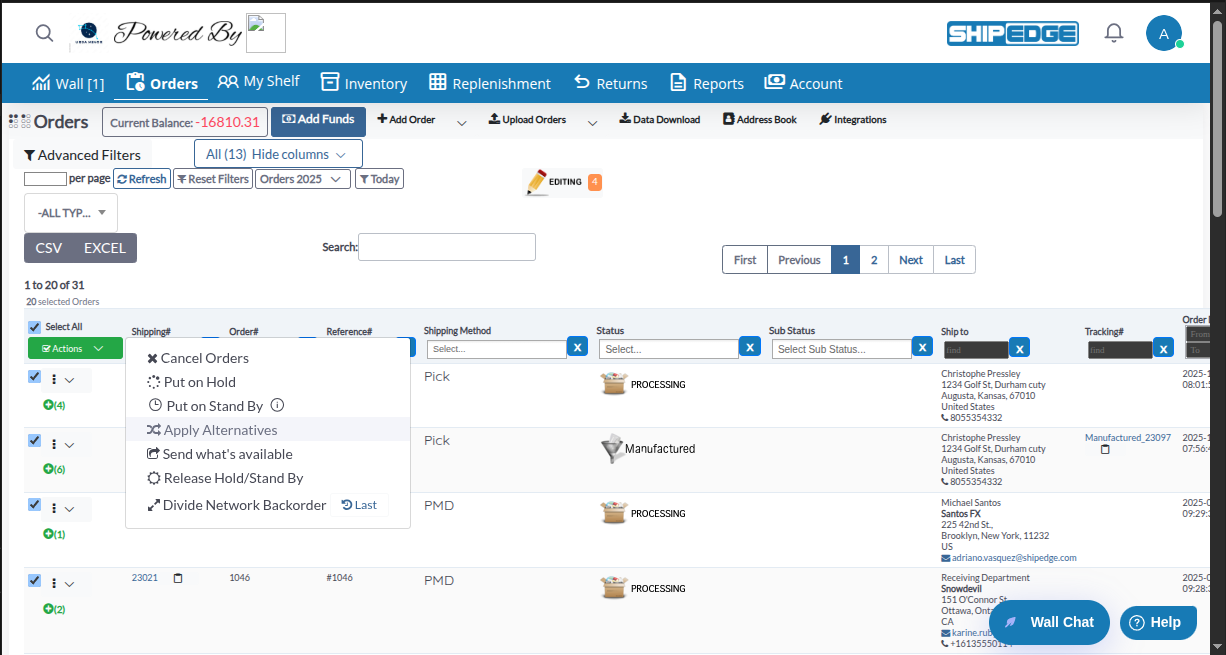
Once you’ve selected orders, click the Actions dropdown menu to access bulk operations:
Cancel multiple orders at once. Only orders in specific statuses can be canceled:
Eligible Statuses:
Select Orders to Cancel
Check the boxes next to orders you want to cancel. Only orders in eligible statuses will be processed.
Open Actions Menu
Click the Actions dropdown button (with checkmark icon) above the table.
Choose Cancel Orders
Click Cancel Orders from the dropdown menu.
Confirm Cancellation
Review the confirmation message. Orders that cannot be canceled will be skipped automatically.
Temporarily pause processing for multiple orders. This prevents orders from moving forward in the fulfillment workflow.
Select Orders
Check the boxes next to orders you want to put on hold.
Open Actions Menu
Click the Actions dropdown button.
Choose Put on Hold
Click Put on Hold from the dropdown menu.
Orders Updated
Selected orders change to Hold status and processing stops until you release them.
Use Put on Hold when:
Place orders on Stand By status. Stand By is a long-term hold that does not reserve inventory.
Eligible Statuses:
Select Orders
Check the boxes next to orders eligible for Stand By status.
Open Actions Menu
Click the Actions dropdown button.
Choose Put on Stand By
Click Put on Stand By from the dropdown menu. A tooltip explains that Stand By doesn’t reserve inventory.
Orders Updated
Selected orders change to Stand By status.
Release multiple orders from Hold or Stand By status to resume normal processing.
Requirements:
Select Held Orders
Check the boxes next to orders in Hold or Stand By status.
Open Actions Menu
Click the Actions dropdown button.
Choose Release Hold/Stand By
Click Release Hold/Stand By from the dropdown menu.
Orders Resume Processing
Selected orders return to their previous status (usually Pending) and continue normal processing.
Automatically substitute out-of-stock items with alternative products for multiple backorders.
Select Backorders
Check the boxes next to orders with backordered items that have alternatives configured.
Open Actions Menu
Click the Actions dropdown button.
Choose Apply Alternatives
Click Apply Alternatives from the dropdown menu.
Alternatives Applied
The system automatically replaces out-of-stock items with configured alternatives where available.
Use Apply Alternatives when:
Ship partial orders for multiple orders when some items are available but others are backordered.
Select Orders
Check the boxes next to orders with partial availability.
Open Actions Menu
Click the Actions dropdown button.
Choose Send what’s available
Click Send what’s available from the dropdown menu.
Partial Shipments Created
Available items ship immediately; backordered items remain for later fulfillment.
Assign multiple orders to specific distribution centers or warehouses. This feature is only available if your account has distribution centers configured.
Select Orders
Check the boxes next to orders you want to route.
Open Actions Menu
Click the Actions dropdown button.
Choose Route Orders
Click Route Orders from the dropdown menu.
Select Destination
Choose the distribution center or warehouse where orders should be fulfilled.
Orders Routed
Selected orders are assigned to the chosen location for fulfillment.
Remove routing assignments from multiple orders, returning them to unassigned status.
Select Routed Orders
Check the boxes next to orders that are currently routed to distribution centers.
Open Actions Menu
Click the Actions dropdown button.
Choose Cancel Routing
Click Cancel Routing from the dropdown menu.
Routing Removed
Orders return to unassigned status and can be routed again if needed.
Split network backorders into individual orders. This feature is only available if logistic centers are activated for your account.
Select Network Backorders
Check the boxes next to orders in Network Backorder status.
Open Actions Menu
Click the Actions dropdown button.
Choose Divide Network Backorder
Click Divide Network Backorder from the dropdown menu.
Monitor Progress
A progress indicator shows the division progress. This process may take time for large batches.
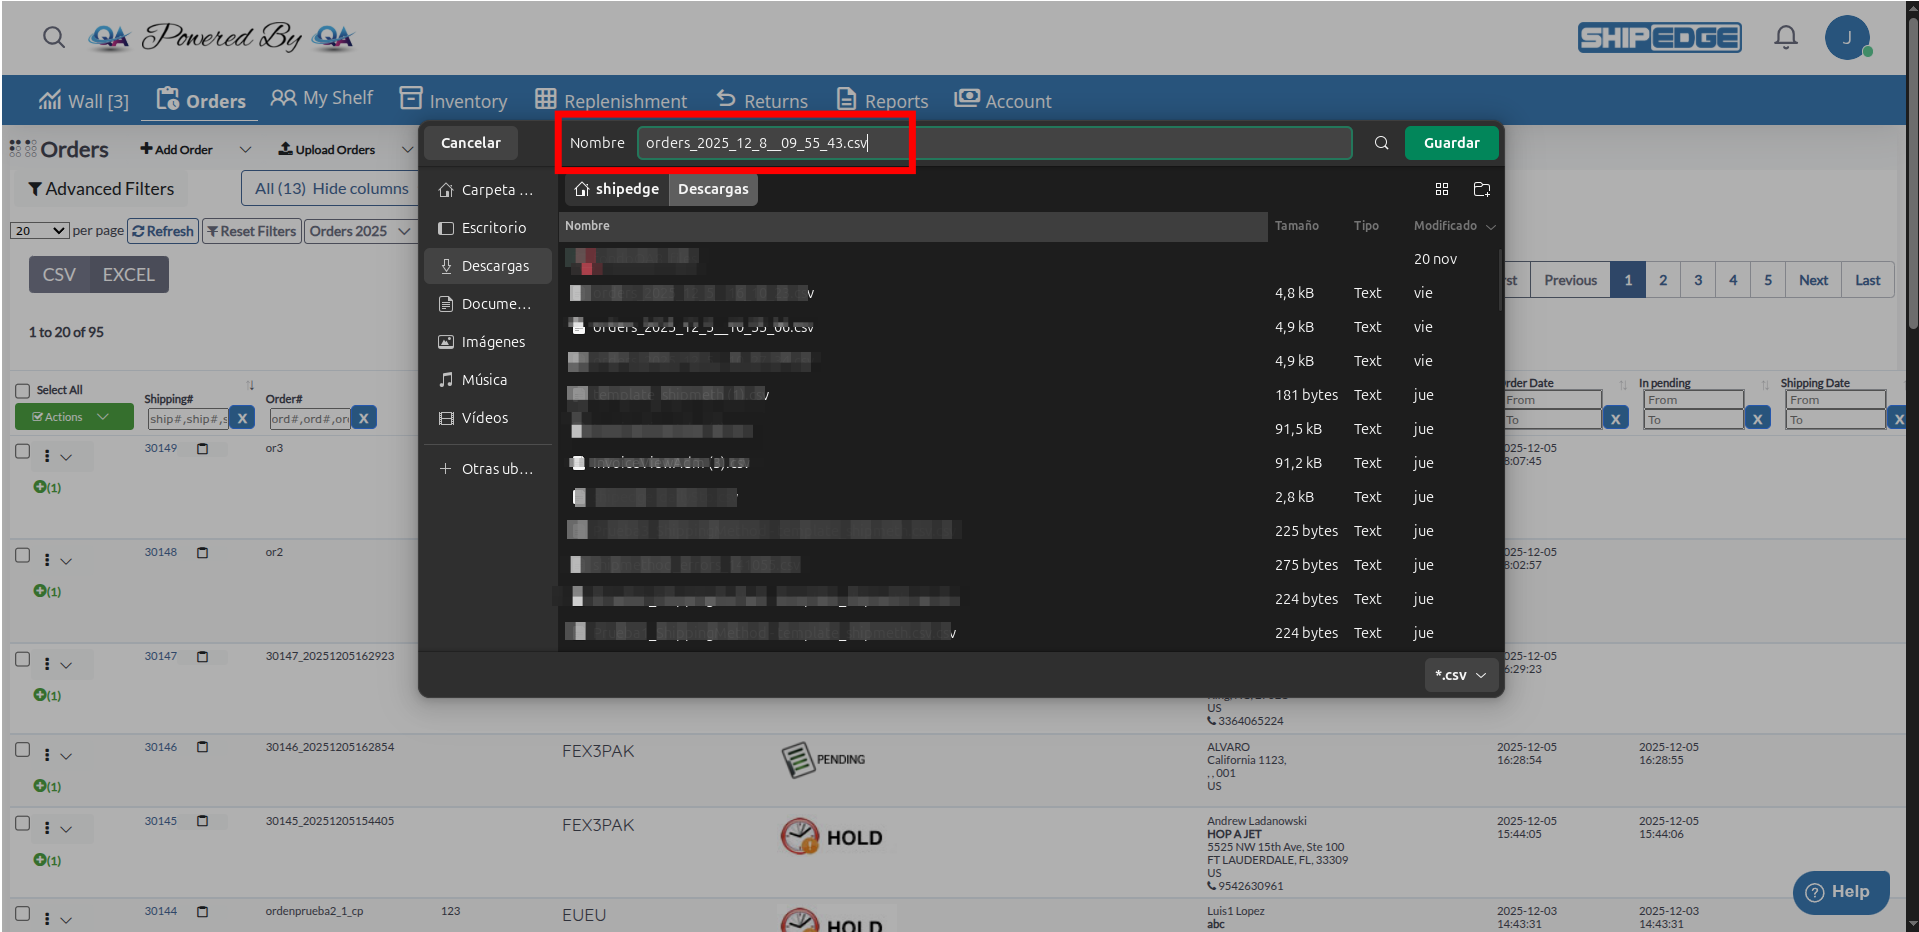
Export order data to CSV format for external analysis or reporting:
Apply Filters (Optional)
Filter orders to export only the data you need. Export includes all orders matching your current filters.
Click CSV Button
Click the CSV button above the orders table.
Download File
The CSV file downloads automatically with filename format: orders_YYYY_MM_DD_HH_mm_ss.csv
Open in Excel or Spreadsheet
Open the CSV file in Excel, Google Sheets, or any spreadsheet application for analysis.
Export Includes:
Always apply filters before selecting orders for bulk actions. This ensures you’re working with the correct order set and prevents accidental changes to wrong orders.
Check order statuses before performing bulk actions. Some actions only work on specific statuses, and verifying prevents errors.
Filter by date range when working with large order volumes. This improves performance and makes it easier to manage daily workflows.
Save frequently used filter combinations for quick access. Create saved filters for common views like “Today’s Pending Orders” or “This Week’s Backorders”.
Double-check selected orders before canceling. Cancellation cannot be undone, so verify you have the correct orders selected.
Watch for progress indicators during long-running bulk actions like dividing network backorders. Don’t navigate away until actions complete.
Problem: You see “You must check at least one Order” when trying to perform a bulk action.
Solution:
Problem: A bulk action doesn’t appear in the Actions menu or doesn’t work.
Solution:
Problem: Selected orders don’t change status after performing a bulk action.
Solution:
Problem: Export fails or shows “too many records” message.
Solution:
Problem: Filters don’t seem to apply or show incorrect results.
Solution:
Next Steps: After managing orders in bulk, learn about Order Status & Workflow to understand how order statuses change throughout the fulfillment process.