Complete Product View
Sree all products in your catalog with inventory quantities across all locations. View SKU, UPC, description, images, and key product attributes in one table.
The Catalog Overview is your central hub for managing all products and inventory in ShipEdge. This comprehensive view displays your entire product catalog in a searchable, sortable table with real-time inventory quantities, product details, and powerful filtering tools. Access product history, manage pick styles, print labels, create replenishments, and view distribution center inventory all from one screen.
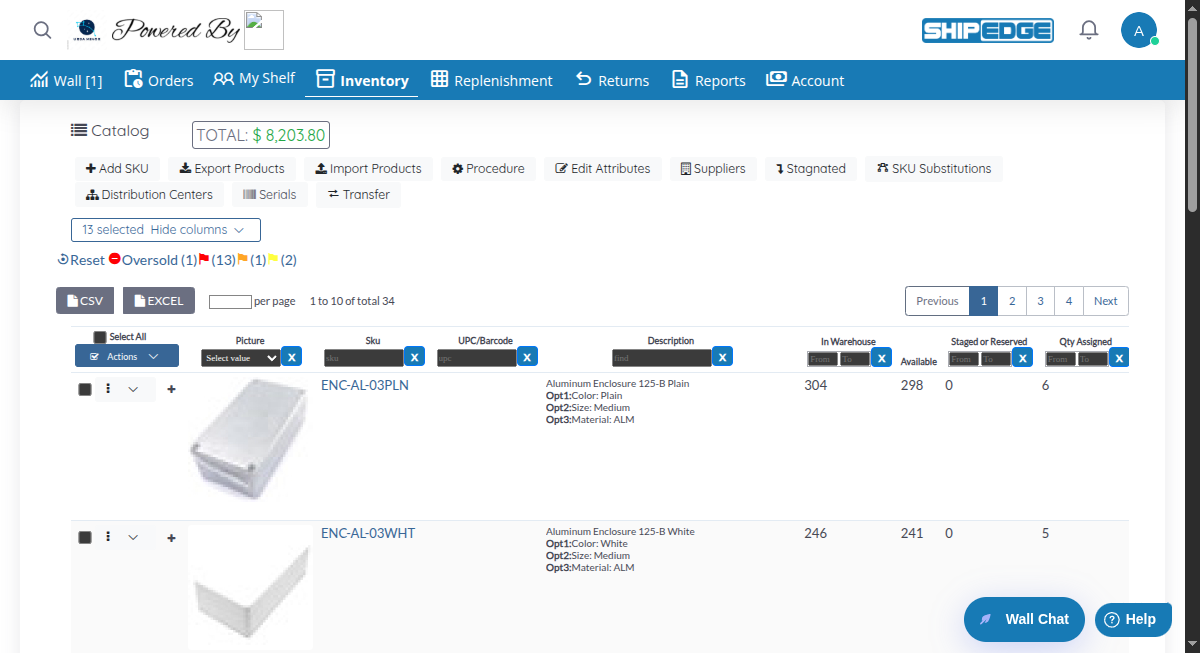
Sree all products in your catalog with inventory quantities across all locations. View SKU, UPC, description, images, and key product attributes in one table.
Monitor inventory levels across multiple metrics: In Warehouse, Available, Reserved, Hurt, Hold, Blocked, and Total Network Available. Track in-transit quantities and identify oversold items.
Filter products by any column using text search, numeric ranges, or date ranges. Search by SKU, UPC, description, supplier, category, or any other field.
Select multiple products and perform bulk operations like creating replenishments, printing labels, or changing pick styles all at once.
The Catalog table displays these key columns (all are sortable and filterable):
QtyGood)QtyGood - QtyHold)QtyReserved)QtyHurt)QtyHold)QtyBlocked)Customize which columns display using the Hide columns dropdown:
Default visible columns include: Picture, Sku, UPC, Description, In Warehouse, Staged or Reserved, Qty Assigned, In-Transit, Supplier, and Category.
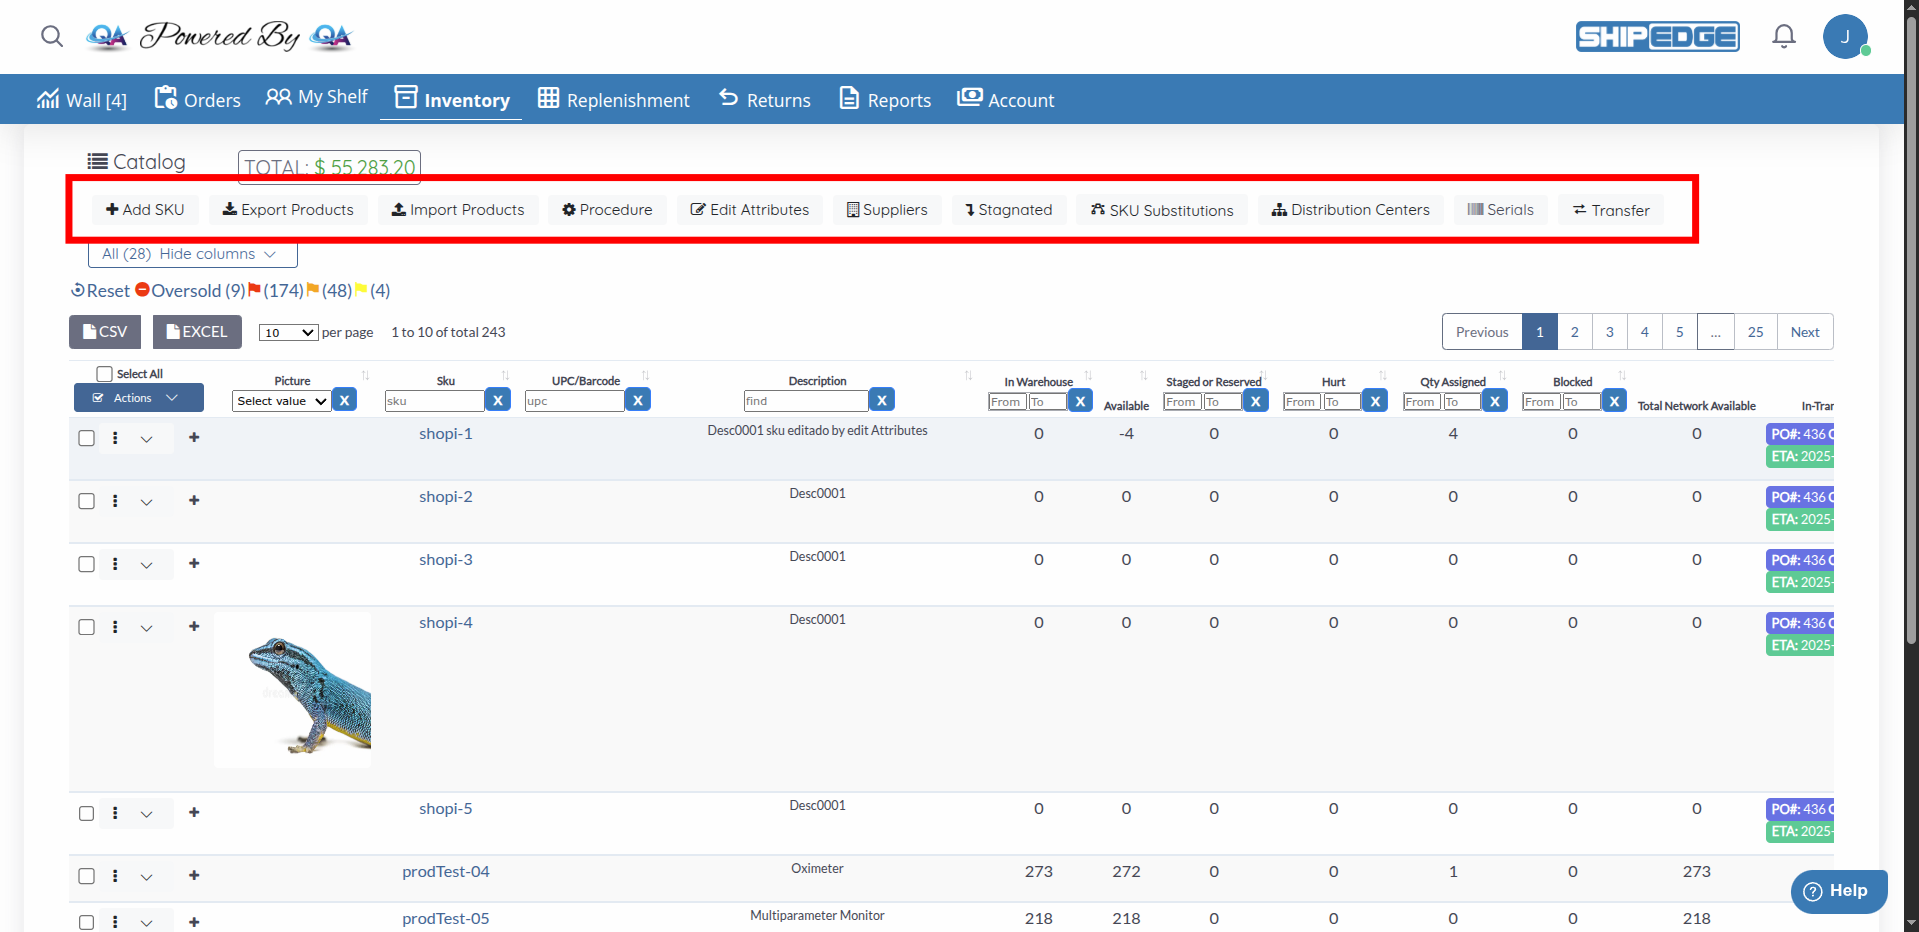
The top toolbar displays the TOTAL inventory value calculated as:
Click the total to view detailed breakdown.
Select multiple products using the checkboxes and perform bulk operations:
Select Products
Check the boxes next to products that need replenishment. Or click Select All to select all products on the current page.
Open Actions Menu
Click the Actions dropdown button at the top left of the table.
Choose Create Replenishment
Click Create Replenishment from the dropdown menu.
Configure Replenishment
A modal opens. Fill in replenishment details like supplier, expected delivery date, PO number, and quantities for each selected product.
Submit Replenishment
Click Submit to create the replenishment request. The system creates purchase orders for the selected products.
Select Products
Check the boxes next to products you want to print labels for. You can select up to 500 products at once.
Open Actions Menu
Click the Actions dropdown button.
Choose Print Labels
Click Print Labels from the dropdown menu.
Configure Label Settings
In the modal, select:
Generate Labels
Click Print to generate a PDF with all labels. The PDF opens in a new window ready for printing.
Select Products
Check the boxes next to products you want to update. Maximum 500 products at once.
Open Actions Menu
Click the Actions dropdown button.
Choose Change Pick Style
Click Change Pick Style from the dropdown menu.
Select Pick Style
Choose the desired pick style from the dropdown:
Update
Click Update to apply the pick style to all selected products.
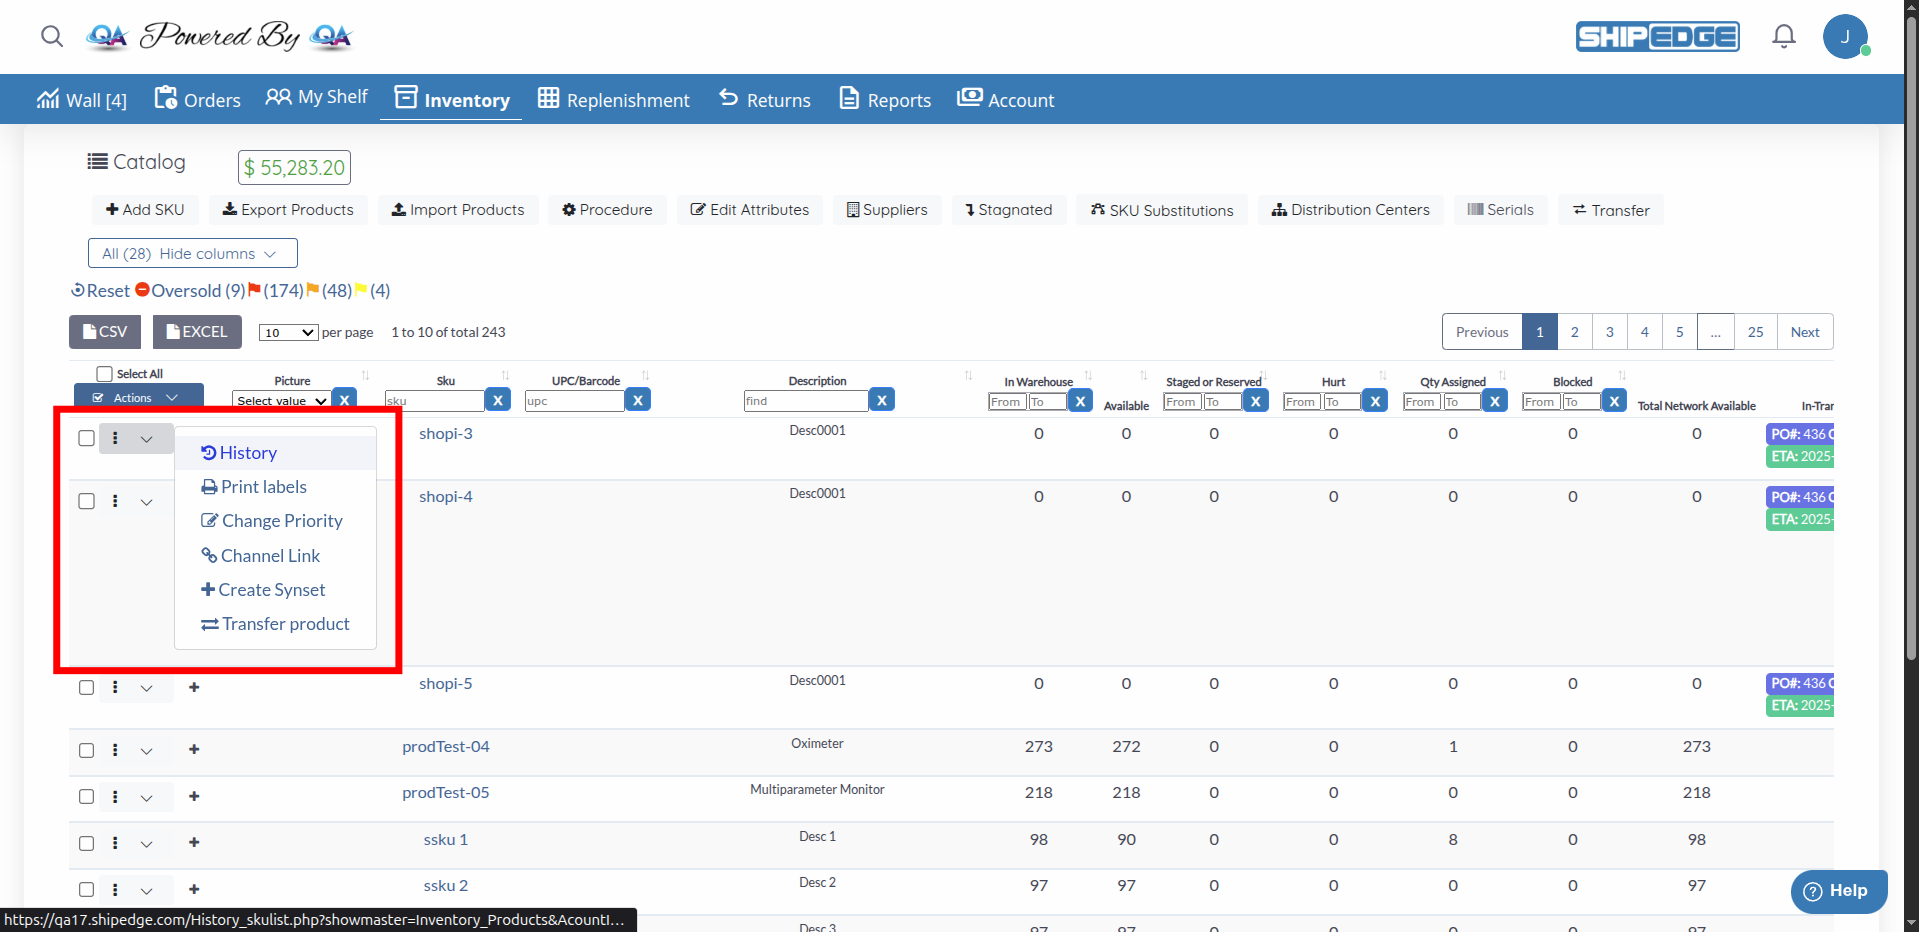
Each product row has an actions menu (⋮) with these options:
View complete history of all transactions for a product (receives, picks, adjustments, transfers).
Click History to open the product history page.
Print labels for a single product. Select label type, number of copies, and size.
If a product has quantities on hold (Qty Assigned > 0), you can change the priority of held quantities.
Click Change Priority to open the priority management page.
Open the product’s page on your sales channel (Amazon, Shopify, etc.) if a channel link is configured.
Note: Configure channel links under My Account > Preferences > Communications Settings > Picture.
Create a product family (Synset) to group related products together.
Transfer quantities between distribution centers (available for non-primary distribution centers).
For products across multiple distribution centers, expand rows to see detailed inventory:
Expand Product Row
Click the expand icon (►) next to the actions menu. The row expands to show a “Pods” table.
View DC Inventory
The Pods table shows inventory for each distribution center:
Filter Pods
Use the filter boxes at the top of each column to find specific distribution centers or quantities.
Expand Bin Details
Click the plus icon (+) next to a product to view bin-level details. The row expands to show a “Bins” table.
View Bin Inventory
The Bins table shows:
Filter Bins
Use filters to search by UOM, quantity, lot number, expiration date, volume, or category.
Refresh Bin Data
Click the refresh button (🔄) in the Bins header to reload bin data.
Each column has a filter box at the top. Filter types vary by column:
Available for: SKU, UPC, Description, Supplier, Model#, Manufacturer, Category, Tags, Harmonization, Country of Origin
Usage: Type text to search. Filters update automatically after you stop typing.
Available for: In Warehouse, Staged or Reserved, Hurt, Qty Assigned, Blocked, Weight, Case Qty
Usage:
Available for: Serial#, Pick Style, Discontinued
Usage: Select an option from the dropdown to filter by that value.
Available for: DateCreation, LastUpdated, Expiration (in Bins)
Usage:
Click the X button next to any filter box to clear that filter.
Click any column header to sort by that column:
Default sort order is by PickStyle descending.
Hide columns you don’t frequently use to reduce clutter. Show only the columns relevant to your workflow using the column visibility selector.
Combine multiple filters to narrow down products. For example, filter by Supplier + In Warehouse < 10 to find low stock from a specific supplier.
Look for products with negative In Warehouse quantities (shown in red alert). These indicate oversold inventory that needs immediate attention.
Use the In-Transit column to see incoming inventory. This helps with planning and prevents over-ordering products already on the way.
Save time by selecting multiple products for bulk operations. Create replenishments or print labels for many products at once instead of one-by-one.
Export the catalog to CSV for offline analysis, reporting, or data migration. Use filters first to export only specific products.
If alert icons are enabled in preferences, you’ll see alerts for products at specific reorder levels:
Click an alert to filter the catalog to products at that reorder level.
Products with negative inventory (In Warehouse < 0) display an Oversold alert with a red minus circle icon (⊖).
Click the Oversold alert to view all oversold products.
For accounts with logistic centers enabled, the Total Network Available column shows the sum of available quantities across all distribution centers.
Click the quantity to view a detailed breakdown by distribution center.
Products with incoming inventory show details in the In-Transit column:
Multiple incoming shipments display as separate badges.
Problem: The catalog table is empty or shows “Nothing found - sorry”.
Solution:
Problem: Typing in a filter box doesn’t filter the results.
Solution:
Problem: Clicking “Export Products” doesn’t download a file.
Solution:
Problem: Clicking “Print” after configuring labels doesn’t open a PDF.
Solution:
Problem: Clicking the expand icon doesn’t show Pods or Bins details.
Solution:
Problem: Changing pick style doesn’t update products.
Solution:
Next Steps: