Order Automation
Orders are automatically imported from your sales channels, eliminating the need to enter them manually.
Integrations Overview is the control center for managing all your connections with eCommerce platforms, marketplaces, and other sales channels. From here you can configure, activate, and monitor all your integrations to automatically sync orders and inventory.
ShipEdge Core supports multiple types of integrations, from direct API connections with platforms like Amazon and Shopify, to imports via CSV files or FTP. Each integration can be configured independently with specific options according to your needs.

Orders are automatically imported from your sales channels, eliminating the need to enter them manually.
Keep your inventory updated in real time across all your platforms to avoid selling out-of-stock products.
Manage multiple sales channels from one place instead of logging into multiple systems.
Each integration can be configured with specific options like address validation, order hold, and more.
ShipEdge Core supports several types of integrations depending on how they connect with your sales channels:
These integrations connect directly with platforms using their official APIs:
Features:
These integrations import orders from CSV files or via FTP/SFTP connections:
Features:
Some integrations send information from ShipEdge to other platforms:
Navigate to Integrations Module
From the main menu, access through Orders > Integrations.
View Main Interface
The page displays:
Navigation Tabs
At the top header you’ll find these tabs:
The main table displays integrations in a simplified two-column layout. The table shows all integrations configured for your account, including:
Name: Integration name (e.g., “Amazon SP”, “Shopify”, “FTP Orders”)
Information: Detailed information about the integration
Each integration row includes action buttons on the right side:
Primary Actions (visible buttons):
Additional Actions (via dropdown menus):
Document/Spreadsheet icon (dropdown menu): Access to:
Wrench/Settings icon (dropdown menu): Quick configuration options:
Manual Synchronization Buttons (for API integrations with Channel ID):
Above the table, you’ll find filtering and search options:
Three filter buttons allow you to view integrations by status:
By default, the view shows only active integrations.
Use the Search field to quickly find integrations by name, description, or StoreID. The table filters in real-time as you type.
At the top of the table, you’ll find:
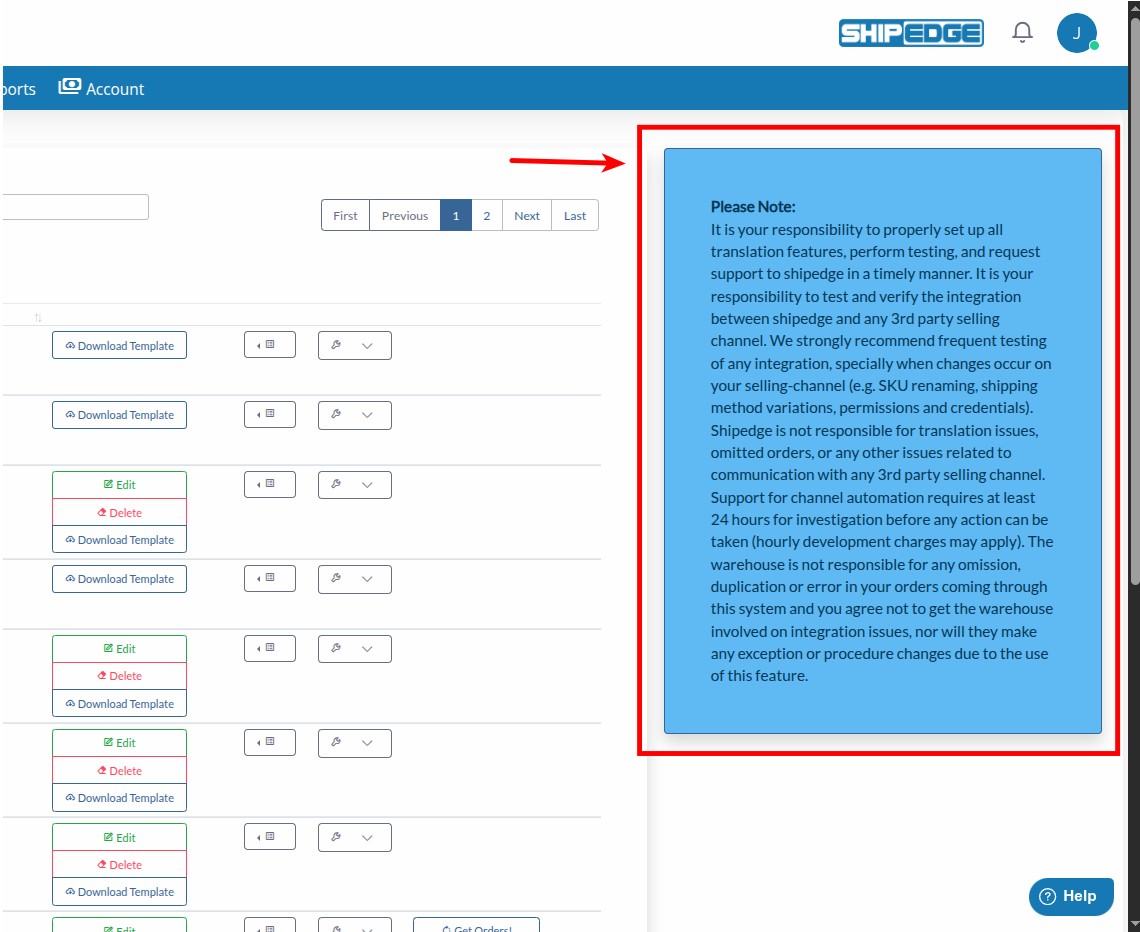
On the right side of the screen, you’ll see a blue information panel titled “Please Note:”. This panel displays important disclaimers and responsibilities regarding integrations:
Key Points:
This notice appears automatically when viewing integrations and serves as a reminder of your responsibilities when using channel automation features.
Each integration can be configured with specific options using the configuration menu. The available options depend on whether the integration is a template (CSV/FTP-based) or a channel (API-based with Channel ID).
Template integrations (CSV uploads, FTP Orders, SFTP Orders) have access to these configuration options:
What it does: Orders enter in “waiting” status so you can review them before sending them to the warehouse.
When to use it: When you need to review and validate orders before processing them.
Additional configuration:
What it does: Validates each order address against the USPS database. The address can be automatically updated to the one suggested by USPS.
When to use it: To ensure addresses are correct and reduce delivery errors.
Important: Orders that fail validation will enter with “address-error” status.
Availability: Only appears if address validation is enabled in your account configuration.
Visual indicator: When enabled, the “Address Validation” label appears in bold in the dropdown menu.
What it does: Verifies whether the address is residential or commercial type.
When to use it: When you need to apply different rates or shipping methods based on address type.
Availability: Only appears if address validation is enabled in your account configuration.
Visual indicator: When enabled, the “Residential Check” label appears in bold in the dropdown menu.
Depending on the integration type, you may also see additional options such as:
Channel integrations (API-based integrations with Channel ID, such as Shopify, Walmart) have access to all template options plus these additional options:
What it does: Requires delivery signature if the order value exceeds a specific amount.
When to use it: To protect high-value orders with delivery signature.
Note: Only available for channel integrations (with Channel ID).
What it does: Reserves a percentage of inventory during synchronization to avoid overselling.
Configuration: Use the slider control to set a percentage from 0% to 100% in 5% increments. The slider shows markers at 0%, 20%, 40%, 60%, 80%, and 100%.
How to use: Click and drag the slider or click on a marker to set the reserve percentage. The value saves automatically when you release the slider.
When to use it: When you need to maintain safety stock that doesn’t sync with channels.
Note: Only available for channel integrations (with Channel ID).
What it does: Adds the channel ID as a suffix to the order number.
When to use it: When you use multiple stores of the same technology and need to distinguish orders.
Example: If the Channel ID is 123, order “ORD-001” becomes “ORD-001#123”.
Visual indicator: When enabled, the “Add Suffix” label appears in bold in the dropdown menu.
Note: Only available for channel integrations (with Channel ID).
What it does: Divides available inventory among multiple channels when you have the same integration configured multiple times.
When to use it: When you sell the same product in multiple stores and need to distribute stock.
Note: Only available for channel integrations (with Channel ID).
For API integrations, you can manually sync orders and inventory:
What it does: Requests import of new orders from the connected platform.
Process:
Limitation: This button can only be pressed once per hour to provide fair access to all customers.
When to use it: When you need to import orders immediately instead of waiting for automatic synchronization.
What it does: Updates inventory on the connected platform with current ShipEdge quantities.
Process:
Limitation: This button can only be pressed once per hour. If you try to press it before an hour has passed, the system will show how many minutes remain.
Display: Shows the last synchronization date/time below the button.
When to use it: When you need to update inventory on the platform immediately after major changes.
Some integrations (Shopify, Amazon Vendor, FBA, Send to Amazon) allow retrying orders that failed to import:
Access the Option
Click the spreadsheet icon dropdown menu for the integration, then select “Try again Orders”.
Upload File
Upload a CSV, TSV, XLS, or XLSX file containing the order numbers you want to retry.
Select Column
The system will show the file columns. Select the column that contains the order numbers.
Process
Click “Get Orders” to send the orders again to the import system.
Verify Result
The system will show a list of orders that were sent successfully. You can verify in the Orders view in a few minutes.
To add a new integration, you have two main options:
Go to Preferences
Navigate to My Account > Preferences and look for the “Channel Automation” section.
Configure Channel
Follow the specific instructions for the platform you want to connect.
Activate Integration
Once configured, the integration will appear in the Integrations view.
Click “Add Template”
In the Integrations view, click the “Add Template” button.
Configure Template
Configure the name, template type, and CSV file format.
Configure Fields
Use “Config Input File” to map CSV fields to ShipEdge fields.
Activate
Check the “Active” box to activate the integration.
Use “Hold Entry” for new integrations until you confirm orders are importing correctly.
Enable “Address Validation” to reduce delivery errors and automatically update addresses.
Review synchronization logs regularly to detect problems early.
Configure a reserve percentage to maintain safety stock and avoid overselling.
Enable “Add Suffix” when you have multiple stores of the same platform to easily distinguish orders.
Use manual synchronization buttons only when necessary, respecting the once-per-hour limit.
Possible causes:
Solution:
Possible causes:
Solution:
Cause: These buttons can only be used once per hour.
Solution: Wait at least one hour since the last time you pressed the button. The system will show how many minutes remain if you try to press it before.
Cause: “Address Validation” may be automatically updating addresses or there’s a problem with data format.
Solution:
Next Step: Setting Up Integrations - Learn how to configure specific integrations step by step