Skip to content

Order Rules (Automation)

Order Rules (Automation) allows you to automate order processing based on specific conditions you define. Rules can execute when specific events occur (such as when an order is imported) or according to a scheduled time.

With automation rules, you can eliminate repetitive tasks like changing shipping methods for certain channels, canceling orders that meet specific conditions, or sending orders directly to processing when certain criteria are met.

Task Automation

Eliminate repetitive tasks by processing orders automatically according to conditions you define.

Smart Processing

Orders are processed automatically when they meet specific conditions, reducing manual errors.

Time Savings

Save hours of manual work by processing hundreds of orders automatically with well-configured rules.

Consistency

Ensure all orders are processed consistently according to your business rules.


Automation rules have three main components:

The trigger determines when the rule executes:

  • Event-based: The rule executes when a specific event occurs (e.g., order imported, order updated)
  • Schedule: The rule executes according to a schedule you configure (e.g., every hour, daily)

Filters determine which orders are processed. You can use multiple filters combined with AND or OR to select specific orders.

Actions determine what is done with orders that meet the filters. You can configure multiple actions that execute in sequence.


  1. Access Rules

    Navigate to Rules from the main menu or go directly to /rules.php?type=orders.

  2. Create New Rule

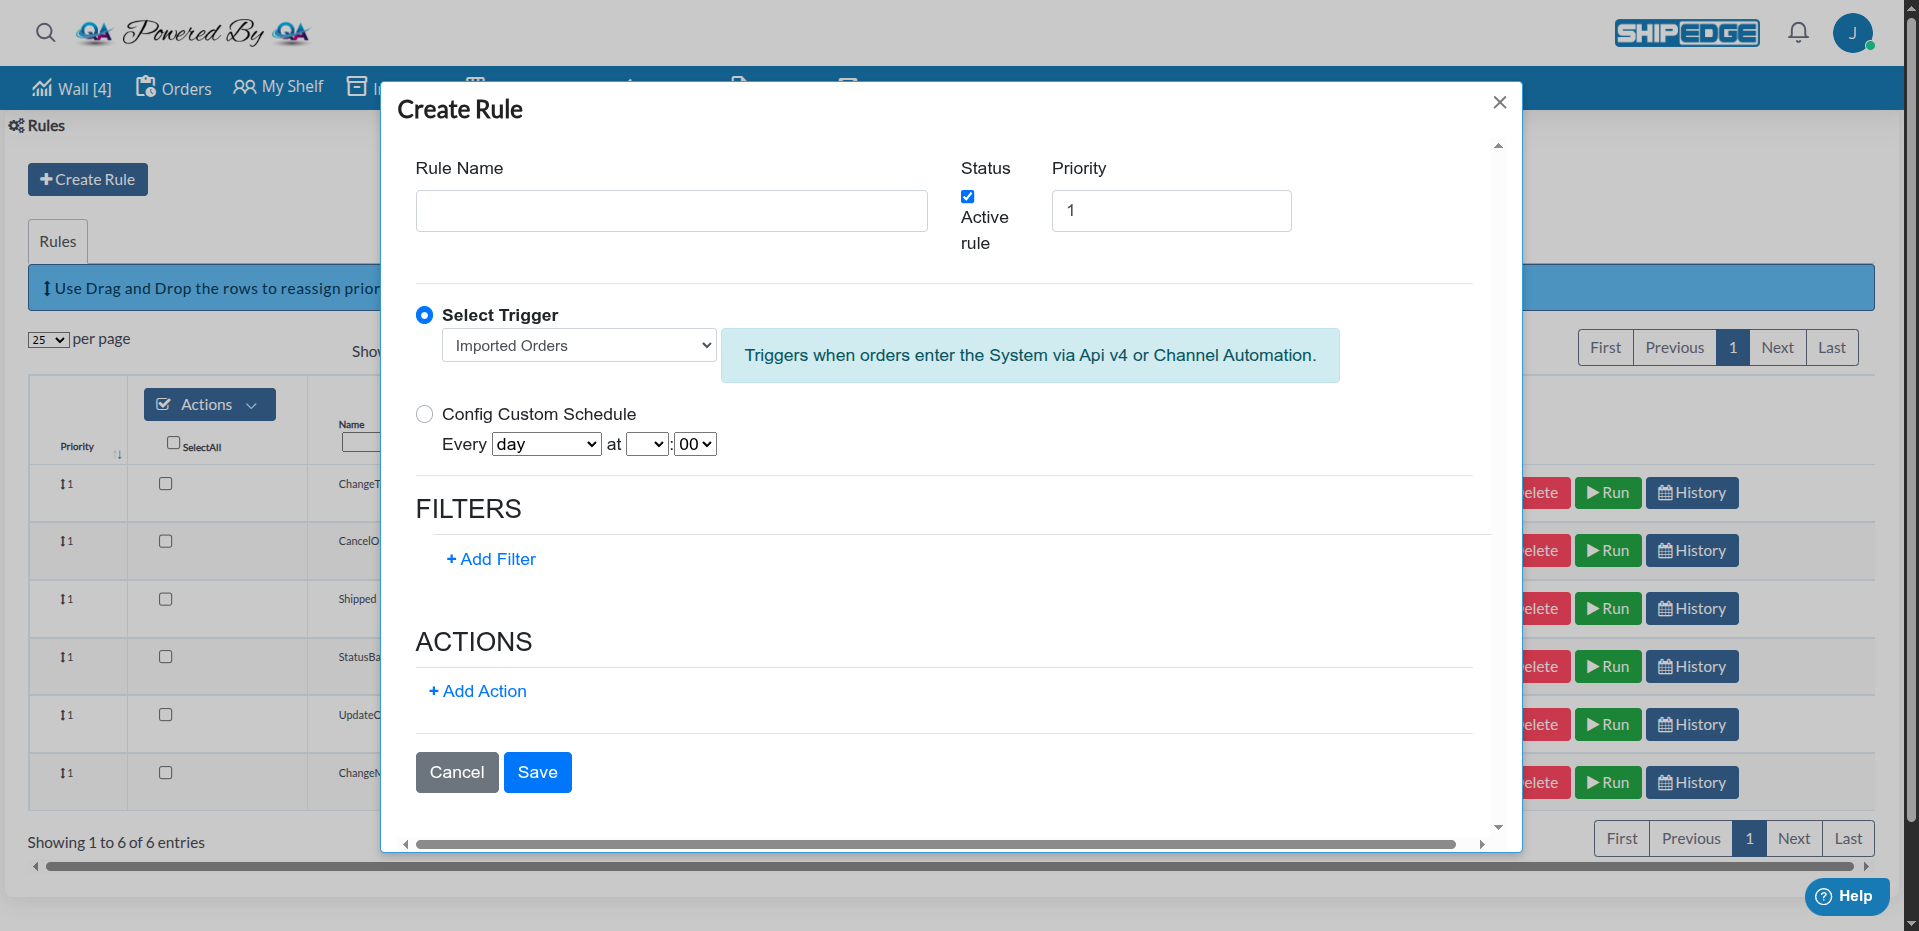
    Click the “Create Rule” button located at the top of the page.

  3. Configure Basic Information

    Complete the basic fields:

    • Rule Name: Descriptive name for the rule (e.g., “Auto-process Amazon Orders”)
    • Status: Check “Active rule” to activate the rule immediately
    • Priority: Priority number (rules with higher priority execute first)
  4. Select Trigger

    Choose how the rule will be triggered:

    Option A: Select Trigger (Event-based)

    • Select an event from the dropdown (e.g., “Imported Orders”, “Order Created”, “Order updated”)

    Option B: Config Custom Schedule

    • Select this option to schedule the rule according to a specific time
    • Configure the schedule using the cron selector
  5. Add Filters

    Click ”+ Add Filter” to add conditions that select orders:

    • Select the field to filter (e.g., Channel, Ship Method, Order Status)
    • Select the condition (e.g., “Is equal to”, “Includes”, “Greater than”)
    • Enter the value or select from the list
    • Combine filters with AND or OR as needed
  6. Add Actions

    Click ”+ Add Action” to define what to do with selected orders:

    • Select the action type (e.g., “Autoprocess”, “Cancel order”, “Change shipping method”)
    • Configure specific action parameters if necessary
  7. Save the Rule

    Click “Save” to create the rule. If it’s active, it will begin executing automatically.


Rules can execute when the following events occur:

  • Imported Orders: Triggers when orders enter the system via API v4 or Channel Automation
  • Order Created: Triggers when an order is created manually using “Add Order”
  • Order updated: Triggers when an order is updated in any way
  • Order BackOrder: Triggers when an order’s status changes to Backorder
  • Order canceled: Triggers when an order is canceled
  • Order divided: Triggers when an order is divided into multiple shipments from the OMS
  • Order pending: Triggers when an order’s status changes to Pending
  • Order processing: Triggers when an order’s status changes to Processing
  • Order shipped: Triggers when an order’s status changes to Shipped
  • Order shipped by FBA: Triggers when status changes to Shipped by Amazon FBA
  • Order shipped by MCF: Triggers when status changes to Shipped by Amazon MCF
  • Order shipped by Dropshipper: Triggers when status changes to Shipped by Dropshipper
  • Order sent by FBA: Triggers when status changes to Amazon FBA
  • Order sent by MCF: Triggers when status changes to Amazon MCF

You can filter orders using the following fields:

  • Order Number: Order number
  • Order Date: Order date (with special options like “Today”, “Yesterday”, “Last 24 Hours”)
  • Order Status: Current order status
  • Sub Status: Order sub-status (e.g., “Ready to Process”)
  • Order Type: Order type
  • Channel: Sales channel (Amazon, Shopify, etc.)
  • Carrier name: Shipping carrier name
  • Ship method: Shipping method
  • Num line items: Number of product lines in the order
  • Total weight: Total order weight
  • Total price: Total order price
  • Customer Name: Customer name
  • Email: Customer email

For each field, you can use different conditions depending on the type:

Text and Number Conditions:

  • Is equal to (=): Equal to a specific value
  • Is not equal to (<>): Different from a specific value
  • Includes: Includes one or more values (comma-separated)
  • Do not include: Does not include one or more values

Numeric Conditions:

  • Less than (<): Less than
  • Greater than (>): Greater than
  • Less than or equal to (<=): Less than or equal to
  • Greater than or equal to (>=): Greater than or equal to
  • Between: Between two values

Date Conditions:

  • Last 12 Hours: Last 12 hours
  • Last 24 Hours: Last 24 hours
  • Today: Today
  • Yesterday: Yesterday
  • This Month: This month
  • Last 2 Months: Last 2 months
  • Last 3 Months: Last 3 months
  • After Num Days: After a specific number of days

Rules can execute the following actions:

What it does: Sends only available products from selected orders, dividing the order if necessary.

Limitations:

  • Only works with orders in Pending or Backorder status
  • Only works with orders that have quantity greater than 1
  • Maximum 200 orders per execution

When to use it: When you want to partially ship orders that have some products available and others not.

What it does: Cancels selected orders.

Limitations:

  • Can only cancel orders in the following statuses:
    • Pending
    • Backorder
    • Submit (incomplete)
    • Error
    • Returned by carrier
    • Low balance

When to use it: To automatically cancel orders that meet specific conditions (e.g., very old orders, orders from certain channels with issues).

What it does: Places orders in “Hold” status for manual review.

When to use it: When you need to manually review orders that meet certain conditions before processing them.

What it does: Changes the shipping method of selected orders to a specific method you choose.

Required configuration: You must select the shipping method you want to change to.

When to use it: To apply specific shipping methods based on channel, carrier, or order conditions.

What it does: Sends orders directly to “Processing” status for the warehouse to process.

Limitations:

  • Only works with orders in “Pending” status

When to use it: To automatically process orders that meet specific conditions without manual intervention.

What it does: Sends an HTTP POST notification to a URL you specify with information about orders.

Required configuration:

  • Address: Webhook URL (e.g., https://your-server.com/webhook)
  • Webhook Structure data: Data structure to send (e.g., “Order backorder”, “Order shipped”)
  • Character encoding: Character encoding (UTF-8, ASCII, etc.)
  • Identify with certificate: Option for certificate authentication

When to use it: To integrate with external systems that need notifications when specific events occur.

What it does: Divides network backorders among multiple locations or warehouses.

When to use it: When you have multiple warehouses and want to automatically distribute backorders.


Goal: Automatically send all imported Amazon orders to processing.

Configuration:

  • Trigger: “Imported Orders”
  • Filter: Channel = “Amazon SP” (or your Amazon integration name)
  • Action: “Autoprocess”

Result: All new Amazon orders are automatically sent to processing.

Example 2: Change Shipping Method for International Orders

Section titled “Example 2: Change Shipping Method for International Orders”

Goal: Automatically change shipping method to “Express” for international orders.

Configuration:

  • Trigger: “Order updated” or “Imported Orders”
  • Filter: Country ≠ “US” (or your country code)
  • Action: “Change shipping method” → Select “Express”

Result: International orders are automatically updated with Express shipping method.

Goal: Automatically cancel backorder orders that are more than 30 days old.

Configuration:

  • Trigger: “Config Custom Schedule” (run daily)
  • Filter 1: Order Status = “Backorder”
  • Filter 2: Order Date → “After Num Days” = 30
  • Action: “Cancel order”

Result: Backorder orders older than 30 days are automatically canceled.

Goal: Notify an external system when an order is marked as shipped.

Configuration:

  • Trigger: “Order shipped”
  • Filter: (Optional) Add specific filters if you only want certain orders
  • Action: “Send webhook”
    • Address: https://your-system.com/order-shipped
    • Webhook Structure data: “Order shipped”
    • Character encoding: UTF-8

Result: An HTTP notification is sent to your system when an order is marked as shipped.


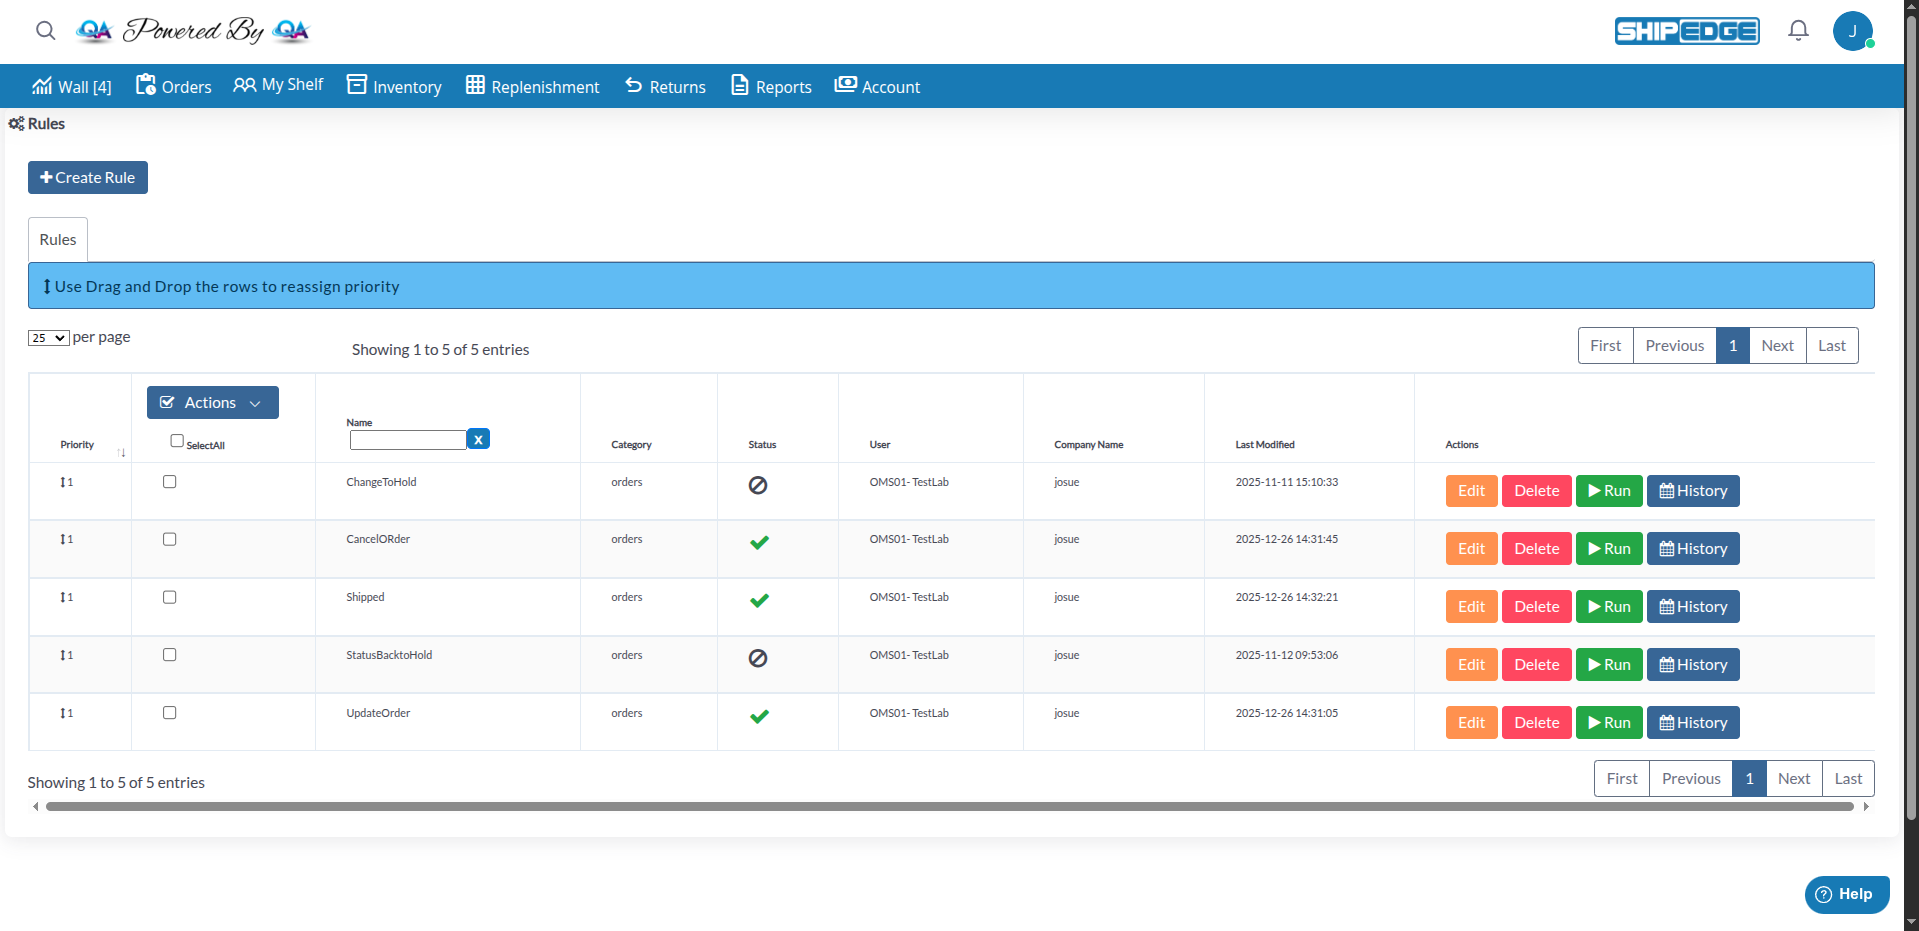
The main view shows all your rules with the following information:

  • Priority: Rule priority (you can reorganize by dragging and dropping)
  • Name: Rule name
  • Category: Rule type (Orders)
  • Status: Status (active or disabled)
  • User: User who created the rule
  • Company Name: Account name
  • Last Modified: Last modification date
  1. Locate the Rule

    In the rules table, find the rule you want to edit.

  2. Click Edit

    Click the “Edit” button in the actions column.

  3. Modify Configuration

    Make necessary changes in the form that opens.

  4. Save Changes

    Click “Save” to save changes.

Individually:

  • Use the checkbox in the status column to activate/deactivate a specific rule

Multiple Rules:

  1. Check the checkboxes of the rules you want to modify
  2. Click the “Actions” button in the table header
  3. Select “Enabled” or “Disabled”
  4. Confirm the action
  1. Locate the Rule

    In the rules table, find the rule you want to execute.

  2. Execute

    Click the “Run” button (play icon) in the actions column.

  3. Wait for Processing

    The system will process the rule and show a message when finished.

  1. Locate the Rule

    In the rules table, find the rule for which you want to view history.

  2. Open History

    Click the “History” button (calendar icon) in the actions column.

  3. Review Executions

    You’ll see a complete history of all rule executions, including:

    • Execution date and time
    • Status (success or error)
    • Number of orders processed
    • Additional details
  1. Locate the Rule

    In the rules table, find the rule you want to delete.

  2. Delete

    Click the “Delete” button in the actions column.

  3. Confirm

    Confirm that you want to delete the rule in the dialog that appears.


Rules execute in priority order. Rules with higher priority numbers execute first.

  1. Use Drag and Drop

    In the rules table, drag and drop rows to reorganize priority order.

  2. View Changes

    The priority number will automatically update according to the new position.

  3. Save

    Changes are automatically saved when you drop the row.


Start Simple

Start with simple rules and add complexity gradually. It’s easier to debug simple rules.

Test First

Use “Run” to test rules manually before fully activating them. Review history to verify results.

Specific Filters

Use specific filters to ensure only correct orders are processed. Better to be too specific than too broad.

Document Rules

Use descriptive names for your rules that clearly explain what they do. This makes future maintenance easier.

Review Regularly

Periodically review the execution history of your rules to ensure they’re working as expected.

Correct Priority

Organize rules by logical priority. The most critical rules should have the highest priority.


Possible causes:

  • The rule is disabled (Status = false)
  • Filters are too restrictive and there are no orders that meet them
  • The trigger is not firing as expected
  • There’s an error in the rule configuration

Solution:

  1. Verify that the rule is active
  2. Use “Run” to execute the rule manually and see if there are errors
  3. Review execution history to see error messages
  4. Temporarily simplify filters to verify they work

Cause: Filters are not specific enough or are configured incorrectly.

Solution:

  1. Review the rule’s filters
  2. Add additional filters to make the selection more specific
  3. Use AND/OR combinations to refine the selection
  4. Test with “Run” on a small set of orders first

Possible causes:

  • The order is not in the correct status for the action (e.g., Autoprocess only works with Pending orders)
  • There’s an error in the action configuration
  • The action failed for some system reason

Solution:

  1. Verify action limitations in the documentation
  2. Review execution history to see specific error messages
  3. Verify that orders meet the prerequisites for the action

Cause: Several rules are trying to process the same orders with conflicting actions.

Solution:

  1. Review rule priorities
  2. Adjust filters so rules don’t overlap
  3. Ensure rules with higher priority are the most important
  4. Consider combining related rules into a single rule with multiple actions


Next Step: 3PL Carrier Management - Configure carrier management for 3PL services