Real-Time Updates
Receive instant notifications when events occur instead of checking the API repeatedly.
Webhooks allow ShipEdge to automatically send notifications to your external systems when specific events occur, such as when an order is shipped, inventory is corrected, or a replenishment is received. This enables real-time integration without polling the API.
Receive instant notifications when events occur instead of checking the API repeatedly.
Trigger actions in your systems automatically when orders ship, inventory changes, or replenishments arrive.
Eliminate the need to poll the API constantly. Webhooks push data to you only when events happen.
Keep your external systems synchronized with ShipEdge automatically, reducing manual work and errors.
Log in to your ShipEdge OMS account
Access your Order Management System account through the web interface.
Navigate to Preferences
Go to My Account > Preferences in the main menu.
Open Webhooks tab
Click on the Webhooks tab in Preferences.
Configure webhooks
You’ll see options to:
WMS webhooks are configured separately and are available for warehouse-specific events.
Order Status Changes:
Order Shipping Methods:
Order Fulfillment Types:
Order Actions:
Most webhook events support multiple versions (v1, v2, v3, v4) with different data formats:
orders/shipped, adds store filter)orders/shipped (adds store filter and remove order number suffix option)Go to Webhooks Configuration
Navigate to My Account > Preferences > Webhooks.
Click Add webhook
Or edit an existing webhook and click “Update webhook” to save changes.
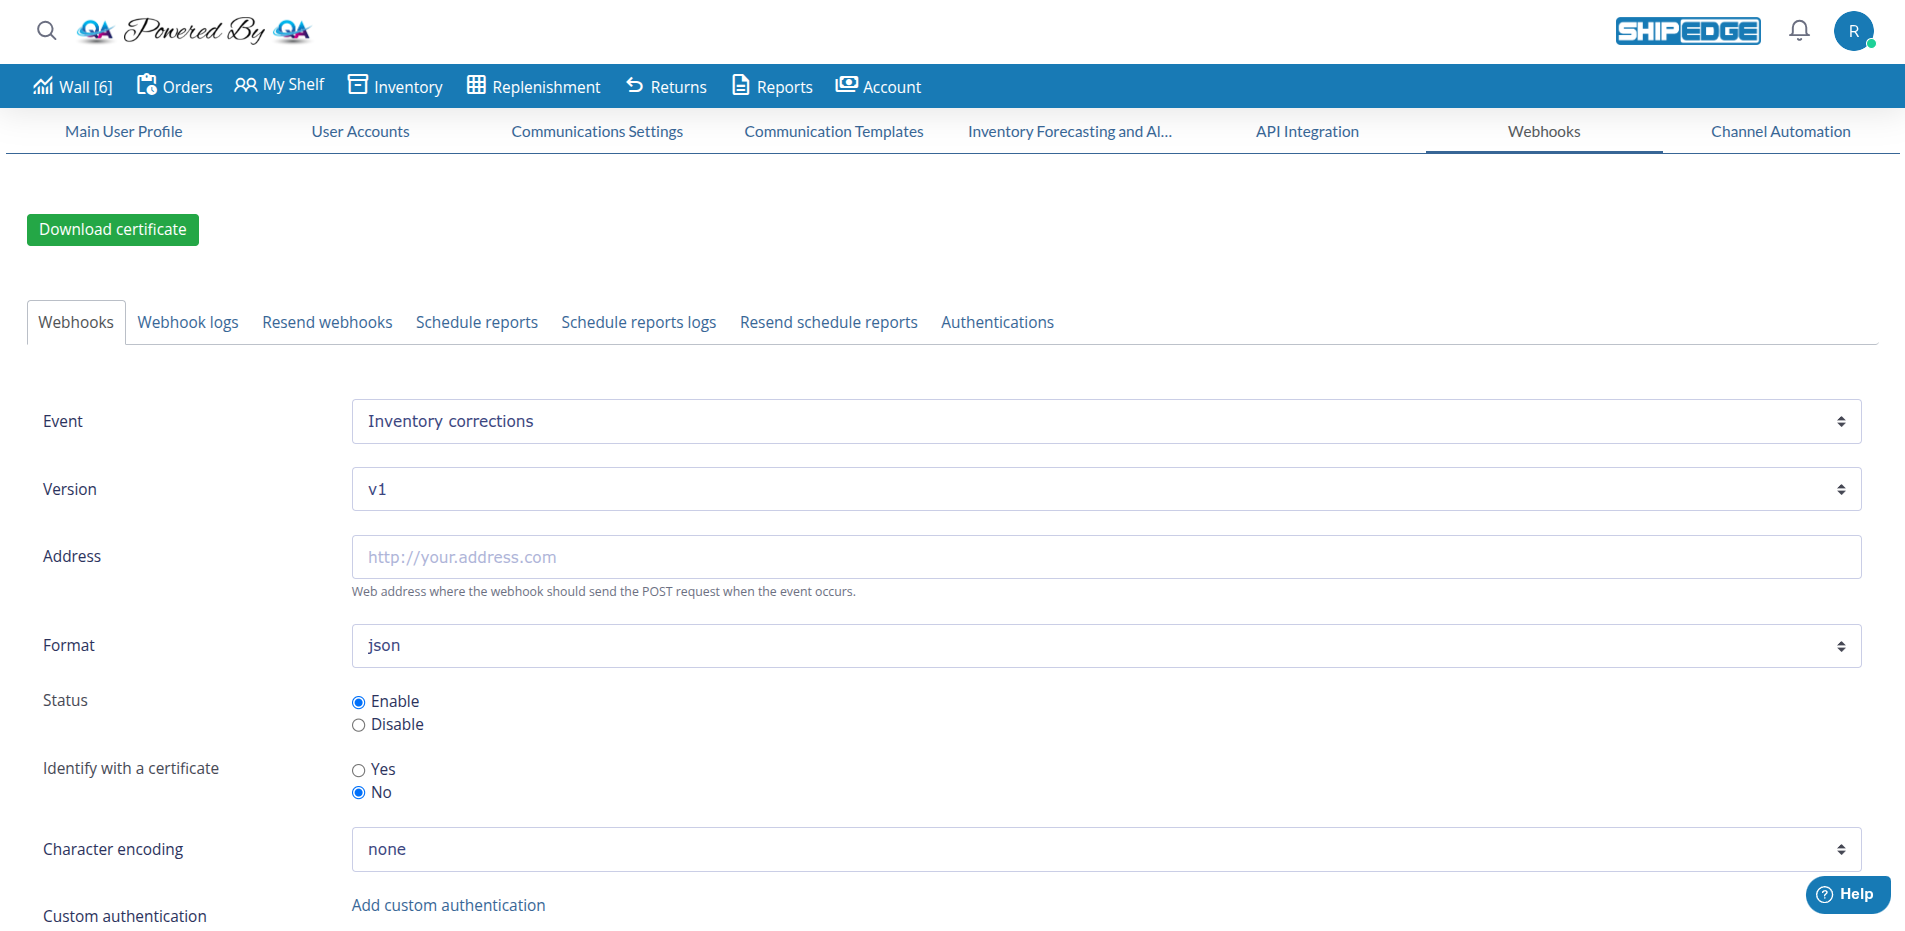
Select Event
Choose the event you want to monitor from the dropdown (e.g., “Order shipped”).
Select Version
Choose the version format (v1, v2, or v3 if available). Use v2 or v3 for best results.
Enter Address
Provide the full URL where ShipEdge should send notifications (e.g., http://your.address.com). The field is labeled “Address”.
Configure Status
Set webhook status to Enable to activate it, or Disable to turn it off temporarily.
Add Custom Headers (Optional)
Add custom HTTP headers (key/value pairs) if your server requires authentication or special headers.
Configure Custom Authentication (Optional)
Select a pre-configured authentication from the “Custom authentication” dropdown, or add one at Authentications first.
Identify with a certificate (Optional)
Set to Yes if your server requires SSL client certificates. Use No for standard connections. A “Download certificate” button is available at the top of the page.
Character encoding (Optional)
Select encoding (none, ASCII, UTF-8, etc.) if needed for your endpoint.
Save Webhook
Click “Add webhook” to create, or “Update webhook” to save changes. Success messages: “New webhook added.” or “Webhook updated.” The webhook works immediately if status is Enable.
Required Fields:
Optional Fields:
Event-Specific Filters (shown when applicable):
Webhooks send data as JSON in the HTTP POST request body. The exact structure depends on the event type and version.
{ "event": "orders/shipped_v2", "account_id": 100, "order_id": 12345, "order_number": "ORD-001", "order_reference": "REF-123", "status": "shipped", "shipped_date": "2024-01-15 10:30:00", "tracking_number": "1Z999AA10123456784", "carrier": "UPS", "shipping_method": "Ground", "customer": { "email": "customer@example.com", "name": "John Doe", "address": { "address1": "123 Main St", "city": "Los Angeles", "state": "CA", "zip": "90001", "country": "USA" } }, "items": [ { "sku": "PROD-001", "quantity": 2, "description": "Product Description" } ], "total": 59.98, "shipping_cost": 5.99}{ "event": "inventory/corrections_v2", "account_id": 100, "correction_id": 789, "sku": "PROD-001", "location": "A-01", "bin": "BIN-001", "previous_quantity": 50, "new_quantity": 45, "adjustment": -5, "reason": "Cycle count adjustment", "user": "warehouse_user", "timestamp": "2024-01-15 14:20:00"}Your webhook endpoint should:
<?php// Get the raw POST data$payload = file_get_contents('php://input');$data = json_decode($payload, true);
// Validate the dataif (!$data || !isset($data['event'])) {    http_response_code(400);    exit('Invalid webhook data');}
// Process based on event typeswitch ($data['event']) {    case 'orders/shipped_v2':        // Handle order shipped        $orderId = $data['order_id'];        $orderNumber = $data['order_number'];        $trackingNumber = $data['tracking_number'];
        // Update your system        updateOrderStatus($orderId, 'shipped', $trackingNumber);        sendCustomerNotification($orderNumber, $trackingNumber);        break;
    case 'inventory/corrections_v2':        // Handle inventory correction        $sku = $data['sku'];        $newQuantity = $data['new_quantity'];
        // Update inventory in your system        updateInventory($sku, $newQuantity);        break;
    default:        // Unknown event type        error_log("Unknown webhook event: " . $data['event']);}
// Always return 200 OKhttp_response_code(200);echo 'OK';?>const express = require('express');const app = express();
app.use(express.json());
app.post('/webhooks/order-shipped', (req, res) => { const data = req.body;
// Validate the data if (!data.event || !data.order_id) { return res.status(400).send('Invalid webhook data'); }
// Process the event if (data.event === 'orders/shipped_v2') { const { order_id, order_number, tracking_number } = data;
// Update your system updateOrderStatus(order_id, 'shipped', tracking_number); sendCustomerNotification(order_number, tracking_number); }
// Always return 200 OK res.status(200).send('OK');});
app.listen(3000, () => { console.log('Webhook server listening on port 3000');});Always use HTTPS URLs for webhooks to encrypt data in transit. ShipEdge will not send webhooks to HTTP endpoints in production.
Use custom headers or authentication methods to verify requests are from ShipEdge:
Option 1: Custom Header
Authorization: Bearer your-secret-tokenOption 2: Custom authentication Configure authentication in the webhook settings using pre-configured methods from the Authentications page.
For enhanced security, set “Identify with a certificate” to Yes to use SSL client certificates. Download the certificate from the button at the top of the webhooks page.
If possible, whitelist ShipEdge server IPs on your firewall (contact support for IP ranges).
ShipEdge maintains logs of all webhook attempts. You can view logs to:
Adjacent tabs: Schedule reports, Schedule reports logs, Resend schedule reports, Authentications.
Always use HTTPS URLs for webhooks to ensure data is encrypted in transit.
Process webhooks quickly and return HTTP 200 immediately. ShipEdge times out after 10 seconds.
Implement idempotency to handle duplicate webhook deliveries gracefully.
Always validate webhook data before processing to ensure it’s valid and from ShipEdge.
Use v2 or v3 webhook versions when available for more complete data and better structure.
Regularly check webhook logs to ensure successful delivery and identify issues early.
Test your webhook endpoint thoroughly before going live to ensure it handles all event types correctly.
If your server is temporarily unavailable, ShipEdge will retry, but implement your own retry logic for critical events.
Common causes:
Solution:
Common causes:
Solution:
Common causes:
Solution:
Common causes:
Solution:
Next Step: REST API v4 (OMS) - Learn to use OMS endpoints for order and inventory management