Complete Automation
Integrate ShipEdge with your eCommerce system, ERP, or any custom application to automate processes.
The ShipEdge Core API allows you to integrate your system with ShipEdge to manage orders, inventory, and warehouse operations programmatically. You can create, read, update, and delete data using standard REST endpoints.
ShipEdge Core offers two main API versions: API v4 (modern and recommended) and API v2 (legacy for compatibility). Each version is designed for different use cases and access levels.
Integrate ShipEdge with your eCommerce system, ERP, or any custom application to automate processes.
Create, update, and manage orders, products, and inventory through code instead of using the web interface.
Keep your systems synchronized with ShipEdge in real-time to avoid information gaps.
Process large volumes of data efficiently using optimized endpoints with pagination.
ShipEdge Core offers two main API versions:
Base URL: /apirest/v4/
API v4 is the modern and recommended version for new integrations. It’s built with Slim Framework and offers standard RESTful endpoints.
Main features:
Subdivisions:
/apirest/v4/oms/): For order and inventory management from OMS/apirest/v4/wms/): For warehouse operations from WMSAll APIs require authentication via HTTP headers. The exact method varies by API version:
Required headers:
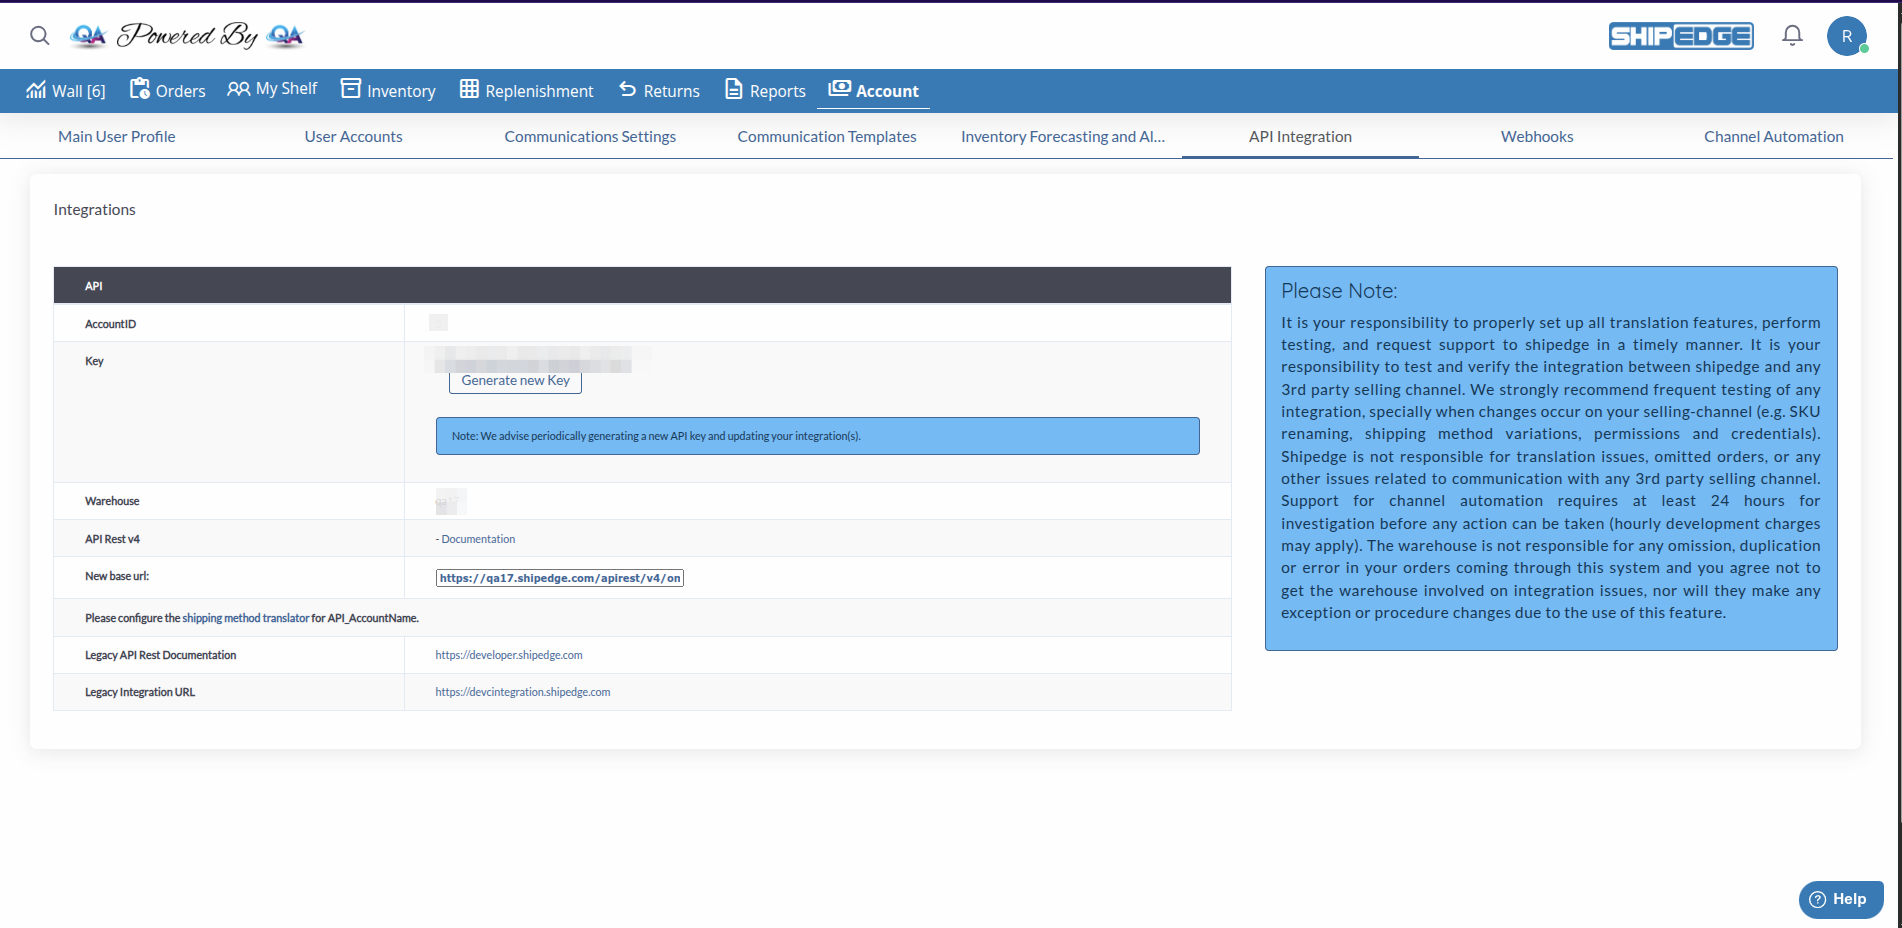
AccountID: [Your numeric AccountID]Key: [Your API Key]Where to find your credentials:
Request example:
curl -X POST https://your-instance.shipedge.com/apirest/v4/oms/ping \ -H "AccountID: 100" \ -H "Key: abcde12345"Required headers:
AccountID: [Your numeric AccountID]Authorization: [Your API Key]Or alternatively:
AccountID: [Your numeric AccountID]Key: [Your API Key]Orders:
POST /orders - Create orderGET /orders - List orders (with pagination)GET /orders/{order} - Get order detailsPUT /orders - Update orderPOST /orders/cancel - Cancel orderPOST /orders/cancel-bulk - Cancel multiple ordersPOST /orders/sub_status - Update sub-statusInventory:
GET /inventory/products - List products (with pagination)POST /inventory/products - Create productPATCH /inventory/products - Update productGET /inventory/products/{id} - Get productGET /inventory/stock - Get stock levelsGET /inventory/products/{id}/uom - Get units of measureReplenishments:
POST /inventory/replenishments - Create replenishmentGET /inventory/replenishments - List replenishmentsPATCH /inventory/replenishments - Update replenishmentGET /inventory/replenishments/{id} - Get replenishmentReturns:
POST /inventory/returns - Create returnGET /inventory/returns - List returnsGET /inventory/returns/{id} - Get returnOthers:
POST /ping - Verify system statusGET /distribution_centers - List distribution centersPOST /serials/bulk - Create serial numbers in bulkGET /attributes/{type}/{id} - Get attributesPOST /attributes/{type}/{id} - Create attributeWarehouse Operations:
POST /ping - Verify system statusPOST /orders/UpdateWeight - Update order weightPOST /recount - Perform inventory recountPOST /shipments/revert/pending - Revert shipment to pendingGET /inventory/products/{product_id}/bin - Get product binsMobile Application (eXos):
POST /exos-login-1 - User loginPOST /exos-verify-code-1 - Verify 2FA codePOST /exos-v1/pp-getOrders-1 - Get orders for pickingPOST /exos-v1/pp-updateLogPick-1 - Update picking logPOST /exos-v1/pp-move-1 - Move inventoryPOST /exos-v1/qc-shippings-1 - Get shipments for QCPro WMS:
POST /pro-v1/inventory-list-1 - Get inventory listPOST /pro-v1/put-away-load - Load for put-awayPOST /pro-v1/put-away-move - Move in put-awaySuccessful responses generally follow this format:
{ "data": { // Response data }}Ping response example:
{ "data": { "status": "Successful", "result": "pong!" }}Error responses include information about what went wrong:
{ "response": { "success": false, "message": "Error description" }}Common HTTP status codes:
200 - Success400 - Invalid request (missing or incorrect parameters)401 - Unauthorized (invalid credentials or account not activated)403 - Forbidden (no permissions)404 - Not found (resource doesn’t exist)500 - Server errorEndpoints that return lists (like /orders or /products) support pagination via query parameters:
Parameters:
page: Page number (default: 1)per_page: Items per page (default: varies by endpoint)Example:
GET /apirest/v4/oms/orders?page=1&per_page=50Paginated response:
{ "data": [...], "pagination": { "current_page": 1, "per_page": 50, "total": 150, "total_pages": 3 }}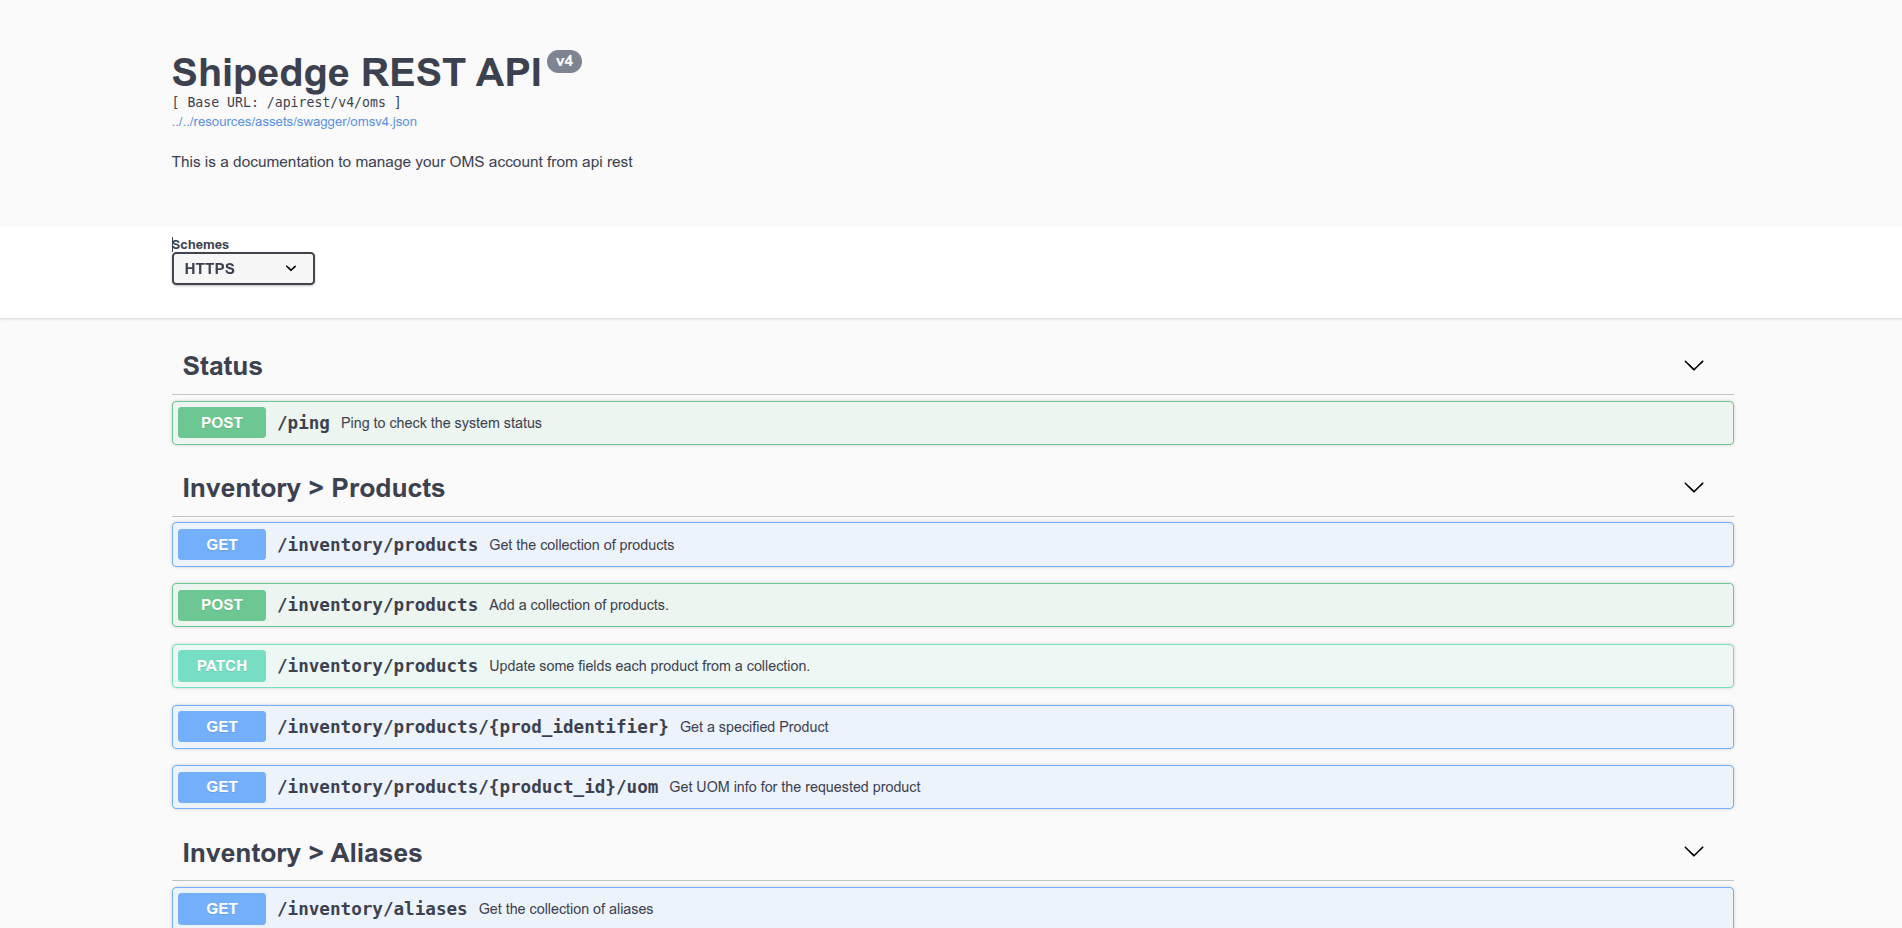
ShipEdge Core includes interactive Swagger documentation to explore all available endpoints:
API v4 OMS Swagger:
https://your-instance.shipedge.com/apirest/v4/oms/docsAPI v4 WMS Swagger:
https://your-instance.shipedge.com/apirest/v4/wms/docsFor new integrations, always use API v4. It’s more modern, better documented, and has better support.
Always check HTTP status codes and handle errors appropriately in your code.
Implement rate limiting in your code to avoid overloading the API. Some endpoints have usage limits.
For large listings, always use pagination instead of trying to get all data at once.
Use the /ping endpoint to verify your authentication works before making more complex requests.
Consult Swagger documentation to see the most recent endpoints and their exact parameters.
Common causes:
Solution:
Common causes:
Solution:
Common causes:
Solution:
/apirest/v4/oms/ or /apirest/v4/wms/)Common causes:
Solution:
Next Step: REST API v4 (OMS) - Learn to use OMS endpoints to manage orders and inventory